Blog
How To Set Face Properties Using xlwings? – Transparency
Method
shp=sht.api.Shapes.AddShape(1, 200, 50, 200, 100) #Rectangular area
shp2=sht.api.Shapes.AddShape(9, 150, 70, 200, 100) #Elliptical area
ff=shp2.Fill
ff.ForeColor.RGB= xw.utils.rgb_to_int((255,0,0)) #Set elliptical area to red
ff.Transparency=0.7 #Transparency 0.7
Sample Code
#Text Properties

import xlwings as xw    #Import xlwings package

app=xw.App()
bk=app.books.active   #Get the active workbook
sht=bk.sheets.active    #Get the active worksheet

sht.api.Range('C3').Value='Font Test123'
ft=sht.api.Range('C3').Font
ft.Name = 'Times New Roman'
ft.ColorIndex = 3
ft.Size = 20
ft.Bold=True
ft.Strikethrough = False
ft.Underline = 5
ft.Italic=True

#bk.save()
#bk.close()
#app.kill()
How To Set Face Properties Using xlwings? – Preset Texture Fill
Method
shp1=sht.api.Shapes.AddShape(1, 100, 50, 200, 100) #Rectangular area
ff1=shp1.Fill
ff1.PresetTextured(9) #Preset texture: Green marble
Sample Code
#Area properties - Transparency

import xlwings as xw    #Import xlwings package

app=xw.App()
bk=app.books.active   #Get the active workbook
sht=bk.sheets.active    #Get the active worksheet

shp=sht.api.Shapes.AddShape(1, 200, 50, 200, 100)    #Rectangular area
shp2=sht.api.Shapes.AddShape(9, 150, 70, 200, 100)    #Elliptical area
ff=shp2.Fill
ff.ForeColor.RGB= xw.utils.rgb_to_int((255,0,0))    #Set elliptical area to red
ff.Transparency=0.7    #Transparency 0.7

#bk.save()
#bk.close()
#app.kill()
How To Set Face Properties Using xlwings? – Texture Fill
Method
Using UserTextured method.
shp1=sht.api.Shapes.AddShape(1, 100, 50, 200, 100) #Rectangular area
ff1=shp1.Fill
ff1.UserTextured(root+r”/picpy.jpg”) #Texture fill
Sample Code
#Area properties - Preset texture fill.

import xlwings as xw    #Import xlwings package

app=xw.App()
bk=app.books.active   #Get the active workbook
sht=bk.sheets.active    #Get the active worksheet

shp1=sht.api.Shapes.AddShape(1, 100, 50, 200, 100)    #Rectangular area
ff1=shp1.Fill
ff1.PresetTextured(9)    #Preset texture: Green marble

shp2=sht.api.Shapes.AddShape(9, 400, 50, 200, 100)    #Elliptical area
ff2=shp2.Fill
ff2.PresetTextured(22)    #Preset texture: Walnut wood

#bk.save()
#bk.close()
#app.kill()
How To Set Face Properties Using xlwings? – Picture Fill
Method
Use the `UserPicture` method of the `FillFormat` object for picture fills.
shp1=sht.api.Shapes.AddShape(1, 100, 50, 200, 100) #Rectangular area
ff1=shp1.Fill
ff1.UserPicture(r”D:\picpy.jpg”) #Picture fill
Sample Code
#Area properties - Texture fill

import xlwings as xw    #Import xlwings package
import os
root = os.getcwd()
app=xw.App()
bk=app.books.active   #Get the active workbook
sht=bk.sheets.active    #Get the active worksheet

shp1=sht.api.Shapes.AddShape(1, 100, 50, 200, 100)    #Rectangular area
ff1=shp1.Fill
ff1.UserTextured(r"D:/picpy.jpg")    #Texture fill

shp2=sht.api.Shapes.AddShape(9, 400, 50, 200, 100)    #Elliptical area
ff2=shp2.Fill
ff2.UserTextured(r"D:/picpy.jpg")    #Texture fill

#bk.save()
#bk.close()
#app.kill()
How To Set Face Properties Using xlwings? – Pattern Fill
Method
Use the `Patterned` method of the `FillFormat` object to apply pattern fill. This method takes an `MsoPatternType` enumeration value, which specifies the pattern to be used.
shp1=sht.api.Shapes.AddShape(1, 100, 50, 200, 100) #Rectangular area
ff1=shp1.Fill
ff1.ForeColor.RGB= xw.utils.rgb_to_int((255,0,0))
ff1.Patterned(22) #Pattern fill
ff1.BackColor.RGB= xw.utils.rgb_to_int((0,255,0))
Sample Code
#Area properties - Picture fill

import xlwings as xw    #Import xlwings package

app=xw.App()
bk=app.books.active   #Get the active workbook
sht=bk.sheets.active    #Get the active worksheet

shp1=sht.api.Shapes.AddShape(1, 100, 50, 200, 100)    #Rectangular area
ff1=shp1.Fill
ff1.UserPicture(r"D:\picpy.jpg")    #Picture fill

shp2=sht.api.Shapes.AddShape(9, 400, 50, 200, 100)    #Elliptical area
ff2=shp2.Fill
ff2.UserPicture(r"D:\picpy.jpg")    #Picture fill

#bk.save()
#bk.close()
#app.kill()
How To Set Face Properties Using xlwings? – Multi-Color Gradient Fill
Method
shp1=sht.api.Shapes.AddShape(1, 100, 50, 200, 100) #Rectangular area
ff1=shp1.Fill
ff1.ForeColor.RGB= xw.utils.rgb_to_int((255,0,0))
ff1.OneColorGradient(3, 1, 1) #One color gradient fill
#Insert color nodes in gradient sequence.
ff1.GradientStops.Insert(xw.utils.rgb_to_int((255,0,0)), 0.25)
ff1.GradientStops.Insert(xw.utils.rgb_to_int((0,255,0)), 0.5)
ff1.GradientStops.Insert(xw.utils.rgb_to_int((0,0,255)), 1)
Sample Code
#Area Properties - Pattern Fill

import xlwings as xw    #Import xlwings package

app=xw.App()
bk=app.books.active   #Get the active workbook
sht=bk.sheets.active    #Get the active worksheet

shp1=sht.api.Shapes.AddShape(1, 100, 50, 200, 100)    #Rectangular area
ff1=shp1.Fill
ff1.ForeColor.RGB= xw.utils.rgb_to_int((255,0,0))
ff1.Patterned(22)    #Pattern fill
ff1.BackColor.RGB= xw.utils.rgb_to_int((0,255,0))

shp2=sht.api.Shapes.AddShape(9, 400, 50, 200, 100)    #Elliptical area
ff2=shp2.Fill
ff2.ForeColor.RGB= xw.utils.rgb_to_int((255,255,0))
ff2.Patterned(48)    #Pattern fill
ff2.BackColor.RGB= xw.utils.rgb_to_int((0,0,255))

#bk.save()
#bk.close()
#app.kill()
How To Set Face Properties Using xlwings? – Two-Color Gradient Fill
Method
Use the `TwoColorGradient` method of the `FillFormat` object for two-color gradient fills.
ff.TwoColorGradient(Style, Variant)
shp1=sht.api.Shapes.AddShape(1, 100, 50, 200, 100) #Rectangular area
ff1=shp1.Fill
ff1.ForeColor.RGB= xw.utils.rgb_to_int((255,0,0)) #Start color
ff1.TwoColorGradient(3, 1) #Two-color gradient fill
ff1.BackColor.RGB= xw.utils.rgb_to_int((0, 255,0)) #End color
Sample Code
#Area Properties - Multi-color Gradient Fill

import xlwings as xw    #Import xlwings package

app=xw.App()
bk=app.books.active   #Get the active workbook
sht=bk.sheets.active    #Get the active worksheet

shp1=sht.api.Shapes.AddShape(1, 100, 50, 200, 100)    #Rectangular area
ff1=shp1.Fill
ff1.ForeColor.RGB= xw.utils.rgb_to_int((255,0,0))
ff1.OneColorGradient(3, 1, 1)    #One color gradient fill
#Insert color nodes in gradient sequence.
ff1.GradientStops.Insert(xw.utils.rgb_to_int((255,0,0)), 0.25)
ff1.GradientStops.Delete(2)
ff1.GradientStops.Insert(xw.utils.rgb_to_int((0,255,0)), 0.5)
ff1.GradientStops.Insert(xw.utils.rgb_to_int((0,0,255)), 1)

shp2=sht.api.Shapes.AddShape(9, 400, 50, 200, 100)    #Elliptical area
ff2=shp2.Fill
ff2.ForeColor.RGB= xw.utils.rgb_to_int((0,0,255))
ff2.OneColorGradient(7, 1, 1)    #One color gradient fill
#Insert color nodes in gradient sequence.
ff2.GradientStops.Insert(xw.utils.rgb_to_int((255,0,0)), 0.25)
ff1.GradientStops.Delete(2)
ff2.GradientStops.Insert(xw.utils.rgb_to_int((0,255,0)), 0.5)
ff2.GradientStops.Insert(xw.utils.rgb_to_int((0,0,255)), 1)

#bk.save()
#bk.close()
#app.kill()
How To Set Face Properties Using xlwings? – Single Color Gradient Fill
Method
Use the `OneColorGradient` method of the `FillFormat` object for single-color gradient fills. A single-color gradient fill involves a variation of a single color’s intensity.
ff.OneColorGradient(Style, Variant, Degree)
|
Name |
Required/Optional |
Data Type |
Description |
|
Style |
Required |
MsoGradientStyle |
Gradient style |
|
Variant |
Required |
Integer |
Gradient variant (1 to 4) |
|
Degree |
Required |
Single |
Degree of gradient (0.0 – dark to 1.0 – light) |
shp1=sht.api.Shapes.AddShape(1, 100, 50, 200, 100) #Rectangular area
ff1=shp1.Fill
ff1.ForeColor.RGB= xw.utils.rgb_to_int((255,0,0))
#Solid gradient fill, white to red, gradient from bottom-right to top-left
ff1.OneColorGradient(3, 1, 1)
Sample Code
#Area properties - Two Color Gradient fill

import xlwings as xw    #Import xlwings package

app=xw.App()
bk=app.books.active   #Get the active workbook
sht=bk.sheets.active    #Get the active worksheet

shp1=sht.api.Shapes.AddShape(1, 100, 50, 200, 100)    #Rectangular area
ff1=shp1.Fill
ff1.ForeColor.RGB= xw.utils.rgb_to_int((255,0,0))    #Start color
ff1.TwoColorGradient(3, 1)    #Two-color gradient fill
ff1.BackColor.RGB= xw.utils.rgb_to_int((0, 255,0))    #End color

shp2=sht.api.Shapes.AddShape(9, 400, 50, 200, 100)    #Elliptical area
ff2=shp2.Fill
ff2.ForeColor.RGB= xw.utils.rgb_to_int((0,0,255))    #Start color
ff2.TwoColorGradient(3, 1)    #Two-color gradient fill
ff2.BackColor.RGB= xw.utils.rgb_to_int((0, 255,0))    #End color

#bk.save()
#bk.close()
#app.kill()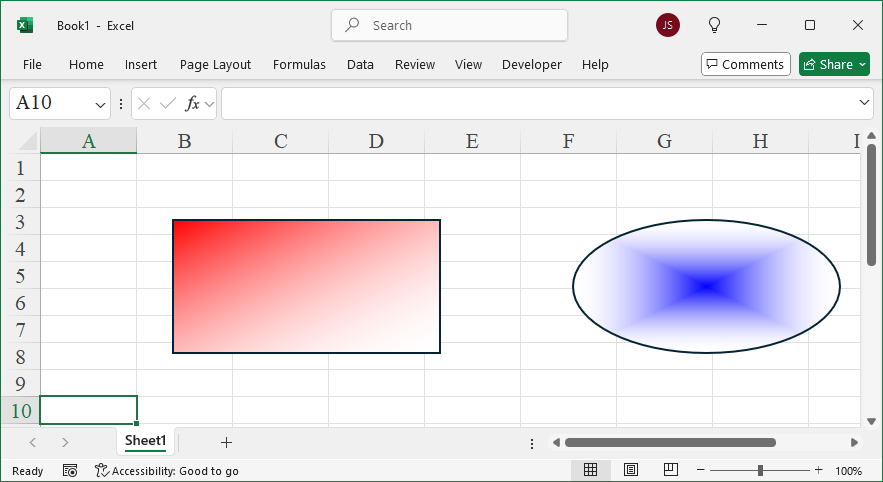
How To Set Face Properties Using xlwings? – Solid Fill
Method
In Excel, a face is represented by the `FillFormat` object. You can access this object via the `Fill` property of a `Shape` object and then programmatically set its properties.
You can specify the color using the `ForeColor` property and apply a solid fill using the `Solid` method.
shp=sht.api.Shapes.AddShape(9, 100, 50, 200, 100)
ff=shp.Fill
ff.ForeColor.RGB= xw.utils.rgb_to_int((255,0,0))
Sample Code
#Area properties - Solid color fill

import xlwings as xw    #Import xlwings package

app=xw.App()
bk=app.books.active   #Get the active workbook
sht=bk.sheets.active    #Get the active worksheet

shp=sht.api.Shapes.AddShape(9, 100, 50, 200, 100)
ff=shp.Fill
ff.ForeColor.RGB= xw.utils.rgb_to_int((255,0,0))

#bk.save()
#bk.close()
#app.kill()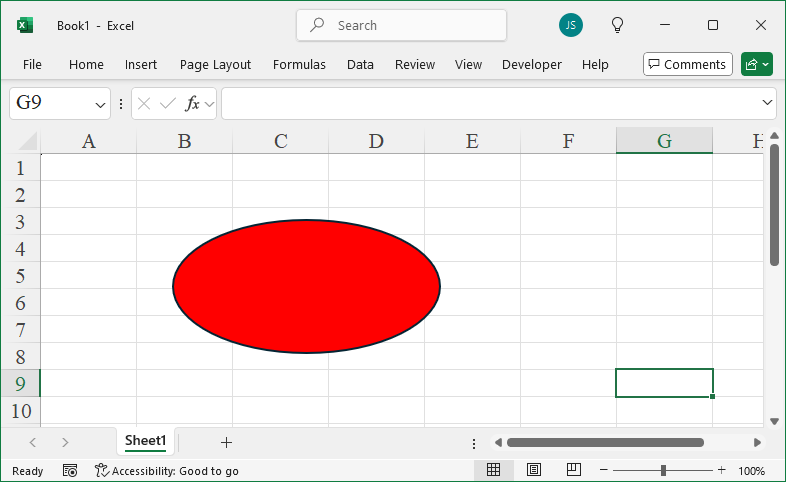
How To Set Line Properties Using xlwings? – Pattern Fill
Method
You can apply a pattern fill to a line object using the `Pattern` property of the `LineFormat` object. This property sets or returns an `MsoPatternType` enumeration value, which defines the pattern of the fill.
|
Name |
Value |
Description |
|
msoPatternCross |
51 |
Crosshatch pattern |
|
msoPatternDarkDownwardDiagonal |
15 |
Dark downward diagonal |
|
msoPatternDarkHorizontal |
13 |
Dark horizontal lines |
|
msoPatternDarkUpwardDiagonal |
16 |
Dark upward diagonal |
|
msoPatternDarkVertical |
14 |
Dark vertical lines |
|
msoPatternHorizontal |
49 |
Horizontal lines |
|
msoPatternVertical |
50 |
Vertical lines |
|
msoPatternSmallGrid |
23 |
Small grid pattern |
|
msoPatternWave |
48 |
Wavy lines |
|
…… |
|
|
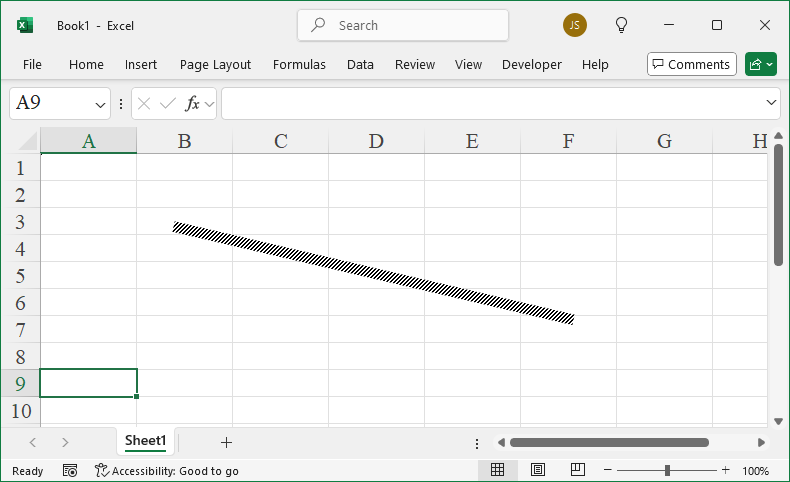
shp=sht.api.Shapes.AddLine(100, 55, 400, 125)
shp.Line.Weight=8
shp.Line.Pattern=16 #Set pattern fill for line segments
Sample Code
#Line Properties - Pattern Fill

import xlwings as xw    #Import xlwings package

app=xw.App()
bk=app.books.active   #Get the active workbook
sht=bk.sheets.active    #Get the active worksheet

shp=sht.api.Shapes.AddLine(100, 55, 400, 125)
shp.Line.Weight=8
shp.Line.Pattern=16    #Set pattern fill for line segments

#bk.save()
#bk.close()
#app.kill()