Blog
How to use Application.ClipboardFormats in the xlwings API way
The Application.ClipboardFormats property in Excel VBA returns an array that lists the data formats currently available on the Clipboard. This is useful for programmatically determining what type of data (e.g., text, bitmap, HTML) has been copied, allowing your xlwings script to handle pasting operations intelligently or to verify clipboard content before proceeding. In xlwings, you access this property through the Application object, which represents the Excel application instance.
Functionality:
The primary function is to inspect the clipboard. It does not alter the clipboard’s contents. By retrieving the array of format IDs, you can check for the presence of specific formats (like xlClipboardFormatText or xlClipboardFormatBitmap) to decide the appropriate course of action in your automation script, such as conditional pasting or data validation.
Syntax in xlwings:
import xlwings as xw

app = xw.apps.active # Or xw.App() for a new instance
formats_array = app.api.ClipboardFormatsapp: This is your xlwingsAppobject..api: This provides direct access to the underlying Excel VBA object model.ClipboardFormats: This is the property being called. It takes no arguments.
The property returns a 1-based array (Variant) containing the integer IDs of the available formats. If the clipboard is empty, it may returnNoneor an empty variant. The specific integer IDs correspond to Excel’sXlClipboardFormatenumeration. Common values include:1:xlClipboardFormatText2:xlClipboardFormatBitmap8:xlClipboardFormatHTML-4142:xlClipboardFormatLink(DDE link)
Code Examples:
- Basic Retrieval and Display:
import xlwings as xw
import sys

app = xw.apps.active
formats = app.api.ClipboardFormats

if formats is not None:
    # Convert the returned COM array to a Python list for easy handling
    # On Windows, the returned object is often a `tuple` when accessed via pywin32.
    format_list = list(formats)
    print(f"Available Clipboard Formats (IDs): {format_list}")
else:
print("Clipboard is empty or formats cannot be retrieved.")- Checking for a Specific Format Before Pasting:
This example checks if text is available on the clipboard before pasting into a specific cell.
import xlwings as xw

app = xw.apps.active
wb = app.books.active
sht = wb.sheets[0]

formats = app.api.ClipboardFormats

# Check if Text format (ID 1) is present
if formats is not None and 1 in formats:
    sht.range("A1").select() # Select the target cell
    app.api.Selection.PasteSpecial(Paste=-4163) # xlPasteValues = -4163
    # Alternatively, for a more xlwings-native approach after checking:
    # text_data = pyperclip.paste() # Using pyperclip module
    # sht.range("A1").value = text_data
else:
print("No text format found on clipboard. Pasting aborted.")- Logging Available Formats for Debugging:
import xlwings as xw
import logging

logging.basicConfig(level=logging.INFO)
app = xw.apps.active

formats = app.api.ClipboardFormats
if formats:
    logging.info("Clipboard Snapshot:")
    for fmt_id in formats:
        # Map some known IDs for better readability
        format_names = {1: "Text", 2: "Bitmap", 8: "HTML", -4142: "DDE Link"}
        name = format_names.get(fmt_id, f"Unknown ID ({fmt_id})")
logging.info(f" - {name}")How To Set Chart Size & Font Using xlwings?
【Example】
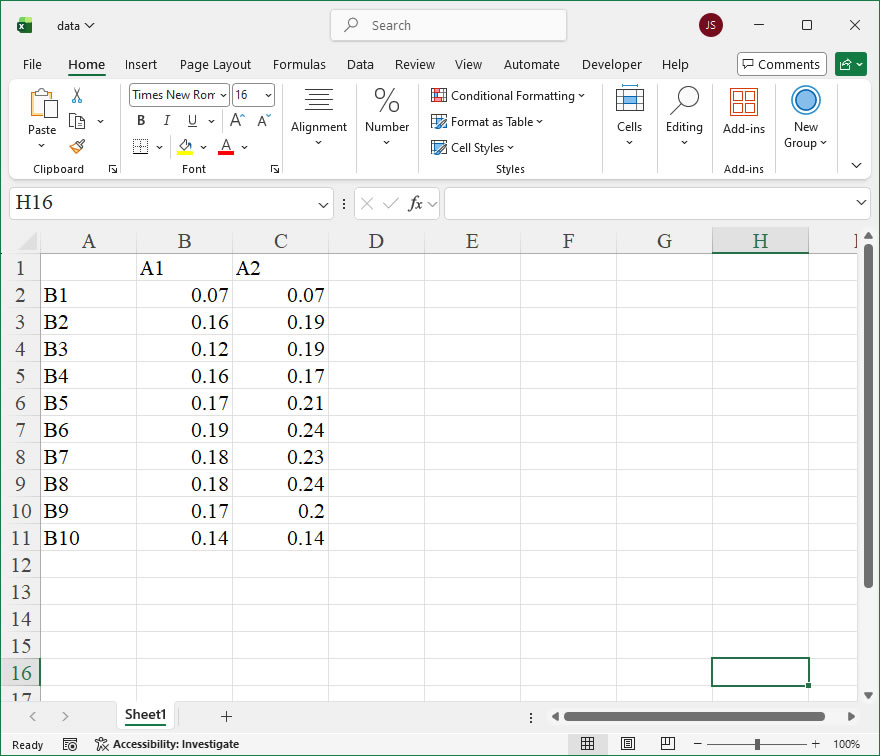
【Code】
import xlwings as xw
import os

def set_style(cht):
    cht.ChartArea.Format.Line.Visible=False
    cht.PlotArea.Format.Fill.Visible=False
    cht.PlotArea.Format.Line.Visible=True
    cht.PlotArea.Format.Line.ForeColor.RGB=xw.utils.rgb_to_int((200,200,200))
    #cht.PlotArea.Format.Line.ForeColor.ObjectThemeColor = msoThemeColorText1
    ax1=cht.Axes(1)
    ax2=cht.Axes(2)
    ax1.HasTitle=True
    ax1.AxisTitle.Text='Categories'
    ax1.AxisTitle.Font.Size=10
    ax1.TickLabels.Font.Size=8
    #ax1.TickLabels.NumberFormat='0.00'
    ax1.HasMajorGridlines=False
    ax2.HasTitle=True
    ax2.AxisTitle.Text='Values'
    ax2.AxisTitle.Font.Size=10
    ax2.TickLabels.Font.Size=8
    ax2.HasMajorGridlines=False
    cht.HasTitle=True
    #cht.ChartTitle.Caption='Plot'
    #cht.ChartTitle.Font.Size=12

root=os.getcwd()
app=xw.App(visible=True,add_book=False)
wb=app.books.open(root+r'/data.xlsx',read_only=False)
sht=wb.sheets('Sheet1')

sht.api.Range('A2:C11').Select()
shp=sht.api.Shapes.AddChart2(-1,xw.constants.ChartType.xlColumnClustered,20,20,400,300,True)
cht=shp.Chart
shp.Left=300
shp.Top=30
shp.Width=300
shp.Height=200

set_style(cht)

#wb.save()
#app.kill()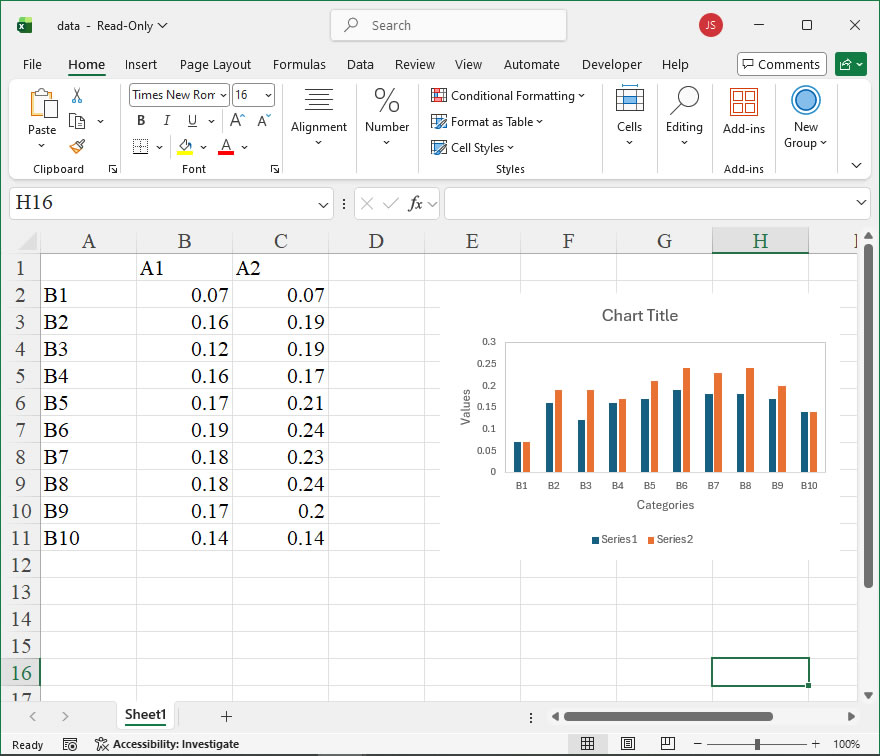
How to use Application.Charts in the xlwings API way
The Charts member of the Application object in Excel’s object model represents the collection of all chart sheets in a workbook. In xlwings, this is accessed via the api property, which provides direct access to the underlying Excel object model. This allows for advanced chart management, such as adding new chart sheets, modifying existing ones, or iterating through all charts in the application. Using Charts is particularly useful when you need to work with chart sheets specifically, as opposed to embedded charts within worksheets.
Functionality:
The Charts collection enables you to create, access, and manipulate chart sheets. Chart sheets are standalone sheets that contain only a chart, separate from worksheet data. You can add new chart sheets, reference existing ones by name or index, and perform operations like copying, moving, or deleting them. This is essential for automating report generation or dashboard creation where charts need to be organized independently.
Syntax:
In xlwings, you typically access Charts through the workbook or application context. The general syntax is:
app.api.Charts: Returns theChartscollection for the entire Excel application, including all open workbooks.wb.api.Charts: Returns theChartscollection for a specific workbook (wherewbis a workbook object).
Key methods and properties include:
Add([Before], [After], [Count]): Adds new chart sheets. Parameters are optional:BeforeandAfterspecify the sheet position (as a sheet object), andCountsets the number of sheets to add (default is 1).Item(Index): Returns a singleChartobject by index (integer) or name (string).Count: Property that returns the number of chart sheets in the collection.
For parameters like Before and After, you can use sheet references, such as wb.sheets['Sheet1'].api, to position the new chart sheet relative to existing sheets.
Examples:
Here are xlwings API code examples demonstrating the use of the Charts member:
- Adding a new chart sheet to a workbook:
import xlwings as xw

# Connect to an existing workbook or create a new one
wb = xw.Book('example.xlsx')
app = xw.apps.active

# Add a new chart sheet named "SalesChart" at the end
new_chart = wb.api.Charts.Add()
new_chart.Name = "SalesChart"
print(f"Added chart sheet: {new_chart.Name}")- Accessing and iterating through all chart sheets in the application:
import xlwings as xw

app = xw.apps.active

# Count the total chart sheets across all open workbooks
total_charts = app.api.Charts.Count
print(f"Total chart sheets in application: {total_charts}")

# Iterate through each chart sheet and print its name
for chart in app.api.Charts:
print(chart.Name)- Creating a chart sheet with specific positioning:
import xlwings as xw

wb = xw.Book('data.xlsx')
# Add a chart sheet before the first worksheet
first_sheet = wb.sheets[0].api
new_chart = wb.api.Charts.Add(Before=first_sheet)
new_chart.Name = "AnalysisChart"

# You can then use the Chart object to set data sources or formats
# For example, set a chart type (assuming data is prepared)
new_chart.ChartType = 51 # 51 corresponds to xlLineMarkers in Excel constants- Deleting a chart sheet by name:
import xlwings as xw

wb = xw.Book('report.xlsx')
# Delete a chart sheet named "OldChart"
try:
    wb.api.Charts("OldChart").Delete()
    print("Deleted chart sheet: OldChart")
except Exception as e:
print(f"Error: {e}")How to use Application.ChartDataPointTrack in the xlwings API way
The ChartDataPointTrack member of the Application object in the Excel object model is a Boolean property that controls whether data points in charts are tracked when the underlying data changes. When this property is set to True, Excel automatically updates data labels and other data point-related elements to reflect changes in the source data. This is particularly useful in dynamic dashboards or reports where the chart data is frequently updated, as it ensures visual elements remain synchronized without manual intervention. In xlwings, this property can be accessed and modified through the Application object, allowing Python scripts to manage this tracking behavior programmatically.
In xlwings, the syntax for accessing and setting the ChartDataPointTrack property is straightforward. Since it belongs to the Application object, you reference it via the xlwings.App instance. The property is a Boolean, accepting True or False values. Here’s the basic syntax:
import xlwings as xw

# Connect to the active Excel instance or start a new one
app = xw.apps.active # Or xw.App() for a new instance

# Get the current value of ChartDataPointTrack
current_setting = app.api.ChartDataPointTrack
print(f"Current setting: {current_setting}")

# Set ChartDataPointTrack to True to enable tracking
app.api.ChartDataPointTrack = True

# Set it to False to disable tracking
app.api.ChartDataPointTrack = False
In this code, app.api provides direct access to the underlying Excel object model, allowing you to use the ChartDataPointTrack property as defined in Excel’s VBA documentation. There are no additional parameters for this property; it’s a simple read/write Boolean. When enabled, it affects all charts in the workbook that are linked to dynamic data sources, ensuring data points update automatically. This can be especially beneficial when combined with other xlwings features for data manipulation, such as updating cell values from Python, as changes will propagate to charts seamlessly.
Here’s a practical example demonstrating the use of ChartDataPointTrack with xlwings. Suppose you have an Excel workbook with a chart that visualizes sales data, and you’re updating the data from Python. By enabling ChartDataPointTrack, you ensure the chart’s data points adjust automatically:
import xlwings as xw
import pandas as pd

# Start or connect to Excel
app = xw.App(visible=True) # Make Excel visible for demonstration
wb = app.books.open('sales_report.xlsx') # Open a workbook with a chart
sheet = wb.sheets['Data']

# Enable ChartDataPointTrack for automatic updates
app.api.ChartDataPointTrack = True
print("Chart data point tracking enabled.")

# Simulate updating the underlying data with new sales figures
new_data = pd.DataFrame({
'Month': ['Jan', 'Feb', 'Mar'],
'Sales': [15000, 18000, 22000]
})
sheet.range('A1').value = new_data # Overwrite the existing data range

# The chart linked to this data range will now update its data points automatically
# For instance, if data labels were showing, they’d reflect the new Sales values

# Optional: Disable tracking after updates if needed
app.api.ChartDataPointTrack = False
print("Tracking disabled after updates.")

# Save and close
wb.save()
app.quit()How To Set Custom Styles Using xlwings?
【Example】
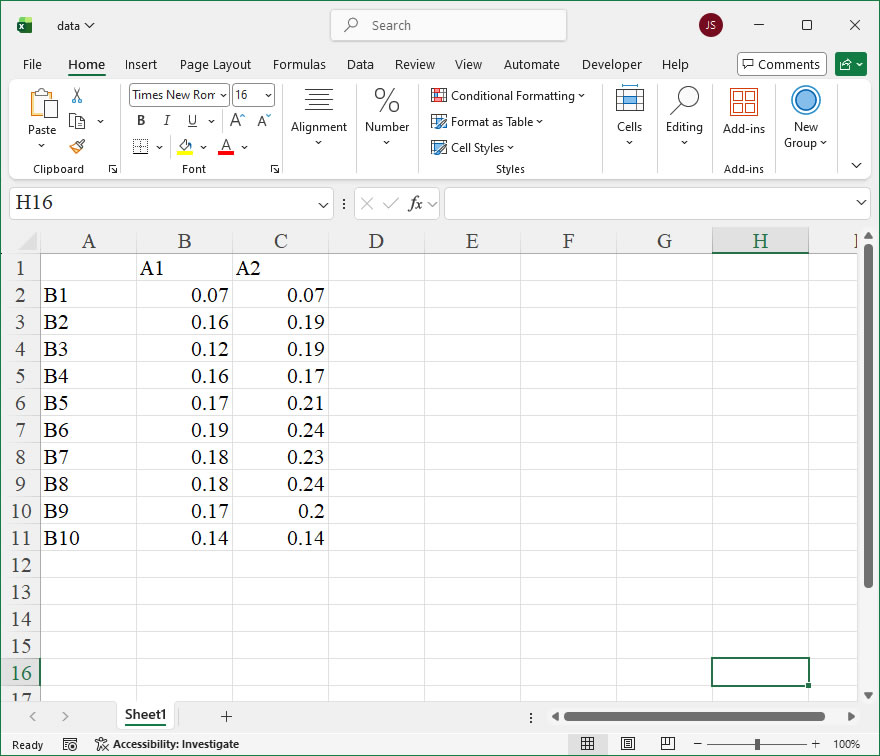
【Code】
import xlwings as xw
import os

def set_style(cht):
    cht.ChartArea.Format.Line.Visible=False
    cht.PlotArea.Format.Fill.Visible=False
    cht.PlotArea.Format.Line.Visible=True
    cht.PlotArea.Format.Line.ForeColor.RGB=xw.utils.rgb_to_int((200,200,200))
    #cht.PlotArea.Format.Line.ForeColor.ObjectThemeColor = msoThemeColorText1
    ax1=cht.Axes(1)
    ax2=cht.Axes(2)
    ax1.HasTitle=True
    ax1.AxisTitle.Text='Categories'
    ax1.AxisTitle.Font.Size=10
    ax1.TickLabels.Font.Size=8
    #ax1.TickLabels.NumberFormat='0.00'
    ax1.HasMajorGridlines=True
    ax2.HasTitle=True
    ax2.AxisTitle.Text='Values'
    ax2.AxisTitle.Font.Size=10
    ax2.TickLabels.Font.Size=8
    ax2.HasMajorGridlines=True
    cht.HasTitle=True
    #cht.ChartTitle.Caption='Plot'
    #cht.ChartTitle.Font.Size=12

root=os.getcwd()
app=xw.App(visible=True,add_book=False)
wb=app.books.open(root+r'/data.xlsx',read_only=False)
sht=wb.sheets('Sheet1')

sht.api.Range('A2:C8').Select()
shp=sht.api.Shapes.AddChart2(-1,xw.constants.ChartType.xlColumnClustered,20,20,350,250,True)
cht=shp.Chart
cht.SeriesCollection(1).ChartType=xw.constants.ChartType.xlLine

set_style(cht)

#wb.save()
#app.kill()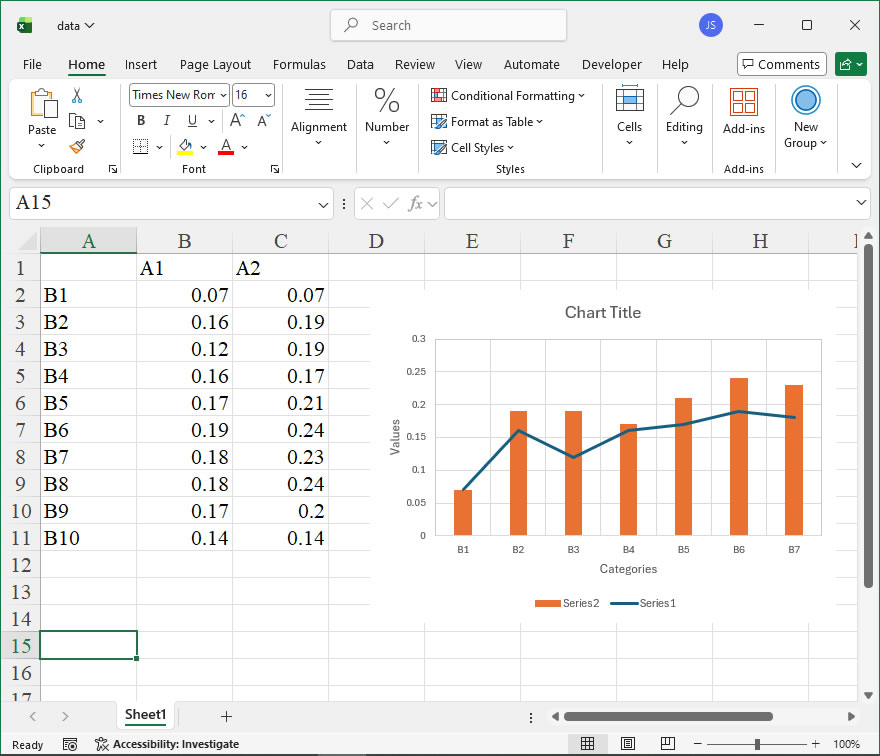
How to use Application.Cells in the xlwings API way
The Application object’s Cells member in Excel’s object model is an essential property for accessing and manipulating individual cells or ranges through their row and column indices. In xlwings, this functionality is primarily accessed via the api property, which exposes the underlying Excel object model, allowing for precise control over cell references.
Functionality:
The Cells property returns a Range object representing a single cell, specified by its row and column numbers. This is particularly useful for programmatically referencing cells without relying on A1-style notation, enabling dynamic cell access in loops or calculations based on numerical indices.
Syntax:
In xlwings, you access the Cells property through the Application object’s api. The basic syntax is:
app.api.Cells(RowIndex, ColumnIndex)- RowIndex (required): An integer specifying the row number of the cell. For example, 1 refers to the first row.
- ColumnIndex (required): An integer specifying the column number of the cell. For example, 1 refers to column A, 2 to column B, and so on. Alternatively, you can use a column letter string, but this is less common in xlwings when using the Cells property directly.
This property is read-write, allowing you to both retrieve and set cell values or properties.
Examples:
Here are practical xlwings API code instances demonstrating the use of the Cells member:
- Accessing a Single Cell Value:
import xlwings as xw
app = xw.App(visible=False) # Start Excel in the background
workbook = app.books.add() # Create a new workbook
sheet = workbook.sheets.active

# Set value in cell B3 (row 3, column 2) using Cells
sheet.api.Cells(3, 2).Value = "Hello, World!"

# Retrieve the value from cell B3
cell_value = sheet.api.Cells(3, 2).Value
print(cell_value) # Output: Hello, World!

app.quit()- Looping Through a Range of Cells:
import xlwings as xw
app = xw.App(visible=False)
workbook = app.books.add()
sheet = workbook.sheets.active

# Populate a 5x5 grid with numbers using Cells in nested loops
for row in range(1, 6):
for col in range(1, 6):
    sheet.api.Cells(row, col).Value = row * col

# Read and print the values from the grid
for row in range(1, 6):
    row_values = [sheet.api.Cells(row, col).Value for col in range(1, 6)]
    print(row_values)

app.quit()- Combining Cells with Other Range Properties:
import xlwings as xw
app = xw.App(visible=False)
workbook = app.books.open("example.xlsx") # Open an existing workbook
sheet = workbook.sheets[0]

# Use Cells to define a range from A1 to C3 by specifying start and end cells
start_cell = sheet.api.Cells(1, 1) # A1
end_cell = sheet.api.Cells(3, 3) # C3
range_obj = sheet.api.Range(start_cell, end_cell)

# Apply formatting to the range
range_obj.Interior.Color = 0x00FF00 # Green background
range_obj.Font.Bold = True

workbook.save()
app.quit()- Dynamic Cell Reference Based on Variables:
import xlwings as xw
app = xw.App(visible=False)
workbook = app.books.add()
sheet = workbook.sheets.active

# Use variables for row and column indices
target_row = 10
target_column = 5 # Column E
sheet.api.Cells(target_row, target_column).Value = "Dynamic Entry"

# Access adjacent cells using offsets from a base cell
base_cell = sheet.api.Cells(target_row, target_column)
base_cell.Offset(0, 1).Value = "Next Column" # Cell F10
base_cell.Offset(1, 0).Value = "Next Row" # Cell E11

app.quit()How to use Application.CellDragAndDrop in the xlwings API way
Application.CellDragAndDrop in xlwings enables or disables the ability to drag and drop cells within Excel. This property is particularly useful when automating Excel through xlwings, as it allows developers to control whether users can interactively move cell contents by dragging—a feature that might interfere with automated processes or require restriction in certain applications. By setting this property, you can ensure the Excel environment behaves predictably during script execution.
Syntax and Parameters in xlwings
In xlwings, you access this property via the Application object. The syntax is straightforward:
app = xw.apps.active # Get the active Excel application
app.api.CellDragAndDrop = value
Here, app.api provides direct access to Excel’s underlying COM object model. The CellDragAndDrop property accepts a Boolean value:
True(default in Excel): Enables cell drag-and-drop functionality.False: Disables cell drag-and-drop, preventing users from moving cells by dragging.
This property is read/write, meaning you can both retrieve its current state and modify it. Note that changes apply to the entire Excel instance and persist until altered again or Excel is restarted. In xlwings, using .api is essential because CellDragAndDrop is a native Excel VBA property not directly wrapped by xlwings’ high-level API.
Code Examples
Below are practical xlwings examples demonstrating how to use CellDragAndDrop:
- Disabling drag-and-drop to prevent user interference during automation:
import xlwings as xw

# Connect to the active Excel instance
app = xw.apps.active

# Disable cell drag-and-drop
app.api.CellDragAndDrop = False
print("Cell drag-and-drop disabled.")

# Perform automated tasks, e.g., data manipulation
wb = app.books.active
sheet = wb.sheets[0]
sheet.range("A1").value = "Data processing in progress..."

# Re-enable drag-and-drop after completion
app.api.CellDragAndDrop = True
print("Cell drag-and-drop re-enabled.")- Checking the current state and toggling the setting:
import xlwings as xw

app = xw.apps.active

# Get the current setting
current_setting = app.api.CellDragAndDrop
print(f"Current CellDragAndDrop setting: {current_setting}")

# Toggle the setting
app.api.CellDragAndDrop = not current_setting
print(f"Toggled to: {app.api.CellDragAndDrop}")- Using in a context manager to temporarily disable drag-and-drop:
import xlwings as xw
from contextlib import contextmanager

@contextmanager
def disable_cell_drag_and_drop(app):
"""Temporarily disable cell drag-and-drop."""
original_setting = app.api.CellDragAndDrop
app.api.CellDragAndDrop = False
try:
    yield
finally:
    app.api.CellDragAndDrop = original_setting

# Usage
app = xw.apps.active
with disable_cell_drag_and_drop(app):
# Perform operations without drag-and-drop interference
app.books.active.sheets[0].range("A1:A10").value = [[i] for i in range(10)]
print("Data written with drag-and-drop disabled.")How To Set Built-in Styles for Excel Charts Using xlwings?
【Example】

【Code】
import xlwings as xw
import os

root=os.getcwd()
app=xw.App(visible=True,add_book=False)
wb=app.books.open(root+r'/data.xlsx',read_only=False)
sht=wb.sheets('Sheet1')

sht.api.Range('A2:C11').Select()
cht1=sht.api.Shapes.AddChart2(228,xw.constants.ChartType.xlLine,10,20,350,250,True).Chart
cht2=sht.api.Shapes.AddChart2(230,xw.constants.ChartType.xlLine,20,20,350,250,True).Chart
cht3=sht.api.Shapes.AddChart2(232,xw.constants.ChartType.xlLine,30,20,350,250,True).Chart
cht4=sht.api.Shapes.AddChart2(233,xw.constants.ChartType.xlLine,40,20,350,250,True).Chart

#wb.save()
#app.kill()
How to use Application.Caption in the xlwings API way
The Application.Caption property in Excel VBA is used to get or set the text that appears in the title bar of the main Excel application window. This property is particularly useful for branding, customizing the user interface, or indicating a specific mode or context within a larger application that uses Excel as a component. When you retrieve the Caption, you get the current title text; when you set it, you can change the title to any custom string. It’s important to note that this change is temporary and reverts to the default (“Microsoft Excel”) when Excel is restarted, unless programmatically set again.
In xlwings, you interact with this property through the api property of the main App or Book objects, which provides direct access to the underlying Excel VBA object model. The syntax for accessing the Application.Caption property is straightforward.
Syntax in xlwings:
To get the current caption:
current_caption = xw.apps[0].api.CaptionTo set a new caption:
xw.apps[0].api.Caption = "My Custom Excel"Here, xw.apps[0] refers to the first running Excel instance. The .api attribute exposes the native Excel VBA Application object, allowing you to use its properties and methods directly. The Caption property is a read/write string. No parameters are required for getting or setting; you simply assign a string value to set it.
Code Examples:
- Retrieving and Printing the Default Caption:
import xlwings as xw
# Ensure Excel is running and get the first instance
app = xw.apps[0]
default_title = app.api.Caption
print(f"The current Excel window title is: {default_title}")
# Typically outputs: The current Excel window title is: Microsoft Excel- Setting a Custom Caption for Branding:
import xlwings as xw
app = xw.apps[0]
app.api.Caption = "Data Analysis Suite v2.1"
# The Excel title bar now displays "Data Analysis Suite v2.1"- Temporarily Modifying Caption During a Macro Execution:
import xlwings as xw
app = xw.apps[0]
original_caption = app.api.Caption
try:
    app.api.Caption = "Processing... Please Wait"
    # Simulate a long-running operation, e.g., data processing
    import time
    time.sleep(5)
finally:
    app.api.Caption = original_caption # Restore original title
# This provides user feedback during operations.- Using Caption to Differentiate Multiple Instances (if applicable):
If you have multiple Excel instances open via xlwings, you can set unique captions to identify them.
import xlwings as xw
# Assuming two instances are open
app1 = xw.apps[0]
app2 = xw.apps[1]
app1.api.Caption = "Instance 1: Sales Data"
app2.api.Caption = "Instance 2: Financial Reports"How To Create a Colorbar Using xlwings?
【Method】

【Example】
import xlwings as xw
import os

def set_style(cht):
    cht.ChartArea.Format.Line.Visible=False
    cht.PlotArea.Format.Fill.Visible=False
    cht.PlotArea.Format.Line.Visible=True
    cht.PlotArea.Format.Line.ForeColor.RGB=xw.utils.rgb_to_int((200,200,200))
    #cht.PlotArea.Format.Line.ForeColor.ObjectThemeColor = msoThemeColorText1
    ax1=cht.Axes(1)
    ax2=cht.Axes(2)
    ax1.HasTitle=True
    ax1.AxisTitle.Text='Categories'
    ax1.AxisTitle.Font.Size=10
    ax1.TickLabels.Font.Size=8
    #ax1.TickLabels.NumberFormat='0.00'
    ax1.HasMajorGridlines=False
    ax2.HasTitle=True
    ax2.AxisTitle.Text='Values'
    ax2.AxisTitle.Font.Size=10
    ax2.TickLabels.Font.Size=8
    ax2.HasMajorGridlines=False
    cht.HasTitle=True
    #cht.ChartTitle.Caption='Plot'
    #cht.ChartTitle.Font.Size=12

root=os.getcwd()
app=xw.App(visible=True,add_book=False)
wb=app.books.open(root+r'/data.xlsx',read_only=False)
sht=wb.sheets('Sheet1')

shp=sht.api.Shapes.AddChart2()
shp.Left=20
cht=shp.Chart
cht.ChartType=xw.constants.ChartType.xlXYScatter
ax1=cht.Axes(1)
ax2=cht.Axes(2)
ax1.MinimumScale=0
ax1.MaximumScale=300
ax2.MinimumScale=0
ax2.MaximumScale=300

set_style(cht)

cht.SeriesCollection().NewSeries()

x=shape_x(cht,50)
y=shape_y(cht,250)
w=cht.PlotArea.InsideWidth/(ax1.MaximumScale-ax1.MinimumScale)*10
h=cht.PlotArea.InsideHeight/(ax2.MaximumScale-ax2.MinimumScale)*200
shp2=cht.Shapes.AddShape(1,x,y,w,h)
shp2.Fill.ForeColor.RGB=xw.utils.rgb_to_int((255,255,26))
shp2.Fill.OneColorGradient(1,1,1)
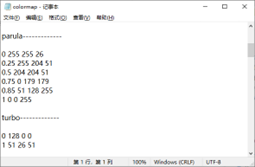
shp2.Fill.GradientStops.Insert(xw.utils.rgb_to_int((255,204,51)),0.25)
shp2.Fill.GradientStops.Delete(2)
shp2.Fill.GradientStops.Insert(xw.utils.rgb_to_int((204,204,51)),0.5)
shp2.Fill.GradientStops.Insert(xw.utils.rgb_to_int((0,179,179)),0.75)
shp2.Fill.GradientStops.Insert(xw.utils.rgb_to_int((51,128,255)),0.85)
shp2.Fill.GradientStops.Insert(xw.utils.rgb_to_int((255,204,51)),1)
shp2.Line.Weight=1
cm_labels=['0','0.5','1']
cm_label_pos=[50,150,250]
for i in range(3):
    lf=shape_x(cht,57)
    tp=shape_y(cht,cm_label_pos[i]+20)
    wd=cht.PlotArea.InsideWidth/(cht.Axes(1).MaximumScale-cht.Axes(1).MinimumScale)*40
    ht=cht.PlotArea.InsideHeight/(cht.Axes(2).MaximumScale-cht.Axes(2).MinimumScale)*30
    shp6=cht.Shapes.AddLabel(1,lf,tp,wd,ht)
    shp6.TextFrame2.TextRange.Characters.Text=cm_labels[i]
    shp6.TextFrame2.TextRange.Characters.Font.Size=8
    shp6.TextFrame2.AutoSize=1    #msoAutoSizeTextToFitShape

x=shape_x(cht,110)
y=shape_y(cht,250)
w=cht.PlotArea.InsideWidth/(ax1.MaximumScale-ax1.MinimumScale)*10
h=cht.PlotArea.InsideHeight/(ax2.MaximumScale-ax2.MinimumScale)*200
shp3=cht.Shapes.AddShape(1,x,y,w,h)
shp3.Fill.ForeColor.RGB=xw.utils.rgb_to_int((255,0,255))
shp3.Fill.OneColorGradient(1,1,1)
shp3.Fill.GradientStops.Insert(xw.utils.rgb_to_int((0,255,255)),1)
shp3.Fill.GradientStops.Delete(2)
shp3.Line.Weight=1
for i in range(3):
    lf=shape_x(cht,117)
    tp=shape_y(cht,cm_label_pos[i]+20)
    wd=cht.PlotArea.InsideWidth/(cht.Axes(1).MaximumScale-cht.Axes(1).MinimumScale)*40
    ht=cht.PlotArea.InsideHeight/(cht.Axes(2).MaximumScale-cht.Axes(2).MinimumScale)*30
    shp6=cht.Shapes.AddLabel(1,lf,tp,wd,ht)
    shp6.TextFrame2.TextRange.Characters.Text=cm_labels[i]
    shp6.TextFrame2.TextRange.Characters.Font.Size=8
    shp6.TextFrame2.AutoSize=1    #msoAutoSizeTextToFitShape

x=shape_x(cht,170)
y=shape_y(cht,250)
w=cht.PlotArea.InsideWidth/(ax1.MaximumScale-ax1.MinimumScale)*10
h=cht.PlotArea.InsideHeight/(ax2.MaximumScale-ax2.MinimumScale)*200
shp4=cht.Shapes.AddShape(1,x,y,w,h)
shp4.Fill.ForeColor.RGB=xw.utils.rgb_to_int((255,255,102))
shp4.Fill.OneColorGradient(1,1,1)
shp4.Fill.GradientStops.Insert(xw.utils.rgb_to_int((0,128,102)),1)
shp4.Fill.GradientStops.Delete(2)
shp4.Line.Weight=1
for i in range(3):
    lf=shape_x(cht,177)
    tp=shape_y(cht,cm_label_pos[i]+20)
    wd=cht.PlotArea.InsideWidth/(cht.Axes(1).MaximumScale-cht.Axes(1).MinimumScale)*40
    ht=cht.PlotArea.InsideHeight/(cht.Axes(2).MaximumScale-cht.Axes(2).MinimumScale)*30
    shp6=cht.Shapes.AddLabel(1,lf,tp,wd,ht)
    shp6.TextFrame2.TextRange.Characters.Text=cm_labels[i]
    shp6.TextFrame2.TextRange.Characters.Font.Size=8
    shp6.TextFrame2.AutoSize=1    #msoAutoSizeTextToFitShape

x=shape_x(cht,230)
y=shape_y(cht,250)
w=cht.PlotArea.InsideWidth/(ax1.MaximumScale-ax1.MinimumScale)*10
h=cht.PlotArea.InsideHeight/(ax2.MaximumScale-ax2.MinimumScale)*200
shp5=cht.Shapes.AddShape(1,x,y,w,h)
shp5.Fill.ForeColor.RGB=xw.utils.rgb_to_int((128,0,0))
shp5.Fill.OneColorGradient(1,1,1)
shp5.Fill.GradientStops.Insert(xw.utils.rgb_to_int((255,0,0)),0.1)
shp5.Fill.GradientStops.Delete(2)
shp5.Fill.GradientStops.Insert(xw.utils.rgb_to_int((255,255,0)),0.39)
shp5.Fill.GradientStops.Insert(xw.utils.rgb_to_int((0,255,255)),0.65)
shp5.Fill.GradientStops.Insert(xw.utils.rgb_to_int((0,0,255)),0.89)
shp5.Fill.GradientStops.Insert(xw.utils.rgb_to_int((0,0,128)),1)
shp5.Line.Weight=1
for i in range(3):
    lf=shape_x(cht,237)
    tp=shape_y(cht,cm_label_pos[i]+20)
    wd=cht.PlotArea.InsideWidth/(cht.Axes(1).MaximumScale-cht.Axes(1).MinimumScale)*40
    ht=cht.PlotArea.InsideHeight/(cht.Axes(2).MaximumScale-cht.Axes(2).MinimumScale)*30
    shp6=cht.Shapes.AddLabel(1,lf,tp,wd,ht)
    shp6.TextFrame2.TextRange.Characters.Text=cm_labels[i]
    shp6.TextFrame2.TextRange.Characters.Font.Size=8
    shp6.TextFrame2.AutoSize=1    #msoAutoSizeTextToFitShape

#wb.save()
#app.kill()