Archive

How to use Application.Intersect in the xlwings API way

The Application.Intersect method in Excel is a powerful tool for determining the overlapping range between two or more specified ranges. In xlwings, this functionality is accessed through the api property, which provides direct access to the underlying Excel object model. This is particularly useful for tasks that require identifying common areas across different data sets, such as validating data entry, applying conditional formatting to specific intersections, or performing calculations only on overlapping cells.

Functionality:
The primary function of Intersect is to return a Range object that represents the rectangular intersection of two or more ranges. If the ranges do not overlap, it returns None. This allows for conditional logic in scripts to handle cases where no overlap exists.

Syntax in xlwings:
The xlwings API call follows the pattern:

intersection_range = xw.apps[app_key].api.Intersect(Range1, Range2, ...)
  • app_key: The key identifier for the Excel application instance, typically accessed via xw.apps (e.g., xw.apps.active for the active app).
  • Range1, Range2, …: These are Range objects representing the areas to check for overlap. You can specify two or more ranges, separated by commas. Each range must be a valid Excel range, which in xlwings can be defined using methods like sheet.range() or sheet.cells().

Parameters:
The parameters are Range objects. In practice, you pass the ranges as arguments directly to the Intersect method. There is no fixed limit on the number of ranges, but at least two are required. The ranges can be from the same or different worksheets within the same workbook.

Code Examples:

  1. Basic Intersection Check:
    This example checks if two ranges on a sheet overlap and prints the address of the intersection if it exists.
import xlwings as xw

# Connect to the active workbook and sheet
wb = xw.books.active
sheet = wb.sheets['Sheet1']

# Define two ranges
range1 = sheet.range('A1:C10')
range2 = sheet.range('B5:E15')

# Get the intersection using the Excel API
intersection = sheet.api.Application.Intersect(range1.api, range2.api)

if intersection:
    print(f"Intersection address: {intersection.Address}")
else:
    print("No overlap between the ranges.")
  1. Applying Formatting to an Intersection:
    Here, conditional formatting is applied to the overlapping area to highlight it.
import xlwings as xw

wb = xw.books.active
sheet = wb.sheets['DataSheet']

# Define multiple ranges
range_a = sheet.range('D1:F20')
range_b = sheet.range('E10:H30')

# Find the intersection
overlap = wb.api.Application.Intersect(range_a.api, range_b.api)

if overlap:
# Apply yellow fill to the overlapping cells
    overlap.Interior.Color = 65535 # Yellow color in RGB
    print("Formatting applied to intersection.")
else:
    print("No intersection to format.")
  1. Data Validation in an Intersection:
    This example sums values only in the overlapping cells of three ranges.
import xlwings as xw

app = xw.apps.active
sheet = app.books['SalesData'].sheets['Monthly']

# Create three ranges
r1 = sheet.range('B2:M10')
r2 = sheet.range('F5:J15')
r3 = sheet.range('A1:Z20')

# Get the common intersection
common_area = app.api.Intersect(r1.api, r2.api, r3.api)

if common_area:
    total = sum(cell.value for cell in common_area if isinstance(cell.value, (int, float)))
    print(f"Total sum in intersection: {total}")
else:
    print("No common area found for calculation.")
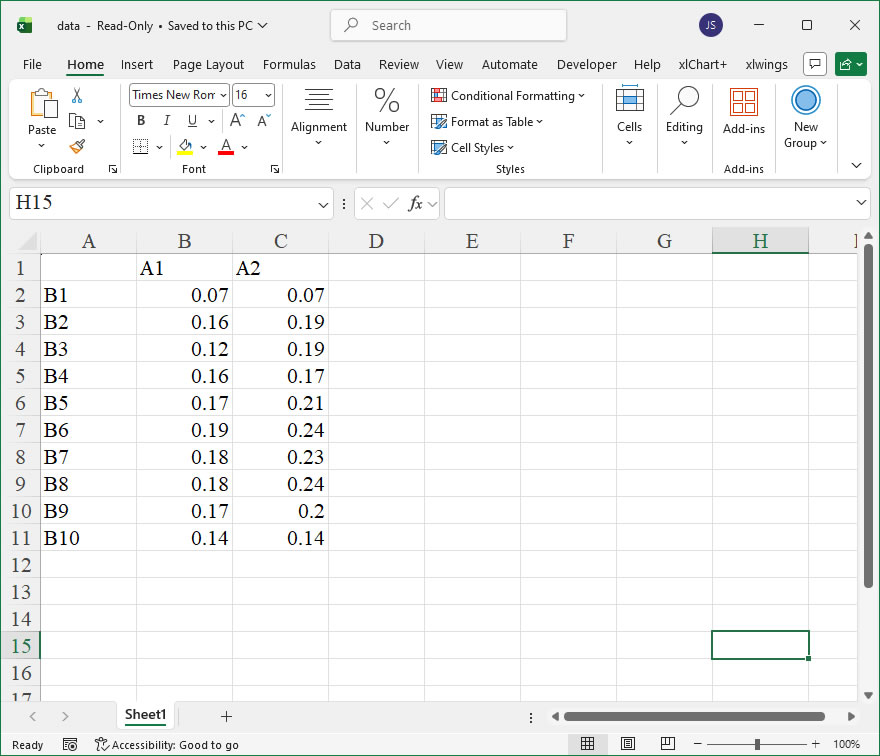
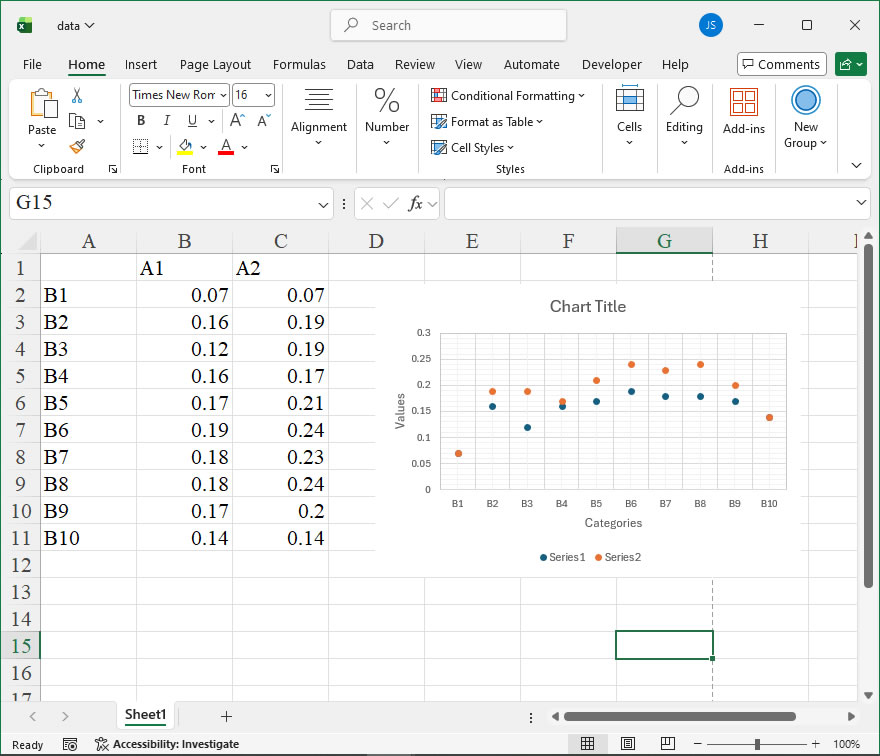
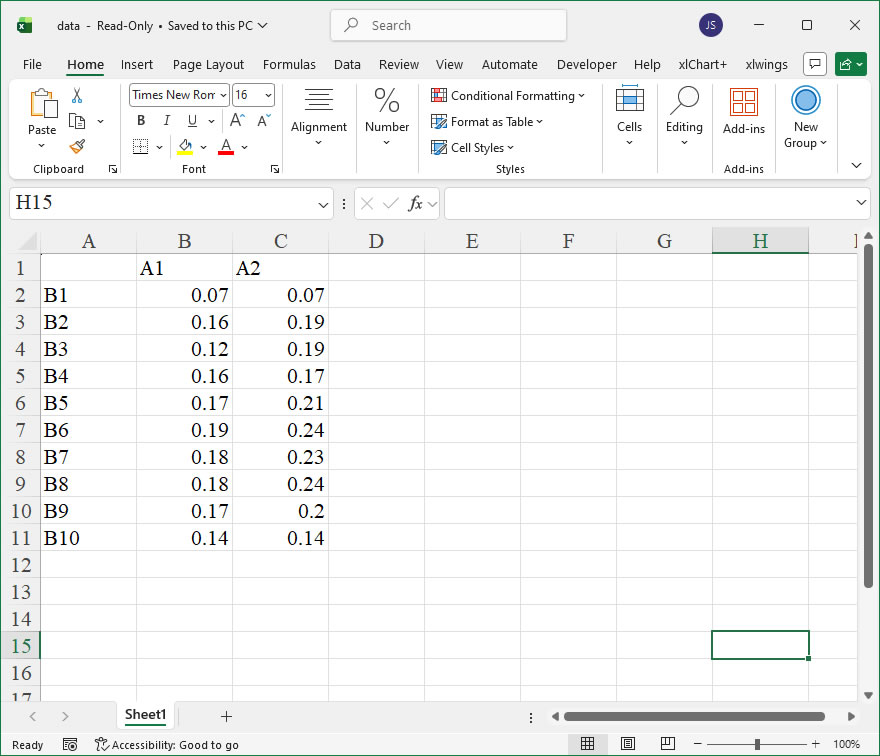
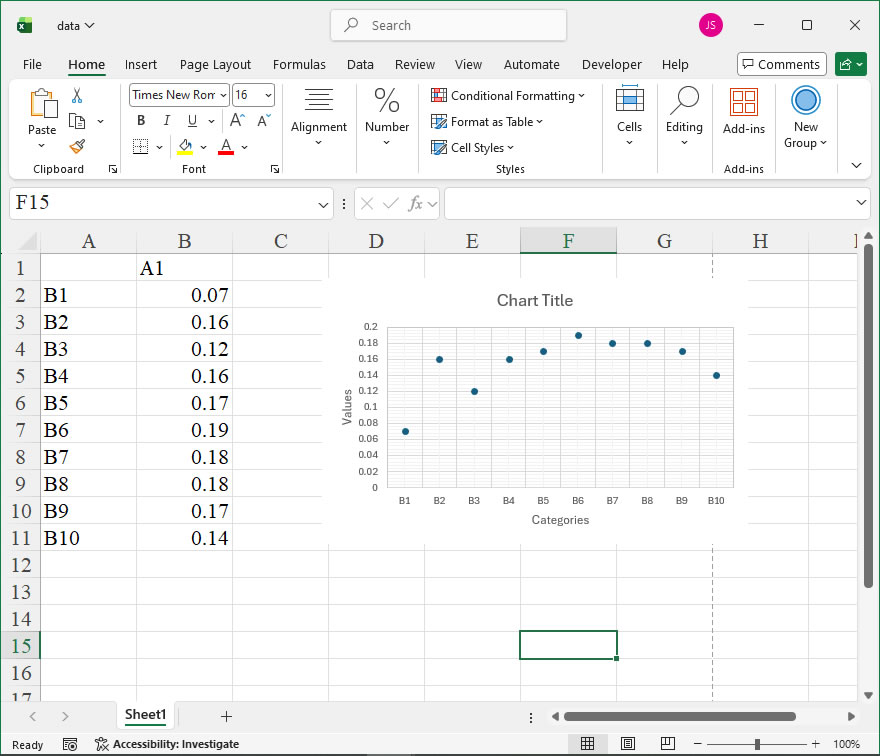
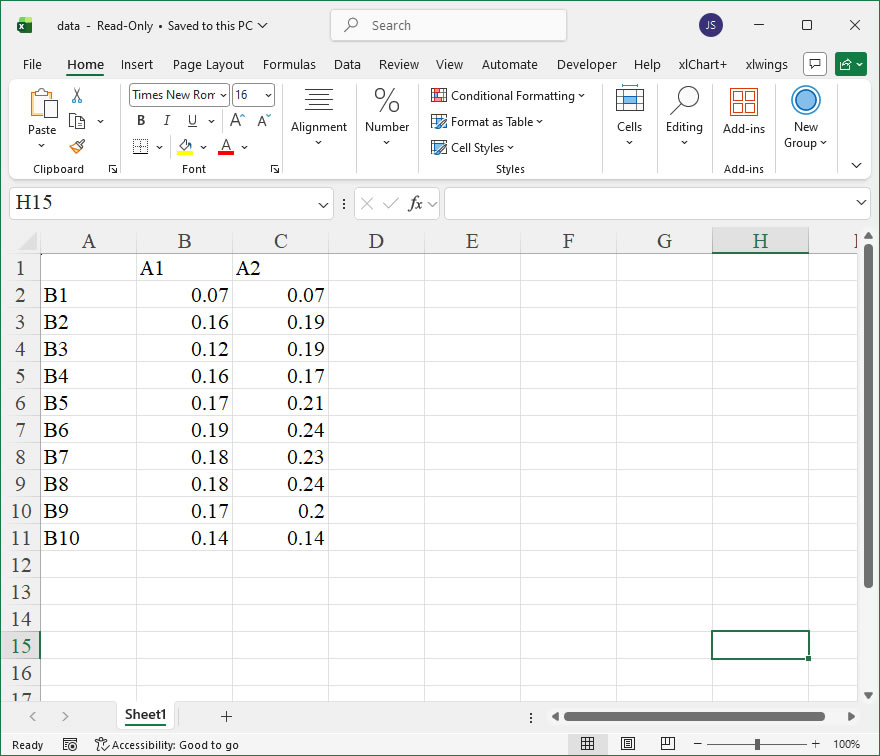
How To Create Complex Dot Chart Using xlwings?

Example

Code

import xlwings as xw
import os

def set_style(cht):
    cht.ChartArea.Format.Line.Visible=False
    cht.PlotArea.Format.Fill.Visible = False
    cht.PlotArea.Format.Line.Visible = True
    cht.PlotArea.Format.Line.ForeColor.RGB=xw.utils.rgb_to_int((200,200,200))
    #cht.PlotArea.Format.Line.ForeColor.ObjectThemeColor = msoThemeColorText1
    ax1 = cht.Axes(1)
    ax2 = cht.Axes(2)
    ax1.HasTitle = True
    ax1.AxisTitle.Text = 'Categories'
    ax1.AxisTitle.Font.Size = 10
    ax1.TickLabels.Font.Size = 8
    #ax1.TickLabels.NumberFormat = '0.00'
    ax1.HasMajorGridlines = True
    ax1.HasMinorGridlines = True
    ax2.HasTitle = True
    ax2.AxisTitle.Text = 'Values'
    ax2.AxisTitle.Font.Size = 10
    ax2.TickLabels.Font.Size = 8
    ax2.HasMajorGridlines = True
    ax2.HasMinorGridlines = True
    cht.HasTitle = True
    #cht.ChartTitle.Caption = 'Plot'
    #cht.ChartTitle.Font.Size = 12

root=os.getcwd()
app=xw.App(visible=True,add_book=False)
wb=app.books.open(root+r'/data.xlsx',read_only=False)
sht=wb.sheets('Sheet1')

sht.api.Range('A2:C11').Select()
shp=sht.api.Shapes.AddChart2(-1,xw.constants.ChartType.xlLineMarkers,20,20,320,220,True)
cht=shp.Chart
cht.SeriesCollection(1).Format.Line.Visible=False
cht.SeriesCollection(2).Format.Line.Visible=False

set_style(cht)

cht.Export(root+'/cht.jpg')
cht.Export(root+'/cht.svg')
cht.ExportAsFixedFormat(0,root+'/cht.pdf')

#wb.save()
#app.kill()

How to use Application.InputBox in the xlwings API way

The Application.InputBox method in Excel VBA is a versatile tool for displaying a dialog box that prompts the user for input. In xlwings, this functionality is exposed through the api property, allowing direct access to the underlying Excel object model. This method is particularly useful for creating interactive Excel applications where you need to gather specific information from the user, such as a string, number, cell reference, or even a formula. Unlike a simple input box, it can validate the type of input, making data collection more robust.

Syntax in xlwings:
The method is accessed via the Application object. The general xlwings API call format is:

app.api.InputBox(Prompt, Title, Default, Left, Top, HelpFile, HelpContextID, Type)

Where:

  • Prompt (Required, String): The message displayed in the dialog box.
  • Title (Optional, Variant): The title for the input box window. If omitted, the default title is “Input”.
  • Default (Optional, Variant): A default value that appears in the text box when the dialog is shown.
  • Left, Top (Optional, Variant): The screen coordinates (in points) for the upper-left corner of the dialog box.
  • HelpFile, HelpContextID (Optional, Variant): Identifiers for a custom Help file.
  • Type (Optional, Variant): Specifies the return data type. If omitted, it defaults to 0 (a String). This is a critical parameter.

The Type argument can take the following values:

ValueMeaning
0A formula
1A number
2Text (a string)
4A logical value (True or False)
8A cell reference, as a Range object
16An error value, such as #N/A
64An array of values

You can sum these values to allow multiple types (e.g., Type=1+2 allows both numbers and text). If the user enters data of an incorrect type or clicks “Cancel”, the method returns False.

Code Examples:

  1. Prompting for a Text String (Default):
import xlwings as xw
app = xw.apps.active
user_name = app.api.InputBox(Prompt="Enter your name:", Title="User Info", Type=2)
if user_name is not False:
    print(f"Hello, {user_name}")
  1. Prompting for a Number with a Default Value:
budget = app.api.InputBox("Enter the project budget:", "Budget Input", Default=10000, Type=1)
if budget is not False:
    total = budget * 1.1
    print(f"Budget with contingency: {total}")
  1. Prompting for a Cell Reference (returns an xlwings Range object):
target_range = app.api.InputBox("Select a data range:", "Range Selector", Type=8)
if target_range is not False:
    # target_range is an xlwings Range object
    values = target_range.value
    print(f"Selected values: {values}")
  1. Allowing Multiple Input Types (Number or Text):
data = app.api.InputBox("Enter ID (number) or Name (text):", "Data Entry", Type=1+2)
if data is not False:
    print(f"Received: {data} (Type: {type(data).__name__})")

How To Simple Dot Chart Using xlwings?

Example

Code

import xlwings as xw
import os

def set_style(cht):
    cht.ChartArea.Format.Line.Visible=False
    cht.PlotArea.Format.Fill.Visible = False
    cht.PlotArea.Format.Line.Visible = True
    cht.PlotArea.Format.Line.ForeColor.RGB=xw.utils.rgb_to_int((200,200,200))
    #cht.PlotArea.Format.Line.ForeColor.ObjectThemeColor = msoThemeColorText1
    ax1 = cht.Axes(1)
    ax2 = cht.Axes(2)
    ax1.HasTitle = True
    ax1.AxisTitle.Text = 'Categories'
    ax1.AxisTitle.Font.Size = 10
    ax1.TickLabels.Font.Size = 8
    #ax1.TickLabels.NumberFormat = '0.00'
    ax1.HasMajorGridlines = True
    ax1.HasMinorGridlines = True
    ax2.HasTitle = True
    ax2.AxisTitle.Text = 'Values'
    ax2.AxisTitle.Font.Size = 10
    ax2.TickLabels.Font.Size = 8
    ax2.HasMajorGridlines = True
    ax2.HasMinorGridlines = True
    cht.HasTitle = True
    #cht.ChartTitle.Caption = 'Plot'
    #cht.ChartTitle.Font.Size = 12

root=os.getcwd()
app=xw.App(visible=True,add_book=False)
wb=app.books.open(root+r'/data.xlsx',read_only=False)
sht=wb.sheets('Sheet1')

sht.api.Range('A2:B11').Select() 
shp=sht.api.Shapes.AddChart2(-1, xw.constants.ChartType.xlLineMarkers,20,20,320,200,True)
cht=shp.Chart
cht.SeriesCollection(1).Format.Line.Visible=False

set_style(cht)

cht.Export(root+'/cht.jpg')
cht.Export(root+'/cht.svg')
cht.ExportAsFixedFormat(0,root+'/cht.pdf')

#wb.save()
#app.kill()

How to use Application.InchesToPoints in the xlwings API way

The InchesToPoints member of the Application object in Excel is a method used to convert a measurement from inches to points. In the context of Excel and desktop publishing, a “point” is a unit of measurement equal to 1/72 of an inch. This conversion is particularly useful when programmatically setting or adjusting properties that require point values, such as row heights, column widths, font sizes, or shape dimensions, but where the initial measurement or design specification is more conveniently thought of in inches. Using InchesToPoints ensures precision and consistency in layout and formatting tasks within a workbook.

Function:
The primary function of Application.InchesToPoints is to take a numeric value representing a length in inches and return the equivalent length in points as a Single (floating-point) data type.

Syntax in xlwings:
In xlwings, you access this method through the app object, which represents the Excel application. The syntax is straightforward:

app.api.InchesToPoints(Inches)
  • app: Your xlwings App instance. This is typically obtained with xw.App() or as xw.apps[#] when connecting to an existing instance.
  • .api: This property provides direct access to the underlying Excel object model (the COM API). It is necessary for calling this method, as xlwings does not wrap every single Excel method in its high-level API.
  • Inches: (Required) A Single or Double number representing the length in inches that you want to convert to points.

Code Examples:
Here are practical examples demonstrating how to use Application.InchesToPoints with xlwings.

  1. Basic Conversion:
    This example simply converts a measurement and prints the result.
import xlwings as xw

# Start a new Excel instance or connect to a running one
app = xw.App(visible=False) # Use visible=True to see Excel

# Convert 2.5 inches to points
points_value = app.api.InchesToPoints(2.5)
print(f"2.5 inches is equal to {points_value} points.")
# Output: 2.5 inches is equal to 180.0 points.

app.quit()
  1. Setting Row Height Based on Inches:
    A common use case is setting a row’s height to a specific inch measurement.
import xlwings as xw

app = xw.App(visible=False)
wb = app.books.add()
ws = wb.sheets[0]

# Desired row height: 0.75 inches
desired_height_inches = 0.75
row_height_points = app.api.InchesToPoints(desired_height_inches)

# Set the height of the first row
ws.api.Rows(1).RowHeight = row_height_points

print(f"Set Row 1 height to {desired_height_inches} inches ({row_height_points} points).")
wb.save('row_height_example.xlsx')
app.quit()
  1. Setting Column Width Based on Inches:
    While column width in Excel uses a different, character-based unit, this method can be part of calculations for shapes or other objects placed relative to columns. For direct cell formatting related to width/height in points, it’s applicable.
import xlwings as xw

app = xw.App(visible=True)
wb = app.books.add()
ws = wb.sheets[0]

# Create a shape and set its width based on inches
# Let's say we want a rectangle that is 2 inches wide
shape_width_inches = 2.0
shape_width_points = app.api.InchesToPoints(shape_width_inches)

# Add a rectangle shape
my_shape = ws.shapes.add_shape(
type=1, # 1 corresponds to a Rectangle
left=ws.range('C5').left,
top=ws.range('C5').top,
width=shape_width_points,
height=50 # height in points
)
my_shape.name = "MyRectangle"

print(f"Shape width set to {shape_width_inches} inches ({shape_width_points} points).")

# Keep the workbook open
input("Press Enter to close...")
app.quit()

How To Save Chart as Image Using xlwings?

Method

The `CopyPicture` method of the `Chart` object allows you to copy the selected chart as an image to the clipboard. The method syntax is as follows: 

cht.CopyPicture(Appearance,Format)

Here, `cht` is the chart object, and the two parameters are: 

– **Appearance**: Sets how the image is copied. A value of 1 copies the image as it appears on screen (default), and a value of 2 copies the image as it appears when printed. 

– **Format**: Specifies the format of the copied image. A value of 2 copies the image as a bitmap (.bmp, .jpg, .gif, .png), and a value of -4147 copies the image as a vector format (supports .emf and .wmf).

How to use Application.Help in the xlwings API way

In Excel’s object model, the Application.Help method is a powerful tool for launching Excel’s built-in help system directly from your code. While xlwings, as a Python library, does not have a direct, one-to-one wrapper for every single Excel VBA method, it provides full access to the underlying Excel Application object through its api property. This allows you to call native Excel methods, including Help, from your Python scripts. This functionality is particularly useful for creating user-friendly macros or applications that can provide context-sensitive assistance.

Functionality:
The primary function of Application.Help is to open the Excel Help pane and display a specific help topic. You can use it to show general help or to jump to a topic identified by a Help Context ID. This can guide users to official documentation about a function, feature, or error message directly from within your automated workflow.

Syntax (via xlwings api):
The call is made through the xlwings App object’s api property, which exposes the native Excel Application COM object.

app.api.Help(HelpFile, HelpContextID)
  • app: Your xlwings App instance (e.g., app = xw.App() or xw.apps.active).
  • .api: The gateway to the native Excel object model.
  • .Help(...): The actual VBA method call.

Parameters:

ParameterData TypeDescriptionHow to Determine Values
HelpFileStringOptional. The name of the Help file you want to display. If omitted, Excel’s default help file is used.Typically, you leave this blank to use Excel’s main help. For add-ins, you would specify their custom .chm or .hlp file name.
HelpContextIDLongOptional. The context ID number for the specific help topic. If provided, Help opens directly to that topic. If omitted, the main Help contents page is shown.These IDs are defined by the Help file author (Microsoft or add-in developer). They are often listed in the VBA Object Browser or add-in documentation.

Code Examples:

  1. Opening General Excel Help:
    This is the simplest use case, launching the main Excel Help window.
import xlwings as xw

# Connect to the active Excel instance
app = xw.apps.active
# Open the default Excel Help
app.api.Help()
  1. Opening Help for a Specific Topic (using a known Context ID):
    This example assumes you know the Context ID for the “VLOOKUP” function help topic (a hypothetical ID for demonstration).
import xlwings as xw

app = xw.App() # Starts a new Excel instance
# Open Help directly to the topic for Context ID 10017
app.api.Help(HelpContextID=10017)
# Note: The actual Context ID for VLOOKUP differs. You need the correct ID from Microsoft's documentation.
  1. Integrating into a Macro for User Assistance:
    You can bind this to a button in your xlwings-powered tool to create a “Help” button.
import xlwings as xw
from xlwings import Book

def show_function_help():
"""Assumes the active cell contains a function name and fetches its help."""
    wb = xw.books.active
    sheet = wb.sheets.active

    # Get the formula from the active cell
    current_cell = sheet.range('A1') # Example: Get function name from A1
    func_name = current_cell.value

    # A simple mapping (In reality, you'd need a full map of function names to Context IDs)
    help_id_map = {"VLOOKUP": 10017, "SUMIF": 10042}

    app = xw.apps.active
    context_id = help_id_map.get(func_name)

if context_id:
    app.api.Help(HelpContextID=context_id)
else:
    app.api.Help() # Open general help if no specific ID is found

# This function can be called from an xlwings Ribbon button or a shape macro.

How to use Application.Goto in the xlwings API way

The Goto method of the Application object in Excel is a powerful feature for navigating to a specific range, reference, or named location within a workbook. It is particularly useful for quickly moving the active cell or selection to a predefined area, which can enhance user interaction and automate navigation tasks in scripts. In xlwings, this functionality is accessed through the api property, which provides direct access to the underlying Excel object model, allowing for precise control similar to VBA.

Functionality:
The primary function of Goto is to shift the active cell or selection to a specified target. This target can be a Range object, a cell reference as a string, or a defined name (e.g., a named range). It can also scroll the window to make the target visible if it is not currently in view. This is especially beneficial in large worksheets where manual scrolling is inefficient, as it streamlines navigation during automated processes.

Syntax:
In xlwings, the Goto method is called via the Application object. The syntax is:

app.api.Goto(Reference, Scroll)
  • Reference: This parameter is required and specifies the destination. It can be:
  • A Range object (e.g., app.range('A1') or app.range('Sheet1!B5')).
  • A string representing a cell address (e.g., 'Sheet2!C10').
  • A string representing a defined name (e.g., 'MyNamedRange').
  • Scroll: This optional parameter is a boolean value (True or False). If set to True, Excel will scroll the window to bring the target into view. The default value is False, meaning no scrolling occurs unless necessary.

Code Examples:

  1. Navigate to a specific cell using a string reference:
import xlwings as xw
app = xw.apps.active # Get the active Excel application
app.api.Goto(Reference='Sheet1!D20', Scroll=True)

This moves the active cell to D20 on Sheet1 and scrolls the window to ensure it is visible.

  1. Navigate to a named range:
import xlwings as xw
app = xw.apps.active
app.api.Goto(Reference='SalesData', Scroll=False)

Assuming ‘SalesData’ is a defined name in the workbook, this selects that range without scrolling.

  1. Navigate using a Range object from xlwings:
import xlwings as xw
app = xw.apps.active
target_range = app.books['Workbook1.xlsx'].sheets['Data'].range('F15')
app.api.Goto(Reference=target_range.api, Scroll=True)

Here, the api property of the xlwings Range object is passed as the Reference, ensuring compatibility with the Excel object model.

  1. Navigate to a range in another workbook:
import xlwings as xw
app = xw.apps.active
app.api.Goto(Reference="[Budget.xlsx]Annual!A1", Scroll=True)

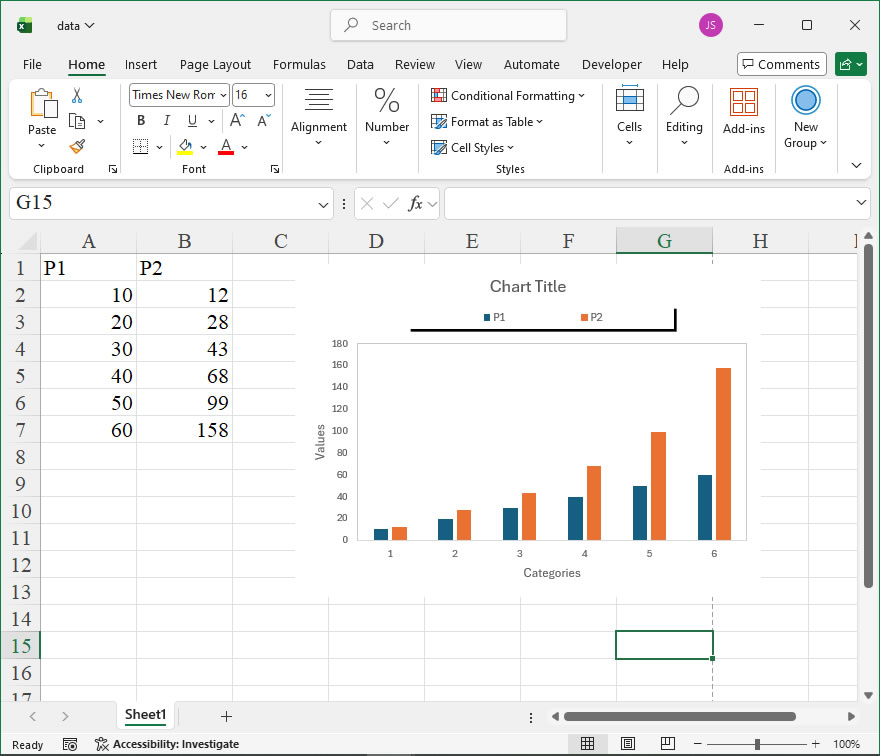
How To Set Legend Using xlwings? 4

Example

Code

import xlwings as xw
import os

def set_style(cht):
    cht.ChartArea.Format.Line.Visible=False
    cht.PlotArea.Format.Fill.Visible=False
    cht.PlotArea.Format.Line.Visible=True
    cht.PlotArea.Format.Line.ForeColor.RGB=xw.utils.rgb_to_int((200,200,200))
    #cht.PlotArea.Format.Line.ForeColor.ObjectThemeColor = msoThemeColorText1
    ax1=cht.Axes(1)
    ax2=cht.Axes(2)
    ax1.HasTitle=True
    ax1.AxisTitle.Text='Categories'
    ax1.AxisTitle.Font.Size=10
    ax1.TickLabels.Font.Size=8
    #ax1.TickLabels.NumberFormat='0.00'
    ax1.HasMajorGridlines=False
    ax2.HasTitle=True
    ax2.AxisTitle.Text='Values'
    ax2.AxisTitle.Font.Size=10
    ax2.TickLabels.Font.Size=8
    ax2.HasMajorGridlines=False
    cht.HasTitle=True
    #cht.ChartTitle.Caption='Plot'
    #cht.ChartTitle.Font.Size=12

root=os.getcwd()
app=xw.App(visible=True, add_book=False)
wb=app.books.open(root+r'/data.xlsx',read_only=False)
sht=wb.sheets('Sheet1')

sht.api.Range('A1:B7').Select()    #
cht=sht.api.Shapes.AddChart2(-1, \
          xw.constants.ChartType.xlColumnClustered,20,20,350,250,True).Chart
cht.HasLegend=True
leg=cht.Legend
leg.Position=xw.constants.LegendPosition.xlLegendPositionTop
leg.Shadow=True
leg.Left=80
leg.Width=200
      
set_style(cht)

cht.Export(root+'/cht.jpg')
cht.Export(root+'/cht.svg')
cht.ExportAsFixedFormat(0,root+'/cht.pdf')

#wb.save()
#app.kill()

How to use Application.GetSaveAsFilename in the xlwings API way

The GetSaveAsFilename method of the Application object in Excel is a powerful tool for prompting users to specify a filename and location for saving a file, without actually performing the save operation. This is particularly useful in scenarios where you need to obtain a user-defined file path for further processing, such as exporting data, creating reports, or setting a save destination in a macro. In xlwings, this functionality is accessed through the api property, which provides direct access to the underlying Excel object model.

Functionality:
The primary function of GetSaveAsFilename is to display the standard “Save As” dialog box. It returns the full path selected by the user as a string. If the user cancels the dialog, it returns False. This allows your script to conditionally proceed based on user input, ensuring flexibility and user control over file operations.

Syntax in xlwings:
The method is called via the Excel Application object. The basic xlwings API syntax is:

file_path = xw.apps[app_key].api.GetSaveAsFilename(InitialFilename, FileFilter, FilterIndex, Title, ButtonText)

Parameters:

  • InitialFilename (Optional, Variant): Suggests a default filename. If omitted, the current workbook’s name is used.
  • FileFilter (Optional, Variant): A string specifying file type filters. It consists of pairs: a description and the file extension, separated by commas, with pairs delimited by semicolons. For example, "Excel Files (*.xlsx), *.xlsx, Text Files (*.txt), *.txt".
  • FilterIndex (Optional, Variant): The index number (1-based) of the default file filter to use from FileFilter. If omitted, the first filter is used.
  • Title (Optional, Variant): The title text displayed in the dialog box. If omitted, the default title is shown.
  • ButtonText (Optional, Variant): On Macintosh only, the text for the save button.

Code Examples:

  1. Basic Usage: Prompt the user for a filename with a default suggestion.
import xlwings as xw

# Connect to the active Excel instance
app = xw.apps.active
# Get a save filename, suggesting "Report.xlsx"
suggested_path = app.api.GetSaveAsFilename(InitialFilename="Report.xlsx")
if suggested_path != False:
    print(f"User selected: {suggested_path}")
else:
    print("Save dialog was cancelled.")
  1. With File Filters: Allow the user to choose between Excel and CSV formats.
import xlwings as xw

app = xw.apps.active
# Define filters for Excel and CSV files
file_filters = "Excel Workbook (*.xlsx), *.xlsx, CSV Files (*.csv), *.csv"
selected_path = app.api.GetSaveAsFilename(FileFilter=file_filters, FilterIndex=2, Title="Export Data")
if selected_path:
    # Process the path (e.g., save data using pandas or other libraries)
    print(f"File will be saved to: {selected_path}")
  1. Integration with Data Export: Combine with pandas to save a DataFrame based on user input.
import xlwings as xw
import pandas as pd

# Sample DataFrame
data = pd.DataFrame({'A': [1, 2, 3], 'B': [4, 5, 6]})
app = xw.apps.active
path = app.api.GetSaveAsFilename(InitialFilename="DataExport.csv",
FileFilter="CSV Files (*.csv), *.csv",
Title="Save CSV File")
if path and isinstance(path, str):
    # Ensure the file has the correct extension if not provided by user
    if not path.endswith('.csv'):
        path += '.csv'
        data.to_csv(path, index=False)
        print(f"Data saved to {path}")