Archive

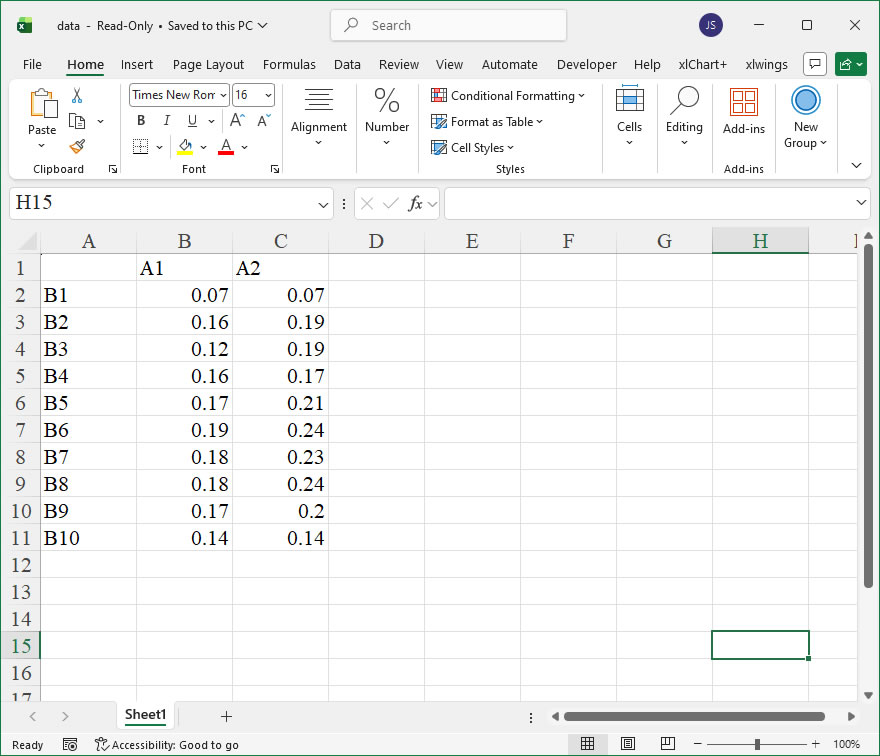
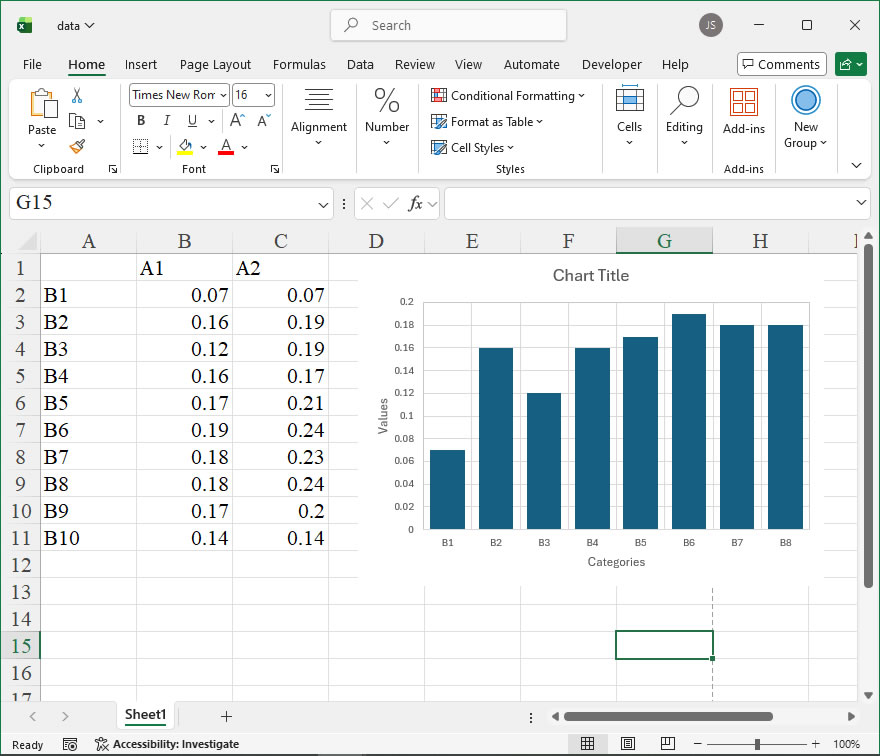
How To Create Simple Column Chart With Different Colors Using xlwings?

Example

Code

import xlwings as xw
import os

def set_style(cht):
    cht.ChartArea.Format.Line.Visible=False
    cht.PlotArea.Format.Fill.Visible = False
    cht.PlotArea.Format.Line.Visible = True
    cht.PlotArea.Format.Line.ForeColor.RGB=xw.utils.rgb_to_int((200,200,200))
    #cht.PlotArea.Format.Line.ForeColor.ObjectThemeColor = msoThemeColorText1
    ax1 = cht.Axes(1)
    ax2 = cht.Axes(2)
    ax1.HasTitle = True
    ax1.AxisTitle.Text = 'Categories'
    ax1.AxisTitle.Font.Size = 10
    ax1.TickLabels.Font.Size = 8
    #ax1.TickLabels.NumberFormat = '0.00'
    ax1.HasMajorGridlines = True
    ax2.HasTitle = True
    ax2.AxisTitle.Text = 'Values'
    ax2.AxisTitle.Font.Size = 10
    ax2.TickLabels.Font.Size = 8
    ax2.HasMajorGridlines = True
    cht.HasTitle = True
    #cht.ChartTitle.Caption = 'Plot'
    #cht.ChartTitle.Font.Size = 12

root=os.getcwd()
app=xw.App(visible=True,add_book=False)
wb=app.books.open(root+r'/data.xlsx',read_only=False)
sht=wb.sheets('Sheet1')

sht.api.Range('A2:B9').Select()  #
shp=sht.api.Shapes.AddChart2(-1,xw.constants.ChartType.xlColumnClustered,20,20,350,250,True)
cht=shp.Chart  #
cht.ChartGroups(1).GapWidth=50
cht.SeriesCollection(1).Points(1).Format.Fill.ForeColor.RGB=xw.utils.rgb_to_int((192,0,0))
cht.SeriesCollection(1).Points(2).Format.Fill.ForeColor.RGB=xw.utils.rgb_to_int((255,0,0))
cht.SeriesCollection(1).Points(3).Format.Fill.ForeColor.RGB=xw.utils.rgb_to_int((255,192,0))
cht.SeriesCollection(1).Points(4).Format.Fill.ForeColor.RGB=xw.utils.rgb_to_int((255,255,0))
cht.SeriesCollection(1).Points(5).Format.Fill.ForeColor.RGB=xw.utils.rgb_to_int((146,208,80))
cht.SeriesCollection(1).Points(6).Format.Fill.ForeColor.RGB=xw.utils.rgb_to_int((0,176,0))
cht.SeriesCollection(1).Points(7).Format.Fill.ForeColor.RGB=xw.utils.rgb_to_int((0,176,240))
cht.SeriesCollection(1).Points(8).Format.Fill.ForeColor.RGB=xw.utils.rgb_to_int((0,112,192))

set_style(cht)

cht.Export(root+'/cht.jpg')
cht.Export(root+'/cht.svg')
cht.ExportAsFixedFormat(0,root+'/cht.pdf')

#wb.save()
#app.kill()
How to use Application.OnKey in the xlwings API way

The Application.OnKey member in Excel VBA allows developers to assign macros or specific actions to particular key combinations, effectively creating custom keyboard shortcuts. In xlwings, this functionality is exposed through the Application object’s on_key method, enabling Python scripts to dynamically set or clear these key bindings. This is particularly useful for building interactive Excel-based applications where certain keystrokes need to trigger automated processes, such as data refresh, formatting, or navigation.

Functionality:
Application.on_key in xlwings maps key combinations to callable Python functions or clears existing bindings. When the assigned key is pressed in Excel, the linked function executes, allowing for seamless integration of Python logic with user interactions. This can enhance productivity by automating repetitive tasks directly from the keyboard.

Syntax:
In xlwings, the method is accessed via app.api.OnKey, where app is an instance of xlwings.App. The syntax follows:

app.api.OnKey(Key, Procedure)
  • Key (required): A string specifying the key combination. Use codes like "^c" for Ctrl+C or "+{F1}" for Shift+F1. For special keys, enclose in braces (e.g., "{ENTER}"). See the table below for common codes.
  • Procedure (optional): A string naming the macro to run, or a callable Python function (via app.macro). If omitted or set to "", the key binding is cleared.

Key Code Examples:

CombinationCode
Ctrl+A"^a"
Alt+F4"%{F4}"
Shift+Tab"+{TAB}"
Enter"{ENTER}"

Example Usage:
Below are xlwings code snippets demonstrating Application.on_key:

  1. Assign a Python function to Ctrl+Shift+D:
import xlwings as xw

def custom_action():
wb = xw.books.active
wb.sheets[0].range("A1").value = "Shortcut triggered!"

app = xw.apps.active
# Use app.macro to wrap the Python function
app.api.OnKey("^+d", app.macro("custom_action"))

Pressing Ctrl+Shift+D in Excel will write the message to cell A1.

  1. Clear a key binding:
app.api.OnKey("^+d", "")

This removes the shortcut for Ctrl+Shift+D.

  1. Bind a simple key to an Excel macro:
app.api.OnKey("{F5}", "MyMacro")

Assumes “MyMacro” is a VBA macro stored in the workbook. Pressing F5 runs it.

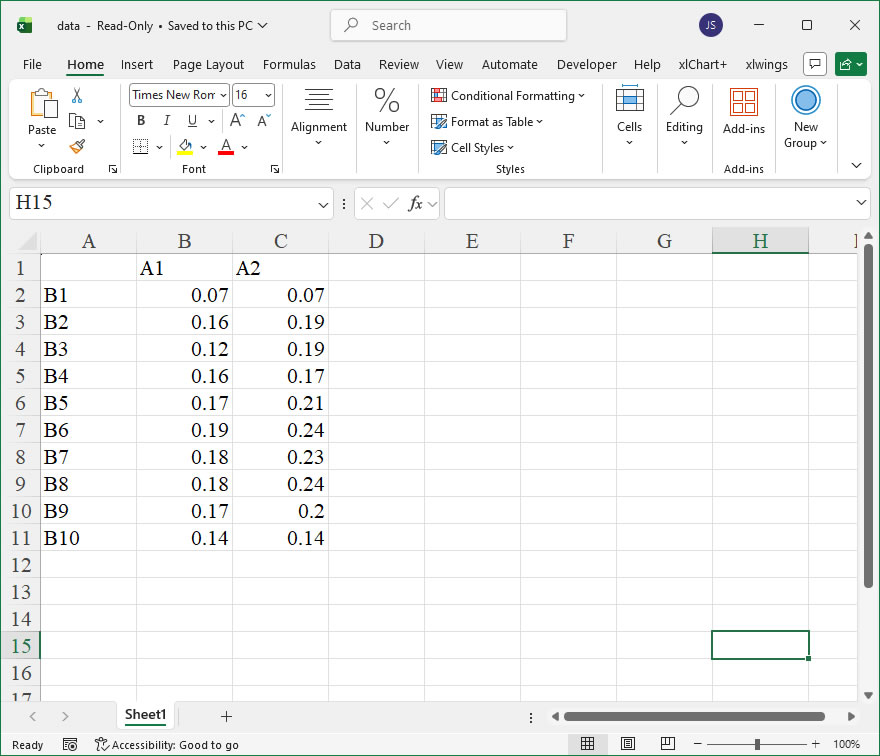
How To Create Simple Column Chart Using xlwings?

Example

Code

import xlwings as xw
import os

def set_style(cht):
    cht.ChartArea.Format.Line.Visible=False
    cht.PlotArea.Format.Fill.Visible = False
    cht.PlotArea.Format.Line.Visible = True
    cht.PlotArea.Format.Line.ForeColor.RGB=xw.utils.rgb_to_int((200,200,200))
    #cht.PlotArea.Format.Line.ForeColor.ObjectThemeColor = msoThemeColorText1
    ax1 = cht.Axes(1)
    ax2 = cht.Axes(2)
    ax1.HasTitle = True
    ax1.AxisTitle.Text = 'Categories'
    ax1.AxisTitle.Font.Size = 10
    ax1.TickLabels.Font.Size = 8
    #ax1.TickLabels.NumberFormat = '0.00'
    ax1.HasMajorGridlines = True
    ax2.HasTitle = True
    ax2.AxisTitle.Text = 'Values'
    ax2.AxisTitle.Font.Size = 10
    ax2.TickLabels.Font.Size = 8
    ax2.HasMajorGridlines = True
    cht.HasTitle = True
    #cht.ChartTitle.Caption = 'Plot'
    #cht.ChartTitle.Font.Size = 12

root=os.getcwd()
app=xw.App(visible=True,add_book=False)
wb=app.books.open(root+r'/data.xlsx',read_only=False)
sht=wb.sheets('Sheet1')

sht.api.Range('A2:B9').Select()  #
shp=sht.api.Shapes.AddChart2(-1,xw.constants.ChartType.xlColumnClustered,20,20,350,250,True)
cht=shp.Chart  #
cht.ChartGroups(1).GapWidth=40

set_style(cht)

cht.Export(root+'/cht.jpg')
cht.Export(root+'/cht.svg')
cht.ExportAsFixedFormat(0,root+'/cht.pdf')

#wb.save()
#app.kill()
How to use Application.NextLetter in the xlwings API way

The Application.NextLetter property in Excel, when accessed through the xlwings API, provides a way to programmatically open the next mail message in the Microsoft Outlook inbox that is related to the reviewed workbook. This is particularly useful in workflows where Excel workbooks are sent via email for review, and you need to cycle through responses directly from Excel. It mimics the functionality of the “Next” button in the “Reviewing” toolbar within Excel’s user interface.

In xlwings, you interact with this property through the app object, which represents the Excel Application. The property is read-only and returns a MailItem object from the Outlook object model, representing the next email. The basic syntax is straightforward:

next_mail = app.api.NextLetter

Here, app is your xlwings App instance. The .api attribute provides direct access to the underlying Excel object model, allowing you to use the NextLetter property. It’s important to note that this property only works if the workbook was originally sent for review via email and there are subsequent mail items in the inbox related to it. If there is no next mail message, accessing this property will typically raise an error or return None, so error handling is advisable.

Consider a scenario where you have an Excel workbook open that was part of an email review cycle. The following xlwings code example demonstrates how to use NextLetter to open the next related email and extract its subject line, showcasing integration with the win32com.client library to interact with Outlook’s properties:

import xlwings as xw
import win32com.client

# Connect to the active Excel instance
app = xw.apps.active

try:
# Get the next mail item related to the reviewed workbook
    next_mail = app.api.NextLetter

    # To interact with the mail item's properties, you might use win32com
    # The NextLetter property returns a MailItem object
    # We can use win32com.client.Dispatch to access it if needed,
    # but note: app.api.NextLetter already returns a COM object for the mail.
    # Here, we directly access its Subject property.
    # In practice, ensure Outlook is accessible.
    mail_subject = next_mail.Subject
    print(f"Next email subject: {mail_subject}")

    # You can then display the email, for example:
    next_mail.Display(True) # Opens the email in Outlook for viewing

except AttributeError as e:
    print("No next mail item found or property not available.")
except Exception as e:
    print(f"An error occurred: {e}")

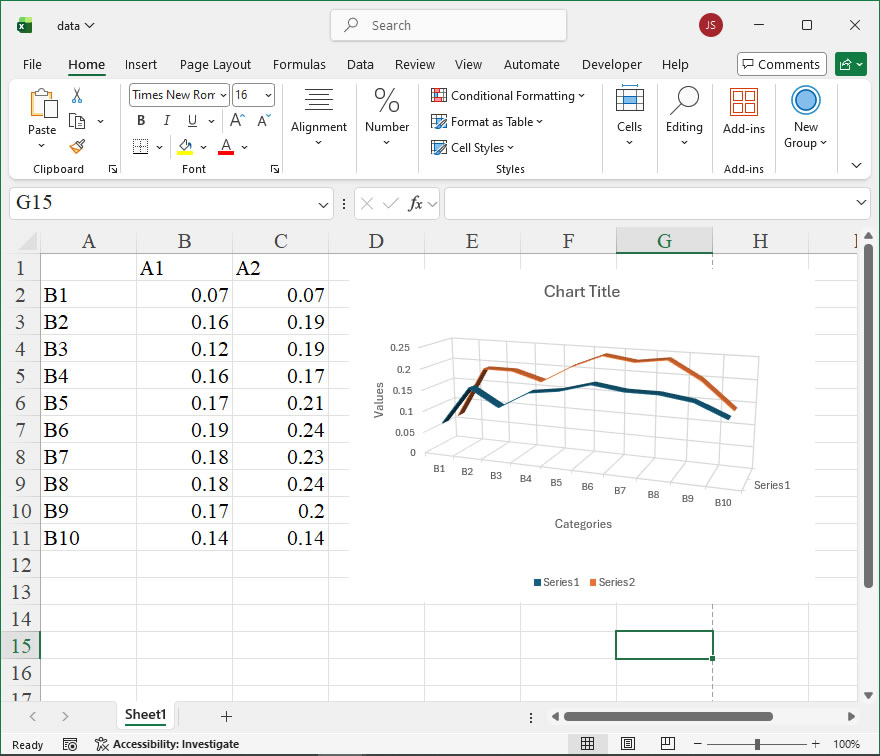
How To Create 3D Line Chart Using xlwings?

Example

Code

import xlwings as xw
import os

def set_style(cht):
    cht.ChartArea.Format.Line.Visible=False
    cht.PlotArea.Format.Fill.Visible = False
    cht.PlotArea.Format.Line.Visible = False
    cht.PlotArea.Format.Line.ForeColor.RGB=xw.utils.rgb_to_int((200,200,200))
    #cht.PlotArea.Format.Line.ForeColor.ObjectThemeColor = msoThemeColorText1
    ax1 = cht.Axes(1)
    ax2 = cht.Axes(2)
    ax1.HasTitle = True
    ax1.AxisTitle.Text = 'Categories'
    ax1.AxisTitle.Font.Size = 10
    ax1.TickLabels.Font.Size = 8
    #ax1.TickLabels.NumberFormat = '0.00'
    ax1.HasMajorGridlines = True
    ax2.HasTitle = True
    ax2.AxisTitle.Text = 'Values'
    ax2.AxisTitle.Font.Size = 10
    ax2.TickLabels.Font.Size = 8
    ax2.HasMajorGridlines = True
    cht.HasTitle = True
    #cht.ChartTitle.Caption = 'Plot'
    #cht.ChartTitle.Font.Size = 12

root=os.getcwd()
app=xw.App(visible=True,add_book=False)
wb=app.books.open(root+r'/data.xlsx',read_only=False)
sht=wb.sheets('Sheet1')

sht.api.Range('A2:C11').Select()  #
shp=sht.api.Shapes.AddChart2(-1,xw.constants.ChartType.xl3DLine,20,20,350,250,True)
cht=shp.Chart  #

set_style(cht)

cht.Export(root+'/cht.jpg')
cht.Export(root+'/cht.svg')
cht.ExportAsFixedFormat(0,root+'/cht.pdf')

#wb.save()
#app.kill()
How to use Application.MailLogon in the xlwings API way

The MailLogon member of the Application object in Excel’s object model is a method that allows you to log on to a MAPI mail system programmatically. This functionality is useful when you need to automate email-related tasks, such as sending workbooks or reports directly from Excel via the default email client. In xlwings, you can access this method through the Application object, enabling you to integrate email operations into your Python scripts for enhanced automation and productivity. Note that this method relies on the underlying MAPI (Messaging Application Programming Interface) system, so it requires a compatible email client like Microsoft Outlook to be installed and configured on the machine.

The syntax for calling the MailLogon method via xlwings is as follows:

app.api.MailLogon(Name, Password, DownloadNewMail)

Here, app refers to the xlwings Application object, typically obtained using xw.App() or xw.apps.active. The parameters are:

  • Name (optional, Variant): A string specifying the mail profile name. If omitted, the default profile is used.
  • Password (optional, Variant): A string for the mail password. If omitted, the stored password is used if available.
  • DownloadNewMail (optional, Variant): A Boolean value that determines whether new mail is downloaded upon logon. Set to True to download new mail, or False otherwise. The default is True.

The parameters can be passed by position or as keyword arguments. For example, to log on with a specific profile and download new mail, you might use app.api.MailLogon("MyProfile", "mypassword", True). It’s important to handle security and password storage carefully in scripts to avoid exposing sensitive information.

Below is a code example demonstrating the use of MailLogon with xlwings. This example assumes Excel and a MAPI-compliant email client are running, and it logs on to a mail profile before performing a simple email-related task, such as sending the active workbook. Note that in practice, you should ensure proper error handling and user authentication.

import xlwings as xw

# Start or connect to an Excel application
app = xw.App(visible=True) # Set visible=False for background operation

# Open a workbook (optional, for context)
wb = app.books.open('example.xlsx')

# Log on to the mail system using MailLogon
try:
# Using default profile and downloading new mail
    app.api.MailLogon(DownloadNewMail=True)
    print("Logged on to mail system successfully.")

    # Example: Send the active workbook as an email attachment
    # This uses the Mailer object via the Workbook's Mailer property (deprecated in newer Excel versions)
    # For modern email automation, consider using Outlook's COM object or other libraries
    wb.api.Mailer.Send()
    print("Workbook sent via email.")
except Exception as e:
    print(f"An error occurred: {e}")
finally:
# Clean up: Log off from mail and close Excel
    app.api.MailLogoff()
    wb.close()
    app.quit()

How to use Application.MailLogoff in the xlwings API way

The Application.MailLogoff method in Excel is used to log the user off from an email system (such as Microsoft Outlook) that has been previously logged into through Excel. This is particularly relevant when using Excel’s email features, like sending workbooks via email programmatically. In xlwings, which provides a Pythonic way to automate Excel, you can access this method through the Application object to manage email sessions cleanly, ensuring resources are released and sessions are properly closed after email operations.

Functionality
The primary function of MailLogoff is to terminate an active email session that was initiated via Excel. This is useful in automation scripts where you send emails from Excel and want to log out afterward to prevent issues like multiple open sessions or security concerns. It does not take any parameters and simply ends the session. Note that this method is part of the Excel object model and may not be frequently used in modern automation, as many developers prefer direct email libraries (e.g., smtplib in Python), but it remains available for compatibility with Excel-based email workflows.

Syntax
In xlwings, you call MailLogoff through the Application object. The syntax is straightforward since it has no arguments:

app.xl_app.MailLogoff()

Here, app refers to an xlwings App instance representing the Excel application. xl_app is the underlying COM object (via pywin32 on Windows or appscript on macOS) that exposes the Excel Application object from the Excel object model. The method is invoked without any parameters.

Example
Below is a complete xlwings code example that demonstrates logging into an email session (using MailLogon, which is often paired with MailLogoff) and then logging off. This example assumes you have Excel and an email client like Outlook set up. Note that MailLogon may require credentials, but in practice, it often uses the current user’s default profile.

import xlwings as xw

# Start an Excel application instance
app = xw.App(visible=False) # Set visible=True to see Excel

try:
# Log into email (this might trigger a login prompt or use default credentials)
# In some cases, MailLogon may not be needed if a session is already active
    app.xl_app.MailLogon(Name="YourName", Password="YourPassword",    DownloadNewMail=False)
    print("Logged into email successfully.")

    # Perform email-related tasks, e.g., send a workbook via email
    # (Code for sending email would go here, but is omitted for brevity)

    # Log off from the email session
    app.xl_app.MailLogoff()
    print("Logged off from email.")

except Exception as e:
    print(f"An error occurred: {e}")

finally:
# Close the Excel application
    app.quit()

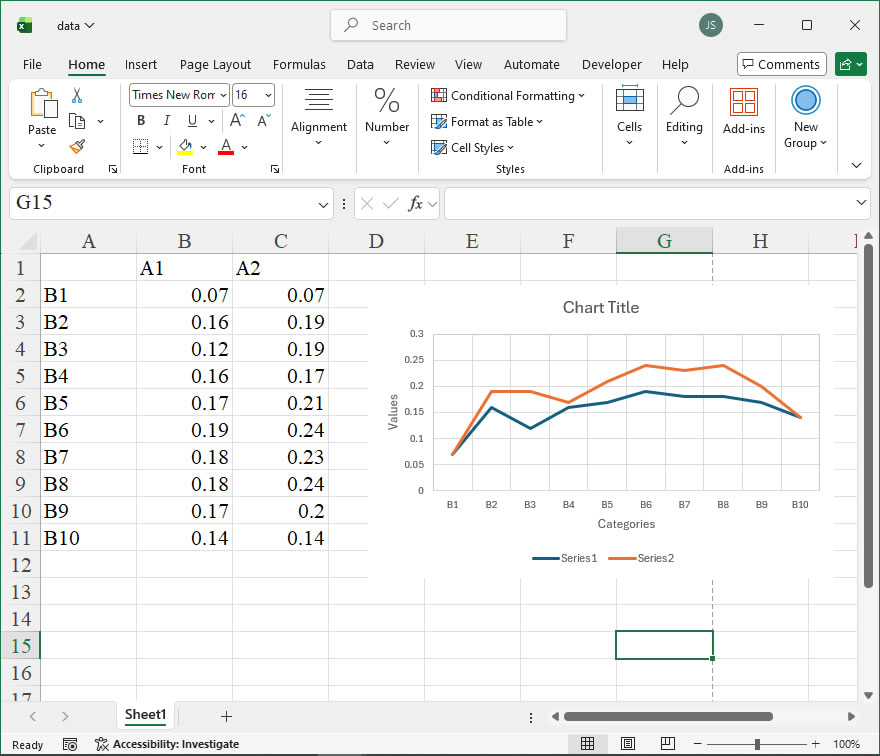
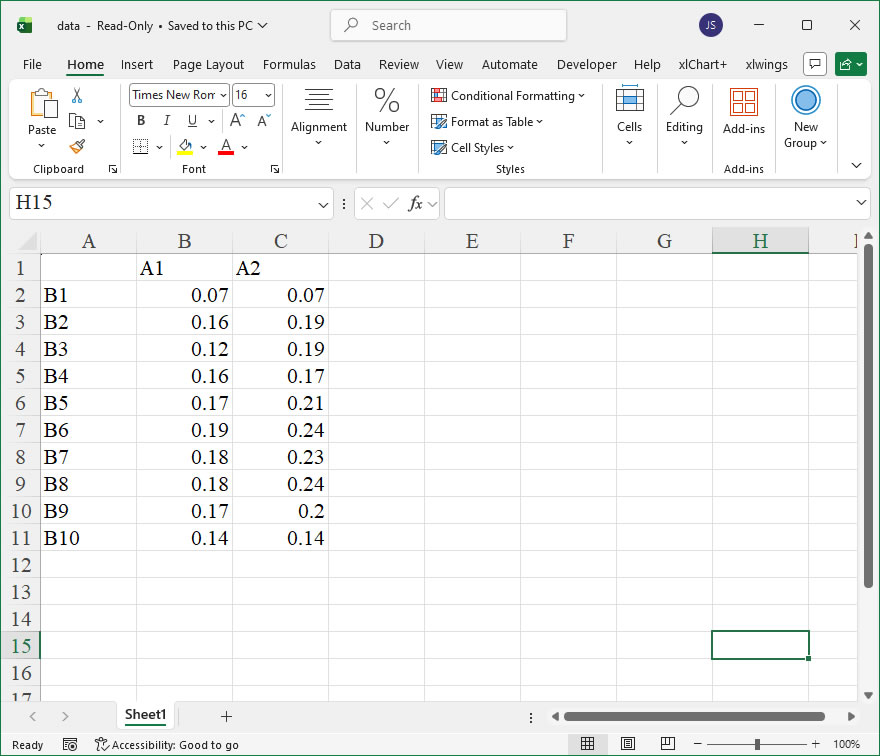
How To Create Complex Line Chart Using xlwings?

Example

Code

import xlwings as xw
import os

def set_style(cht):
    cht.ChartArea.Format.Line.Visible=False
    cht.PlotArea.Format.Fill.Visible = False
    cht.PlotArea.Format.Line.Visible = True
    cht.PlotArea.Format.Line.ForeColor.RGB=xw.utils.rgb_to_int((200,200,200))
    #cht.PlotArea.Format.Line.ForeColor.ObjectThemeColor = msoThemeColorText1
    ax1 = cht.Axes(1)
    ax2 = cht.Axes(2)
    ax1.HasTitle = True
    ax1.AxisTitle.Text = 'Categories'
    ax1.AxisTitle.Font.Size = 10
    ax1.TickLabels.Font.Size = 8
    #ax1.TickLabels.NumberFormat = '0.00'
    ax1.HasMajorGridlines = True
    ax2.HasTitle = True
    ax2.AxisTitle.Text = 'Values'
    ax2.AxisTitle.Font.Size = 10
    ax2.TickLabels.Font.Size = 8
    ax2.HasMajorGridlines = True
    cht.HasTitle = True
    #cht.ChartTitle.Caption = 'Plot'
    #cht.ChartTitle.Font.Size = 12

root=os.getcwd()
app=xw.App(visible=True,add_book=False)
wb=app.books.open(root+r'/data.xlsx',read_only=False)
sht=wb.sheets('Sheet1')

sht.api.Range('A2:C11').Select()
shp=sht.api.Shapes.AddChart2(-1, xw.constants.ChartType.xlLine, 20, 20, 350, 220, True)
cht=shp.Chart

set_style(cht)

cht.Export(root+'/cht.jpg')
cht.Export(root+'/cht.svg')
cht.ExportAsFixedFormat(0,root+'/cht.pdf')

#wb.save()
#app.kill()
How to use Application.MacroOptions in the xlwings API way

The MacroOptions member of the Application object in Excel’s object model provides a way to configure settings related to macros, particularly the Macro Recorder. This is useful for developers who need to programmatically control how macros are recorded, such as setting the description, shortcut key, or category for a newly recorded macro. While the primary interface is through Excel VBA, xlwings allows you to access and manipulate this functionality from Python, enabling automation of macro-related setups in Excel workbooks.

In xlwings, you can access the MacroOptions method through the api property of an App or Book object, which exposes the underlying Excel object model. The syntax for calling MacroOptions in xlwings closely mirrors its VBA counterpart, but adapted for Python. The general format is:

app.api.MacroOptions(Macro, Description, HasMenu, MenuText, HasShortcutKey, ShortcutKey, Category, StatusBar, HelpContextID, HelpFile)

Here, app is an instance of xlwings.App, representing the Excel application. The parameters are optional and correspond to the settings you can configure for a macro. Below is a table detailing each parameter:

ParameterTypeDescriptionDefault Value in xlwings (if omitted)
MacroStringThe name of the macro (e.g., “MyMacro”).Required; no default.
DescriptionStringA description for the macro.None (ignored).
HasMenuBooleanTrue to add the macro to a menu; False otherwise.None (ignored).
MenuTextStringThe text to display in the menu if HasMenu is True.None (ignored).
HasShortcutKeyBooleanTrue to assign a shortcut key; False otherwise.None (ignored).
ShortcutKeyStringThe shortcut key (e.g., “Ctrl+Shift+M”).None (ignored).
CategoryStringThe category for the macro (e.g., “Custom Functions”).None (ignored).
StatusBarStringText to display in the status bar when the macro is selected.None (ignored).
HelpContextIDLongThe context ID for Help.None (ignored).
HelpFileStringThe path to the Help file.None (ignored).

In practice, you can use this method to set options for an existing macro or to pre-configure settings before recording. For example, to set a description and shortcut key for a macro named “TestMacro” in an active Excel workbook, you can write the following xlwings code:

import xlwings as xw

# Connect to the active Excel instance or start a new one
app = xw.apps.active

# Configure macro options for "TestMacro"
app.api.MacroOptions(
Macro="TestMacro",
Description="This macro performs a data cleanup operation.",
HasShortcutKey=True,
ShortcutKey="Ctrl+Shift+T"
)

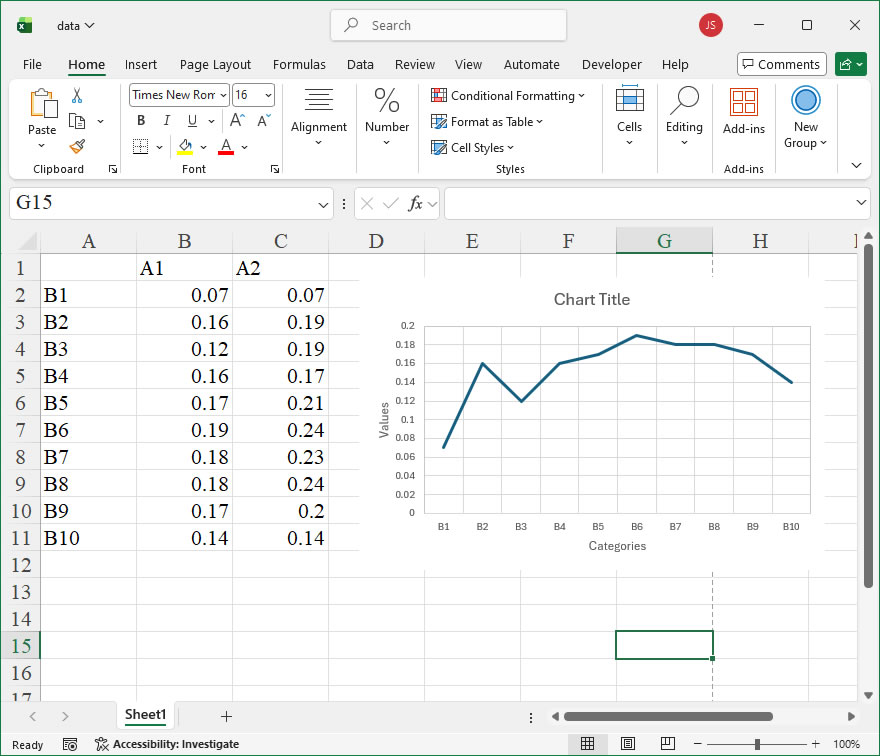
How To Create Simple Line Chart Using xlwings?

Example

Code

import xlwings as xw
import os

def set_style(cht):
    cht.ChartArea.Format.Line.Visible=False
    cht.PlotArea.Format.Fill.Visible = False
    cht.PlotArea.Format.Line.Visible = True
    cht.PlotArea.Format.Line.ForeColor.RGB=xw.utils.rgb_to_int((200,200,200))
    #cht.PlotArea.Format.Line.ForeColor.ObjectThemeColor = msoThemeColorText1
    ax1 = cht.Axes(1)
    ax2 = cht.Axes(2)
    ax1.HasTitle = True
    ax1.AxisTitle.Text = 'Categories'
    ax1.AxisTitle.Font.Size = 10
    ax1.TickLabels.Font.Size = 8
    #ax1.TickLabels.NumberFormat = '0.00'
    ax1.HasMajorGridlines = True
    ax2.HasTitle = True
    ax2.AxisTitle.Text = 'Values'
    ax2.AxisTitle.Font.Size = 10
    ax2.TickLabels.Font.Size = 8
    ax2.HasMajorGridlines = True
    cht.HasTitle = True
    #cht.ChartTitle.Caption = 'Plot'
    #cht.ChartTitle.Font.Size = 12

root=os.getcwd()
app=xw.App(visible=True,add_book=False)
wb=app.books.open(root+r'/data.xlsx',read_only=False)
sht=wb.sheets('Sheet1')

sht.api.Range('A2:B11').Select() 
shp=sht.api.Shapes.AddChart2(-1,xw.constants.ChartType.xlLine,20,20,350,220,True)
cht=shp.Chart

set_style(cht)

cht.Export(root+'/cht.jpg')
cht.Export(root+'/cht.svg')
cht.ExportAsFixedFormat(0,root+'/cht.pdf')

#wb.save()
#app.kill()