Archive

How to use Application.ConvertFormula in the xlwings API way

The Application.ConvertFormula method in Excel is a powerful tool for transforming formula references between different reference styles, such as converting between A1 and R1C1 notation, or between relative, absolute, and mixed references. In xlwings, this functionality is exposed through the api property, allowing Python scripts to leverage Excel’s native conversion capabilities programmatically. This is particularly useful when generating or modifying formulas dynamically, ensuring compatibility across different workbook settings or user preferences.

Functionality
The primary purpose of ConvertFormula is to change the reference style of a formula. It can convert a formula string from the A1 reference style to R1C1, or vice versa. Additionally, it can modify the reference type—converting relative references (like A1) to absolute ($A$1), mixed (A$1 or $A1), or back. This is essential for tasks like template generation, where formulas need to be adjusted based on cell positions, or for macros that interact with formulas in a style-agnostic manner.

Syntax in xlwings
In xlwings, you access this method via the api property of the App or Book objects. The full syntax is:

app.api.ConvertFormula(Formula, FromReferenceStyle, ToReferenceStyle, ToAbsolute, RelativeTo)

The parameters are as follows:

  • Formula (string): The formula string to be converted. This should be provided as text, without a leading equals sign.
  • FromReferenceStyle (int): The reference style of the input formula. Use xlA1 (or 1) for A1 style, and xlR1C1 (or -4150) for R1C1 style.
  • ToReferenceStyle (int): The desired reference style for the output. Same options as FromReferenceStyle.
  • ToAbsolute (int): Specifies the type of absolute reference conversion. This parameter is optional and defaults to xlAbsolute (or 1). The common values are:
  • xlAbsolute (1): Converts to absolute references.
  • xlRelRowAbsColumn (2): Converts to mixed references with relative row and absolute column (e.g., A$1 becomes A1 in relative terms).
  • xlAbsRowRelColumn (3): Converts to mixed references with absolute row and relative column (e.g., $A1 becomes A1 in relative terms).
  • xlRelative (4): Converts to relative references.
  • RelativeTo (object): A Range object that specifies the starting cell for relative references. This is required if ToAbsolute is set to xlRelRowAbsColumn, xlAbsRowRelColumn, or xlRelative. It defines the context for relative conversions.

Code Examples

  1. Converting from A1 to R1C1 style:
import xlwings as xw
app = xw.App(visible=False)
# Convert the formula "SUM(A1:B2)" from A1 to R1C1 style
result = app.api.ConvertFormula("SUM(A1:B2)", 1, -4150)
print(result) # Output: SUM(R1C1:R2C2)
app.quit()
  1. Changing relative references to absolute:
import xlwings as xw
app = xw.App(visible=False)
# Convert "A1+B2" to absolute references in A1 style
result = app.api.ConvertFormula("A1+B2", 1, 1, 1)
print(result) # Output: $A$1+$B$2
app.quit()
  1. Using relative conversion with a specific cell context:
import xlwings as xw
app = xw.App(visible=False)
book = app.books.add()
sheet = book.sheets[0]
# Define the relative starting cell as C3
relative_cell = sheet.range("C3").api
# Convert "A1" to a relative reference based on C3
result = app.api.ConvertFormula("A1", 1, 1, 4, relative_cell)
print(result) # Output: This will be a relative formula like "RC[-2]" in R1C1, but in A1 style, it adjusts accordingly.
book.close()
app.quit()
How To Set Value Range of Value Axis Using xlwings?

Method

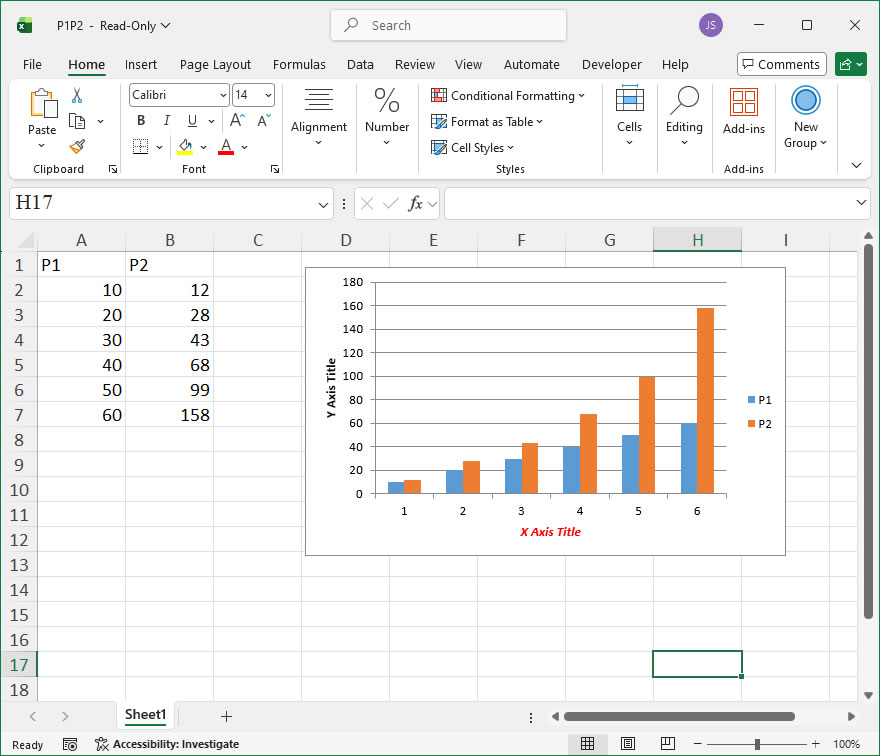
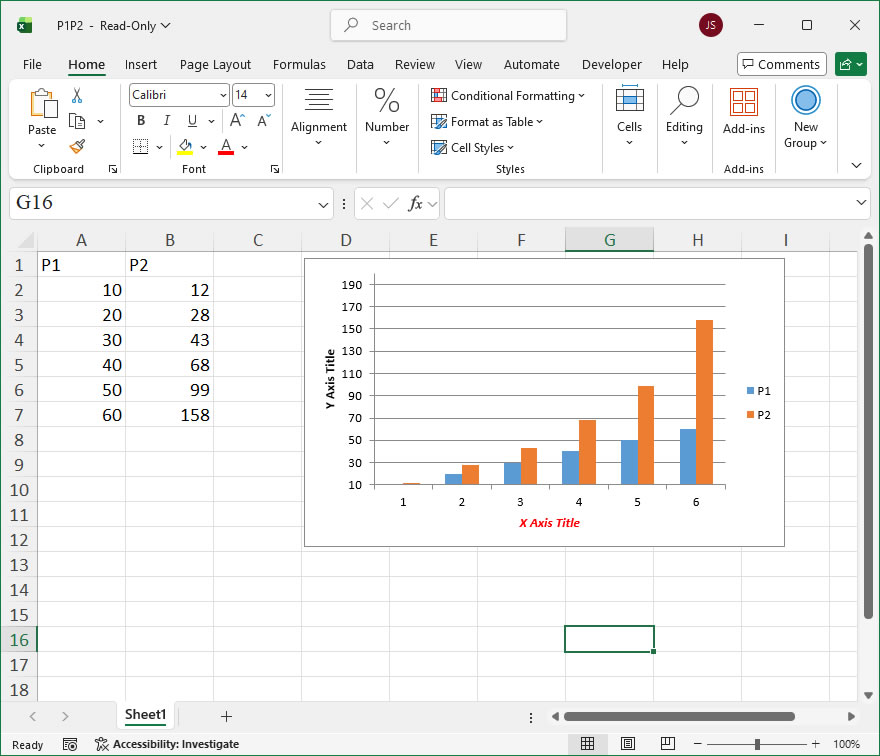
For the vertical axis (which is a value axis), use the **MinimumScale** and **MaximumScale** properties of the vertical axis object to set the minimum and maximum values for the value axis.


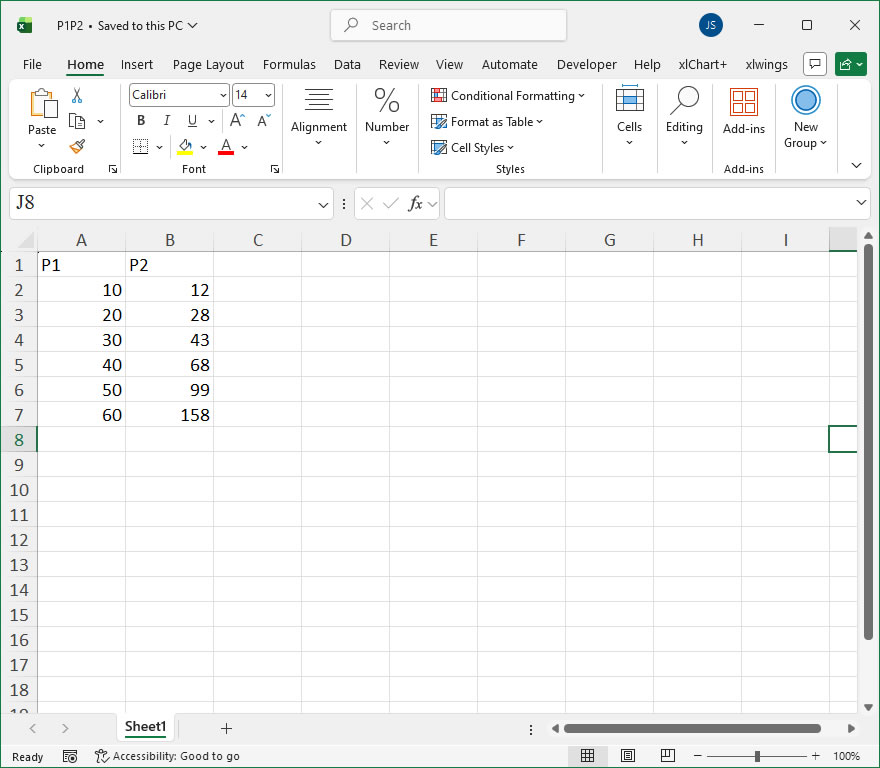
sht.api.Range(‘A1:B7’).Select()    #Data

cht=sht.api.Shapes.AddChart().Chart    #Add chart

axs=cht.Axes(1)    #Horizontal axis

axs2=cht.Axes(2)    #Vertical axis

axs.HasTitle=True    #Horizontal axis has title

axs.AxisTitle.Caption=’X Axis Title’    #Title text

axs.AxisTitle.Font.Italic=True    #Italic font

axs.AxisTitle.Font.Color=xw.utils.rgb_to_int((255,0,0))    #Red

axs2.HasTitle=True    #Vertical axis has title

axs2.AxisTitle.Caption=’Y Axis Title’    #Title text

axs2.AxisTitle.Font.Bold=True    #Bold font

axs2.MinimumScale=10

axs2.MaximumScale=200


Example

Code

#Axis - Value Axis Range

import xlwings as xw
import os

root = os.getcwd()
app = xw.App(visible=True, add_book=False)
wb=app.books.open(root+r'/P1P2.xlsx',read_only=False)
sht=wb.sheets(1)

sht.api.Range('A1:B7').Select()    #Data
cht=sht.api.Shapes.AddChart().Chart    #Add chart
axs=cht.Axes(1)    #Horizontal axis
axs2=cht.Axes(2)    #Vertical axis
axs.HasTitle=True    #Horizontal axis has title
axs.AxisTitle.Caption='X Axis Title'    #Title text
axs.AxisTitle.Font.Italic=True    #Italic font
axs.AxisTitle.Font.Color=xw.utils.rgb_to_int((255,0,0))    #Red
axs2.HasTitle=True    #Vertical axis has title
axs2.AxisTitle.Caption='Y Axis Title'    #Title text
axs2.AxisTitle.Font.Bold=True    #Bold font
axs2.MinimumScale=10
axs2.MaximumScale=200

#wb.save()
#wb.close()
#app.kill()

How to use Application.CheckSpelling in the xlwings API way

The Application.CheckSpelling method in Excel is a useful tool for checking the spelling of a single word or a text string programmatically. When accessed through the xlwings library in Python, it provides a way to integrate Excel’s built-in spelling checker into automated scripts and data processing workflows. This can be particularly valuable for validating user inputs, cleaning text data, or ensuring consistency in reports before they are finalized.

In xlwings, the CheckSpelling method is called from the Application object. The syntax follows the pattern of the Excel Object Model, adapted for Python. The basic xlwings API call format is:

app.api.CheckSpelling(Word, CustomDictionary, IgnoreUppercase, MainDictionary, CustomDictionary2, CustomDictionary3, CustomDictionary4, CustomDictionary5, CustomDictionary6, CustomDictionary7, CustomDictionary8, CustomDictionary9, CustomDictionary10)

The parameters are:

  • Word (Required, String): The word or text string you want to check.
  • CustomDictionary (Optional, String): The file name of the custom dictionary to examine if the word is not found in the main dictionary. The default is an empty string.
  • IgnoreUppercase (Optional, Boolean): True to ignore words in all uppercase letters. False to check them. The default is False.
  • MainDictionary (Optional, Variant): This can be a language identifier (e.g., “en-US”) or a constant representing a built-in dictionary. It is often left as an optional argument in xlwings, defaulting to the application’s current language setting.
  • CustomDictionary2 to CustomDictionary10 (Optional, String): Additional custom dictionary file names.

The method returns a Boolean value. It returns True if the word is found in at least one of the specified dictionaries, and False if it is not found in any. This allows you to use the method in conditional logic within your Python code.

Here are two practical xlwings code examples:

Example 1: Checking a Single Word
This example checks if the word “Analyzze” is spelled correctly according to Excel’s dictionaries.

import xlwings as xw

# Connect to the active Excel instance or start a new one
app = xw.apps.active

# Check the spelling of a word
word_to_check = "Analyzze"
is_correct = app.api.CheckSpelling(word_to_check)

if is_correct:
    print(f"'{word_to_check}' is spelled correctly.")
else:
    print(f"'{word_to_check}' is misspelled.")
    # This will output: 'Analyzze' is misspelled.

Example 2: Checking Multiple Words from a List
This example demonstrates iterating through a list of potential product codes or terms, using the spelling checker as a simple validation filter, and ignoring terms that are in all caps.

import xlwings as xw

app = xw.apps.active

term_list = ["Project", "XYZZY", "Maintainance", "API", "Delevopment"]
valid_terms = []
flagged_terms = []

for term in term_list:
    # Check spelling, ignoring words in all uppercase
    if app.api.CheckSpelling(term, IgnoreUppercase=True):
        valid_terms.append(term)
    else:
        flagged_terms.append(term)

print("Terms considered valid:", valid_terms)
print("Terms flagged for review:", flagged_terms)
# Expected output:
# Terms considered valid: ['Project', 'XYZZY', 'API']
# Terms flagged for review: ['Maintainance', 'Delevopment']

How To Set Axis Title Using xlwings?

Method

Use the **HasTitle** property of the **Axis** object to set whether the axis title is displayed, and the **AxisTitle** property to set the text content of the axis title. Note that the **HasTitle** property must be set to `True` before the **AxisTitle** property can be set. The **AxisTitle** property returns an **AxisTitle** object, which you can use to set the title text and font for the axis.

sht.api.Range(‘A1:B7’).Select()    #Data

cht=sht.api.Shapes.AddChart().Chart    #Add chart

axs=cht.Axes(1)    #Horizontal axis

axs2=cht.Axes(2)    #Vertical axis

axs.HasTitle=True    #Horizontal axis has title

axs.AxisTitle.Caption=’X Axis Title’    #Title text

axs.AxisTitle.Font.Italic=True    #Italic font

axs.AxisTitle.Font.Color=xw.utils.rgb_to_int((255,0,0))    #Red

axs2.HasTitle=True    #Vertical axis has title

axs2.AxisTitle.Caption=’Y Axis Title’    #Title text

axs2.AxisTitle.Font.Bold=True    #Bold font


Example

Code

#Axis Titles

import xlwings as xw
import os

root = os.getcwd()
app = xw.App(visible=True, add_book=False)
wb=app.books.open(root+r'/P1P2.xlsx',read_only=False)
sht=wb.sheets(1)

sht.api.Range('A1:B7').Select()    #Data
cht=sht.api.Shapes.AddChart().Chart    #Add chart
axs=cht.Axes(1)    #Horizontal axis
axs2=cht.Axes(2)    #Vertical axis
axs.HasTitle=True    #Horizontal axis has title
axs.AxisTitle.Caption='X Axis Title'    #Title text
axs.AxisTitle.Font.Italic=True    #Italic font
axs.AxisTitle.Font.Color=xw.utils.rgb_to_int((255,0,0))    #Red
axs2.HasTitle=True    #Vertical axis has title
axs2.AxisTitle.Caption='Y Axis Title'    #Title text
axs2.AxisTitle.Font.Bold=True    #Bold font

#wb.save()
#wb.close()
#app.kill()

How to use Application.CheckAbort in the xlwings API way

The Application.CheckAbort member in Excel’s object model is a property that allows developers to check whether a user has requested to abort a running macro or operation, typically by pressing the Esc key or Ctrl+Break. In xlwings, this functionality is accessed through the Application object, enabling you to programmatically determine if an abort has been initiated, which is useful for implementing graceful termination in long-running scripts. This property is read-only and returns a Boolean value, indicating the state of the abort request.

In xlwings, the Application.CheckAbort property is accessed via the api property of the App or Book objects, which provides direct access to the underlying Excel object model. The syntax for using it in xlwings is as follows:

app = xw.apps.active # Get the active Excel application
check_abort = app.api.CheckAbort

Here, app is an instance of the xlwings App object, and app.api exposes the native Excel Application object. The CheckAbort property does not take any parameters. It returns True if an abort has been requested by the user, and False otherwise. This property is typically used within loops or iterative processes to check for user interruptions, allowing the code to exit cleanly without causing errors or crashes.

For example, consider a scenario where you are processing a large dataset in Excel using xlwings, and you want to allow the user to cancel the operation. You can periodically check the Application.CheckAbort property within a loop. Below is a code instance demonstrating its usage:

import xlwings as xw
import time

# Connect to the active Excel application
app = xw.apps.active

# Simulate a long-running process, such as iterating through rows
for i in range(1, 10001):
    # Check if the user has requested an abort
    if app.api.CheckAbort:
        print("Abort requested by user. Exiting loop.")
        break

    # Perform some operation, e.g., updating a cell value
    sheet = app.books.active.sheets[0]
    sheet.range(f'A{i}').value = f'Processed row {i}'

    # Simulate a delay to mimic processing time
    time.sleep(0.01)

# Optional: Update status every 1000 iterations
if i % 1000 == 0:
    print(f"Processed {i} rows...")

print("Process completed or aborted.")

In this example, the loop iterates through 10,000 rows, updating cells in column A. Before each iteration, it checks app.api.CheckAbort. If the user presses Esc or Ctrl+Break during execution, the property becomes True, triggering the break statement to exit the loop early. This ensures that the macro stops gracefully, and a message is printed to indicate the abort. Without this check, the user might have to force-close Excel or encounter unresponsive behavior.

How To Set Axis Using xlwings?

Method

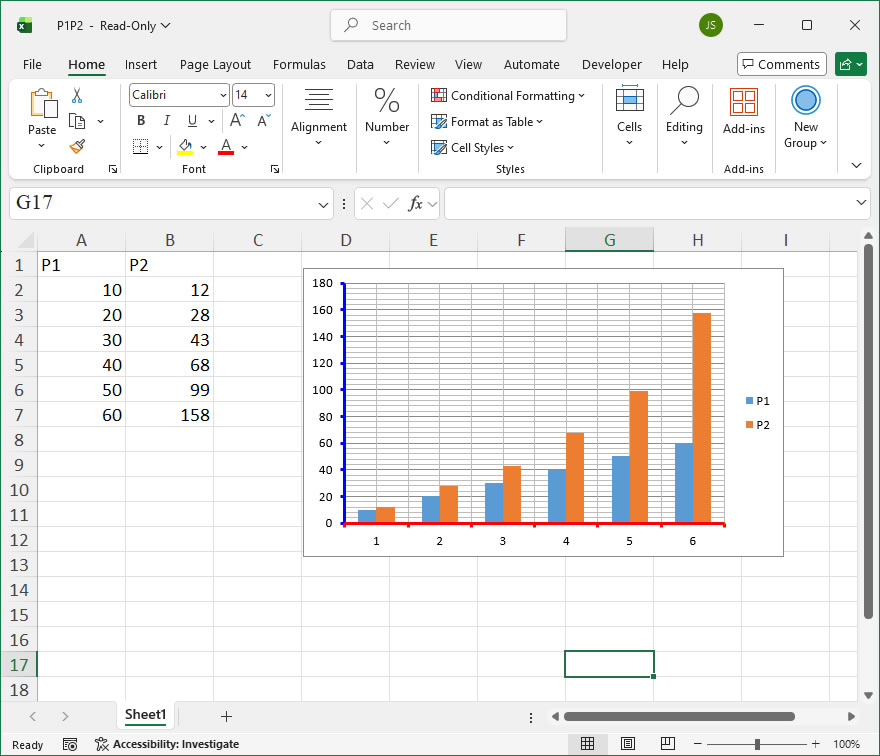
The Border property returns the axis’s border properties.

– ColorIndex property

– Weight property

– DashStyle property


sht.api.Range(“A1:B7”).Select()    #Data

cht=sht.api.Shapes.AddChart().Chart    #Add chart

axs=cht.Axes(1)    #Horizontal axis

axs.Border.ColorIndex=3    #Red

axs.Border.Weight=3    #Line width

axs.HasMinorGridlines=True    #Show minor gridlines

axs2=cht.Axes(2)    #Vertical axis

axs2.Border.Color=xw.utils.rgb_to_int((0,0,255))    #Blue

axs2.Border.Weight=3    #Line width

axs2.HasMinorGridlines=True    #Show minor gridlines


Example

Code

#Axis Settings

import xlwings as xw
import os

root = os.getcwd()
app = xw.App(visible=True, add_book=False)
wb=app.books.open(root+r"/P1P2.xlsx",read_only=False)
sht=wb.sheets(1)

sht.api.Range("A1:B7").Select()    #Data
cht=sht.api.Shapes.AddChart().Chart    #Add chart
axs=cht.Axes(1)    #Horizontal axis
axs.Border.ColorIndex=3    #Red
axs.Border.Weight=3    #Line width
axs.HasMinorGridlines=True    #Show minor gridlines
axs2=cht.Axes(2)    #Vertical axis
axs2.Border.Color=xw.utils.rgb_to_int((0,0,255))    #Blue
axs2.Border.Weight=3    #Line width
axs2.HasMinorGridlines=True    #Show minor gridlines

#wb.save()
#wb.close()
#app.kill()

How to use Application.CentimetersToPoints in the xlwings API way

The Application.CentimetersToPoints method in Excel’s object model is a utility function that converts a measurement from centimeters to points. In the context of xlwings, which provides a Pythonic interface to automate Excel, this method is accessible through the Application object. It is particularly useful when you need to set dimensions, such as row heights, column widths, or shape sizes, in points—Excel’s native unit for such measurements—while working with centimeter-based data. This conversion ensures precision and consistency in layout and formatting tasks, especially in international settings where centimeters are a common metric unit.

Syntax in xlwings:
In xlwings, you call this method via the app object, which represents the Excel application. The syntax is:
app.api.CentimetersToPoints(Centimeters)

  • Centimeters: Required. A numeric value or expression representing the length in centimeters that you want to convert to points. This parameter can be a single number, a variable, or a calculated result.
    The method returns a Single (floating-point) value representing the equivalent measurement in points. Note that 1 centimeter is approximately equal to 28.3465 points in Excel, as points are defined as 1/72 of an inch, and 1 inch equals 2.54 centimeters.

Example Usage with xlwings:
Below are practical examples demonstrating how to use CentimetersToPoints in xlwings for various Excel automation tasks. These examples assume you have an Excel application instance running via xlwings.

  1. Converting a Single Measurement:
    This example converts 5 centimeters to points and prints the result. It is useful for quick calculations or debugging.
import xlwings as xw
app = xw.App(visible=False) # Start Excel in the background
points_value = app.api.CentimetersToPoints(5)
print(f"5 cm is equal to {points_value} points.") # Output: ~141.7325 points
app.quit()
  1. Setting Column Width Based on Centimeters:
    Here, we set the width of column A in the active workbook to a specific centimeter value by converting it to points. Excel’s column width is measured in points (or character units, but points are used for precise control via API).
import xlwings as xw
app = xw.App(visible=True)
wb = app.books.active
ws = wb.sheets[0]
# Convert 3.5 cm to points and set as column width for column A
width_in_points = app.api.CentimetersToPoints(3.5)
ws.api.Columns("A").ColumnWidth = width_in_points
wb.save()
app.quit()
  1. Adjusting Row Height Dynamically:
    This example uses a loop to set row heights for multiple rows based on a list of centimeter values. It showcases how to integrate the conversion into batch operations.
import xlwings as xw
app = xw.App(visible=False)
wb = app.books.add()
ws = wb.sheets[0]
cm_heights = [2.0, 2.5, 3.0] # Heights in centimeters for rows 1 to 3
for i, cm in enumerate(cm_heights, start=1):
points_height = app.api.CentimetersToPoints(cm)
ws.api.Rows(i).RowHeight = points_height
wb.save("adjusted_heights.xlsx")
app.quit()
  1. Calculating Shape Dimensions:
    When adding or resizing shapes, you might need to specify sizes in points. This example creates a rectangle with width and height derived from centimeter measurements.
import xlwings as xw
app = xw.App(visible=True)
wb = app.books.active
ws = wb.sheets[0]
# Define dimensions in centimeters
width_cm, height_cm = 4.0, 2.0
width_pts = app.api.CentimetersToPoints(width_cm)
height_pts = app.api.CentimetersToPoints(height_cm)
# Add a rectangle shape at position (100, 100) with converted dimensions
shape = ws.shapes.add_shape(
1, # Type: rectangle
100, 100, # Left and top positions in points
width_pts, height_pts
)
shape.name = "MetricRectangle"
wb.save()
app.quit()