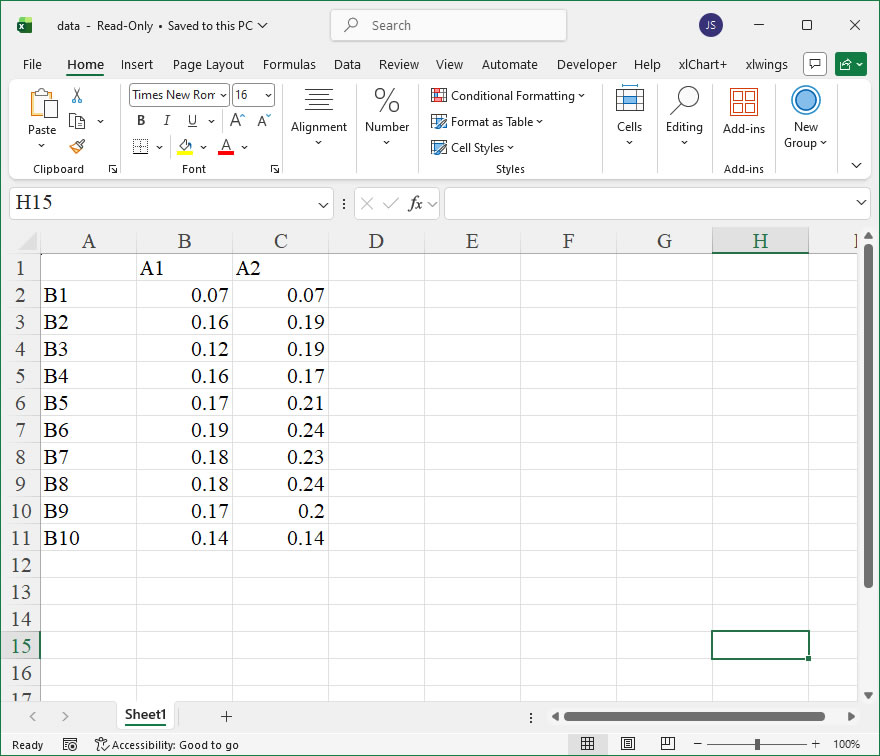
Archive

How To Create 3D Area Chart Using xlwings? 3

Example

Code

import xlwings as xw
import os

def set_style(cht):
    cht.ChartArea.Format.Line.Visible=False
    cht.PlotArea.Format.Fill.Visible = False
    cht.PlotArea.Format.Line.Visible = False
    cht.PlotArea.Format.Line.ForeColor.RGB=xw.utils.rgb_to_int((200,200,200))
    #cht.PlotArea.Format.Line.ForeColor.ObjectThemeColor = msoThemeColorText1
    ax1 = cht.Axes(1)
    ax2 = cht.Axes(2)
    ax1.HasTitle = True
    ax1.AxisTitle.Text = 'Categories'
    ax1.AxisTitle.Font.Size = 10
    ax1.TickLabels.Font.Size = 8
    #ax1.TickLabels.NumberFormat = '0.00'
    ax1.HasMajorGridlines = False
    ax2.HasTitle = True
    ax2.AxisTitle.Text = 'Values'
    ax2.AxisTitle.Font.Size = 10
    ax2.TickLabels.Font.Size = 8
    ax2.HasMajorGridlines = False
    cht.HasTitle = True
    #cht.ChartTitle.Caption = 'Plot'
    #cht.ChartTitle.Font.Size = 12

root=os.getcwd()
app=xw.App(visible=True,add_book=False)
wb=app.books.open(root+r'/data.xlsx',read_only=False)
sht=wb.sheets('Sheet1')

sht.api.Range('A2:D10').Select()  #
shp=sht.api.Shapes.AddChart2(-1,xw.constants.ChartType.xl3DAreaStacked100,20,20,350,250,True)
cht=shp.Chart  #

set_style(cht)

cht.Export(root+'/cht.jpg')
cht.Export(root+'/cht.svg')
cht.ExportAsFixedFormat(0,root+'/cht.pdf')

#wb.save()
#app.kill()

How to use Application.AlertBeforeOverwriting in the xlwings API way

The AlertBeforeOverwriting property of the Application object in Excel is a useful setting that controls whether Excel displays a warning message before overwriting existing non-blank cells when performing operations like dragging or filling data. This feature helps prevent accidental data loss by prompting users to confirm the action. In xlwings, you can access and modify this property through the api property, which provides direct access to the underlying Excel object model.

Functionality:
The AlertBeforeOverwriting property is a boolean value. When set to True, Excel will show an alert dialog box if an operation would overwrite non-empty cells, giving the user the option to cancel or proceed. When set to False, no warning is issued, and data is overwritten silently. This is particularly relevant in automated scripts where you might want to suppress prompts to ensure uninterrupted execution.

Syntax:
In xlwings, the property is accessed via the Application object. The general syntax is:

app.AlertBeforeOverwriting
  • Get the current value: current_setting = app.AlertBeforeOverwriting
  • Set the value: app.AlertBeforeOverwriting = True or app.AlertBeforeOverwriting = False

Here, app refers to the xlwings App instance, which represents the Excel application. The property does not take any parameters; it is a simple read/write boolean property.

Example Usage:
Below are practical xlwings API code examples demonstrating how to use the AlertBeforeOverwriting property.

  1. Checking the Current Setting:
    This example retrieves the current state of the alert setting and prints it.
import xlwings as xw

# Connect to the active Excel instance
app = xw.apps.active
# Get the current AlertBeforeOverwriting value
alert_status = app.AlertBeforeOverwriting
print(f"AlertBeforeOverwriting is currently set to: {alert_status}")
  1. Disabling Alerts to Overwrite Data:
    In automated tasks, you might want to turn off alerts to avoid interruptions. This example sets the property to False, performs a data fill operation that would overwrite cells, and then restores the original setting.
import xlwings as xw

app = xlwings.apps.active
# Save the original setting
original_setting = app.AlertBeforeOverwriting

# Disable overwrite alerts
app.AlertBeforeOverwriting = False

# Perform an operation that overwrites data (e.g., filling a range)
wb = app.books.active
sheet = wb.sheets['Sheet1']
# Overwrite cells A1:A5 with new values
sheet.range('A1:A5').value = [10, 20, 30, 40, 50]

# Restore the original alert setting
app.AlertBeforeOverwriting = original_setting
print("Operation completed with alerts temporarily disabled.")
  1. Enabling Alerts for Safe Operations:
    To ensure user confirmation during manual-like operations in a script, you can enable the alert.
import xlwings as xw

app = xlwings.apps.active
# Ensure alerts are enabled
app.AlertBeforeOverwriting = True

# Now, if a range with data is overwritten, Excel will show a prompt
wb = app.books.active
sheet = wb.sheets['Sheet1']
# Attempt to overwrite non-empty cells (this will trigger an alert if cells contain data)
sheet.range('B1:B3').value = ['New', 'Data', 'Here']
# Note: In an interactive session, the alert dialog would appear, pausing the script until user response.

How To Create 3D Area Chart Using xlwings? 2

Example

Code

import xlwings as xw
import os

def set_style(cht):
    cht.ChartArea.Format.Line.Visible=False
    cht.PlotArea.Format.Fill.Visible = False
    cht.PlotArea.Format.Line.Visible = False
    cht.PlotArea.Format.Line.ForeColor.RGB=xw.utils.rgb_to_int((200,200,200))
    #cht.PlotArea.Format.Line.ForeColor.ObjectThemeColor = msoThemeColorText1
    ax1 = cht.Axes(1)
    ax2 = cht.Axes(2)
    ax1.HasTitle = True
    ax1.AxisTitle.Text = 'Categories'
    ax1.AxisTitle.Font.Size = 10
    ax1.TickLabels.Font.Size = 8
    #ax1.TickLabels.NumberFormat = '0.00'
    ax1.HasMajorGridlines = False
    ax2.HasTitle = True
    ax2.AxisTitle.Text = 'Values'
    ax2.AxisTitle.Font.Size = 10
    ax2.TickLabels.Font.Size = 8
    ax2.HasMajorGridlines = False
    cht.HasTitle = True
    #cht.ChartTitle.Caption = 'Plot'
    #cht.ChartTitle.Font.Size = 12

root=os.getcwd()
app=xw.App(visible=True,add_book=False)
wb=app.books.open(root+r'/data.xlsx',read_only=False)
sht=wb.sheets('Sheet1')

sht.api.Range('A2:D10').Select()  #
shp=sht.api.Shapes.AddChart2(-1,xw.constants.ChartType.xl3DAreaStacked,20,20,350,250,True)
cht=shp.Chart  #

set_style(cht)

cht.Export(root+'/cht.jpg')
cht.Export(root+'/cht.svg')
cht.ExportAsFixedFormat(0,root+'/cht.pdf')

#wb.save()
#app.kill()

How to use Application.AddIns2 in the xlwings API way

In the Excel object model, the Application.AddIns2 property returns an AddIns2 collection that represents all the add-ins currently available to Excel, including both installed add-ins and those that are simply listed in the add-in manager. This collection is more modern than the older AddIns collection, as it includes both COM add-ins and automation add-ins. In xlwings, you can access this property to inspect, manage, or manipulate Excel add-ins programmatically using Python. This is particularly useful for automating tasks that involve checking add-in availability, loading or unloading add-ins, or retrieving information about them for administrative or development purposes.

The xlwings API provides a straightforward way to interact with the Application.AddIns2 property. The syntax for accessing it is through the app object, which represents the Excel application. Specifically, you can use app.api.AddIns2 to get the underlying COM object, allowing you to call its methods and properties. The AddIns2 collection has members such as Count, Item, and Add, which can be used to iterate over add-ins, retrieve specific ones, or install new ones. For example, the Item method takes an index (either a numeric position or a string name) to return a specific AddIn object. Each AddIn object has properties like Name, FullName, Installed, and Path, which provide details about the add-in.

To illustrate, here is a simple xlwings code example that lists all available add-ins and their installation status:

import xlwings as xw

# Connect to the active Excel instance
app = xw.apps.active

# Access the AddIns2 collection
addins2 = app.api.AddIns2

# Print the count of add-ins
print(f"Total add-ins available: {addins2.Count}")

# Iterate through each add-in and display details
for i in range(1, addins2.Count + 1):
    addin = addins2.Item(i)
    print(f"Name: {addin.Name}, Installed: {addin.Installed}, Path: {addin.Path}")

Another example demonstrates how to install an add-in using the Add method. This method requires the full file path of the add-in file (typically with a .xlam or .xll extension) and an optional boolean parameter to specify whether to copy the file to the add-in directory. The method returns the AddIn object for the newly added add-in, which can then be manipulated further:

import xlwings as xw

app = xw.apps.active
addins2 = app.api.AddIns2

# Add a new add-in from a specified path
addin_path = r"C:\Path\To\Your\AddIn.xlam"
new_addin = addins2.Add(addin_path, True) # True copies the file to the add-in directory

# Check if it's installed and install it if not
if not new_addin.Installed:
    new_addin.Installed = True
    print(f"Add-in '{new_addin.Name}' has been installed.")
else:
    print(f"Add-in '{new_addin.Name}' is already installed.")

How To Create 3D Area Chart Using xlwings?

Example

Code

import xlwings as xw
import os

def set_style(cht):
    cht.ChartArea.Format.Line.Visible=False
    cht.PlotArea.Format.Fill.Visible = False
    cht.PlotArea.Format.Line.Visible = False
    cht.PlotArea.Format.Line.ForeColor.RGB=xw.utils.rgb_to_int((200,200,200))
    #cht.PlotArea.Format.Line.ForeColor.ObjectThemeColor = msoThemeColorText1
    ax1 = cht.Axes(1)
    ax2 = cht.Axes(2)
    ax1.HasTitle = True
    ax1.AxisTitle.Text = 'Categories'
    ax1.AxisTitle.Font.Size = 10
    ax1.TickLabels.Font.Size = 8
    #ax1.TickLabels.NumberFormat = '0.00'
    ax1.HasMajorGridlines = False
    ax2.HasTitle = True
    ax2.AxisTitle.Text = 'Values'
    ax2.AxisTitle.Font.Size = 10
    ax2.TickLabels.Font.Size = 8
    ax2.HasMajorGridlines = False
    cht.HasTitle = True
    #cht.ChartTitle.Caption = 'Plot'
    #cht.ChartTitle.Font.Size = 12

root=os.getcwd()
app=xw.App(visible=True,add_book=False)
wb=app.books.open(root+r'/data.xlsx',read_only=False)
sht=wb.sheets('Sheet1')

sht.api.Range('A2:B10').Select()  #
shp=sht.api.Shapes.AddChart2(-1,xw.constants.ChartType.xl3DArea,20,20,350,250,True)
cht=shp.Chart  #
cht.SeriesCollection(1).Format.Fill.ForeColor.RGB=xw.utils.rgb_to_int((0,176,80))

set_style(cht)

cht.Export(root+'/cht.jpg')
cht.Export(root+'/cht.svg')
cht.ExportAsFixedFormat(0,root+'/cht.pdf')

#wb.save()
#app.kill()

How to use Application.AddIns in the xlwings API way

The Application.AddIns property in Excel’s object model provides access to the collection of add-ins currently available or installed. In xlwings, this functionality is exposed through the api property, which grants direct access to the underlying Excel COM objects. This allows Python scripts to programmatically inspect, manage, and interact with Excel add-ins, which are supplemental programs that extend Excel’s capabilities. Using xlwings, you can retrieve information about these add-ins, such as their names, installation status, and file paths, enabling automation tasks like checking for required add-ins before executing dependent macros or functions.

Syntax in xlwings:
The property is accessed via the Application object. In xlwings, the Application is typically represented by the app object when you instantiate a connection to Excel. The syntax is:

addins_collection = app.api.AddIns

This returns an AddIns collection object. From this collection, you can access individual AddIn objects by index or name. Key properties and methods of the AddIn object include:

  • Name: Returns the name of the add-in as a string.
  • FullName: Returns the full file path of the add-in.
  • Installed: A boolean property that gets or sets whether the add-in is installed (i.e., loaded in Excel). Setting this to True loads the add-in; setting it to False unloads it.
  • Title: Often returns the same as Name, but can be the display title.

To retrieve a specific add-in, you can use:

specific_addin = app.api.AddIns("Add-In Name")

or by index (1-based):

first_addin = app.api.AddIns(1)

Example Usage:
Below is a practical xlwings code example that demonstrates how to work with the AddIns collection. This script lists all available add-ins, checks if a specific add-in is installed, and toggles its installation status.

import xlwings as xw

# Connect to the active Excel instance
app = xw.apps.active

# Access the AddIns collection
addins = app.api.AddIns

# List all add-ins with their details
print("Available Add-Ins:")
for i in range(1, addins.Count + 1):
    addin = addins(i)
    print(f"Name: {addin.Name}, Path: {addin.FullName}, Installed: {addin.Installed}")

    # Check and manage a specific add-in, e.g., "Analysis ToolPak"
    target_addin_name = "Analysis ToolPak"
try:
    target_addin = app.api.AddIns(target_addin_name)
    print(f"\nFound '{target_addin_name}'. Currently installed: {target_addin.Installed}")

    # Toggle the installation status
    target_addin.Installed = not target_addin.Installed
    print(f"Toggled installation. Now installed: {target_addin.Installed}")
except Exception as e:
    print(f"Add-in '{target_addin_name}' not found or error: {e}")

# Note: Changes to Installed property take effect immediately in Excel.

How To Create Gradient Filled Stacked Area Chart Using xlwings?

Example

Code

import xlwings as xw
import os

def set_style(cht):
    cht.ChartArea.Format.Line.Visible=False
    cht.PlotArea.Format.Fill.Visible = False
    cht.PlotArea.Format.Line.Visible = True
    cht.PlotArea.Format.Line.ForeColor.RGB=xw.utils.rgb_to_int((200,200,200))
    #cht.PlotArea.Format.Line.ForeColor.ObjectThemeColor = msoThemeColorText1
    ax1 = cht.Axes(1)
    ax2 = cht.Axes(2)
    ax1.HasTitle = True
    ax1.AxisTitle.Text = 'Categories'
    ax1.AxisTitle.Font.Size = 10
    ax1.TickLabels.Font.Size = 8
    #ax1.TickLabels.NumberFormat = '0.00'
    ax1.HasMajorGridlines = False
    ax2.HasTitle = True
    ax2.AxisTitle.Text = 'Values'
    ax2.AxisTitle.Font.Size = 10
    ax2.TickLabels.Font.Size = 8
    ax2.HasMajorGridlines = False
    cht.HasTitle = True
    #cht.ChartTitle.Caption = 'Plot'
    #cht.ChartTitle.Font.Size = 12

root=os.getcwd()
app=xw.App(visible=True,add_book=False)
wb=app.books.open(root+r'/data.xlsx',read_only=False)
sht=wb.sheets('Sheet1')

sht.api.Range('A2:D10').Select()  #
shp=sht.api.Shapes.AddChart2(-1,xw.constants.ChartType.xlAreaStacked,20,20,350,250,True)
cht=shp.Chart  #
cht.SeriesCollection(1).Format.Fill.ForeColor.RGB=xw.utils.rgb_to_int((0,0,255))
cht.SeriesCollection(1).Format.Fill.OneColorGradient(1,1,1)
cht.SeriesCollection(2).Format.Fill.ForeColor.RGB=xw.utils.rgb_to_int((0,176,80))
cht.SeriesCollection(2).Format.Fill.OneColorGradient(1,1,1)
cht.SeriesCollection(3).Format.Fill.ForeColor.RGB=xw.utils.rgb_to_int((255,128,0))
cht.SeriesCollection(3).Format.Fill.OneColorGradient(1,1,1)

set_style(cht)

cht.Export(root+'/cht.jpg')
cht.Export(root+'/cht.svg')
cht.ExportAsFixedFormat(0,root+'/cht.pdf')

#wb.save()
#app.kill()

How to use Application.ActiveWorkbook in the xlwings API way

The Application.ActiveWorkbook property in Excel’s object model refers to the currently active workbook in the Excel application. In xlwings, this is accessed through the app object, which represents the Excel application instance. The ActiveWorkbook property is crucial for automating tasks that require interaction with the workbook that the user is currently viewing or editing, enabling dynamic data manipulation and analysis without hardcoding workbook names.

Functionality:
ActiveWorkbook allows you to retrieve a reference to the workbook that is currently active in Excel. This is useful when you want to perform operations on the workbook that is open and in focus, such as reading data, modifying sheets, or saving changes. It helps in creating flexible scripts that adapt to the user’s current context, reducing the need for manual selection or specification of workbook paths.

Syntax in xlwings:
In xlwings, you can access the active workbook via the app object. The syntax is straightforward:

import xlwings as xw

# Connect to the active Excel instance
app = xw.apps.active # or xw.App() for a new instance if needed
active_wb = app.books.active

Here, app.books.active returns the active workbook object. If no workbook is open, this may raise an error, so it’s good practice to check for open workbooks first. The active_wb object can then be used to access worksheets, ranges, and other properties.

Parameters and Usage:
The property does not take any parameters. It simply returns the workbook that is currently active. In cases where multiple Excel instances are running, xw.apps.active ensures you target the correct application. To avoid errors, you can verify activity status:

if app.books:
    active_wb = app.books.active
    print(f"Active workbook: {active_wb.name}")
else:
    print("No workbooks open.")

Code Examples:
Below are practical examples demonstrating the use of ActiveWorkbook in xlwings for common tasks:

  1. Reading Data from the Active Workbook:
    This example reads a range of data from the first worksheet in the active workbook.
import xlwings as xw

app = xw.apps.active
active_wb = app.books.active
sheet = active_wb.sheets[0] # Access the first sheet
data_range = sheet.range('A1:D10').value # Read values from A1 to D10
print(data_range)
  1. Modifying the Active Workbook:
    Here, we add a new worksheet and populate it with data.
import xlwings as xw

app = xw.apps.active
active_wb = app.books.active
new_sheet = active_wb.sheets.add(name='Analysis')
new_sheet.range('A1').value = ['Category', 'Value']
new_sheet.range('A2').value = [['Sales', 1000], ['Expenses', 500]]
active_wb.save() # Save changes to the active workbook
  1. Automating Chart Creation in the Active Workbook:
    This snippet creates a simple chart based on data in the active workbook.
import xlwings as xw

app = xw.apps.active
active_wb = app.books.active
sheet = active_wb.sheets[0]
chart = sheet.charts.add() # Add a new chart
chart.set_source_data(sheet.range('A1:B5'))
chart.chart_type = 'line'
chart.name = 'Trend Analysis'
  1. Handling Multiple Workbooks:
    If you need to switch between workbooks, ActiveWorkbook can be used to ensure operations target the correct one.
import xlwings as xw

app = xw.apps.active
# Assume two workbooks are open; activate one and then use active workbook
app.books['Workbook1.xlsx'].activate()
active_wb = app.books.active
print(f"Now active: {active_wb.name}") # Output: Workbook1.xlsx

How To Create 100% Stacked Area Chart Using xlwings?

Example

Code

import xlwings as xw
import os

def set_style(cht):
    cht.ChartArea.Format.Line.Visible=False
    cht.PlotArea.Format.Fill.Visible = False
    cht.PlotArea.Format.Line.Visible = True
    cht.PlotArea.Format.Line.ForeColor.RGB=xw.utils.rgb_to_int((200,200,200))
    #cht.PlotArea.Format.Line.ForeColor.ObjectThemeColor = msoThemeColorText1
    ax1 = cht.Axes(1)
    ax2 = cht.Axes(2)
    ax1.HasTitle = True
    ax1.AxisTitle.Text = 'Categories'
    ax1.AxisTitle.Font.Size = 10
    ax1.TickLabels.Font.Size = 8
    #ax1.TickLabels.NumberFormat = '0.00'
    ax1.HasMajorGridlines = False
    ax2.HasTitle = True
    ax2.AxisTitle.Text = 'Values'
    ax2.AxisTitle.Font.Size = 10
    ax2.TickLabels.Font.Size = 8
    ax2.HasMajorGridlines = False
    cht.HasTitle = True
    #cht.ChartTitle.Caption = 'Plot'
    #cht.ChartTitle.Font.Size = 12

root=os.getcwd()
app=xw.App(visible=True,add_book=False)
wb=app.books.open(root+r'/data.xlsx',read_only=False)
sht=wb.sheets('Sheet1')

sht.api.Range('A1:C10').Select()  #
shp=sht.api.Shapes.AddChart2(-1,xw.constants.ChartType.xlAreaStacked100,20,20,350,250,True)
cht=shp.Chart  #

set_style(cht)

cht.Export(root+'/cht.jpg')
cht.Export(root+'/cht.svg')
cht.ExportAsFixedFormat(0,root+'/cht.pdf')

#wb.save()
#app.kill()

How to use Application.ActiveWindow in the xlwings API way

The Application.ActiveWindow property in Excel’s object model is a crucial component for interacting with the currently active workbook window through xlwings. It returns a Window object that represents the topmost window in the application’s window stack. This property is read-only, meaning you cannot set a specific window as active directly via this property; instead, you activate a window using the Window.Activate method. The primary functionality of ActiveWindow is to allow developers to inspect and manipulate properties of the active window, such as its view settings, zoom level, scroll positions, and split panes, enabling dynamic control over the user’s interface during automation tasks.

In xlwings, the API call for accessing the ActiveWindow property is straightforward. The syntax follows the pattern of chaining properties from the main App object, which represents the Excel application instance. The typical usage is: app.api.ActiveWindow. Here, app is an instance of xlwings.App connected to a running Excel application. The .api attribute provides direct access to the underlying COM object model, allowing you to call native Excel VBA properties and methods. The ActiveWindow property does not take any parameters. Once accessed, it returns a Window object, from which you can further access its members, such as Window.View, Window.Zoom, or Window.ScrollRow.

For example, to retrieve and print the current zoom percentage of the active window, you can use the following xlwings code:

import xlwings as xw

# Connect to the active Excel instance
app = xw.apps.active

# Access the ActiveWindow property
active_window = app.api.ActiveWindow

# Get the zoom level (property returns an integer)
zoom_level = active_window.Zoom
print(f"The active window zoom level is: {zoom_level}%")

Another common use case is to control the scroll position of the active window. You can set the first visible row and column to customize what data is in view. The following example demonstrates how to scroll to a specific cell location:

import xlwings as xw

app = xw.apps.active
active_window = app.api.ActiveWindow

# Scroll to make row 50 and column C (3) visible at the top-left corner
active_window.ScrollRow = 50
active_window.ScrollColumn = 3

Additionally, you can check and modify the window view, such as switching between normal view and page break preview. This is useful when preparing reports for printing. The View property accepts integer values corresponding to different view modes. Common values include: xlNormalView (1) for normal view, xlPageBreakPreview (2) for page break preview, and xlPageLayoutView (3) for page layout view. Here is an example:

import xlwings as xw
from xlwings.constants import xlPageBreakPreview

app = xlwings.apps.active
active_window = app.api.ActiveWindow

# Switch to page break preview mode
active_window.View = xlPageBreakPreview # or use integer 2