Blog
How to use Application.CalculationInterruptKey in the xlwings API way
The Application.CalculationInterruptKey property in Excel is a member that allows developers to control which key can be used to interrupt a long calculation in Excel. This is particularly useful when running complex or lengthy calculations where you might want to provide a way to stop the process without forcing Excel to become unresponsive. In xlwings, this property can be accessed and modified through the Application object, providing a programmatic way to manage calculation interruptions in automated Excel tasks.
Functionality:
The CalculationInterruptKey property determines the key that, when pressed during a calculation, will interrupt the process. It helps in creating more user-friendly or controlled environments by specifying whether interruptions are allowed and which key triggers them. This can prevent accidental interruptions or allow for deliberate stops in scenarios like data processing macros.
Syntax in xlwings:
In xlwings, you can access this property using the api property of the App or Book objects to reach the underlying Excel Application object. The syntax is as follows:
app = xw.apps.active # Get the active Excel application
interrupt_key = app.api.CalculationInterruptKey
To set the property, assign a value from the XlCalculationInterruptKey enumeration. The available options are:
xlAnyKey(1): Any key press will interrupt the calculation.xlEscKey(2): Only the Esc key will interrupt the calculation.xlNoKey(3): No key will interrupt the calculation; this disables interruptions.
Parameters and Values:
The property accepts integer values corresponding to the enumeration. In xlwings, you can use the constants directly if imported, but typically, you can use the integer values for simplicity. For example:
- Use
1forxlAnyKey. - Use
2forxlEscKey. - Use
3forxlNoKey.
Example Usage:
Here is a code example demonstrating how to set and retrieve the CalculationInterruptKey property using xlwings:
import xlwings as xw

# Connect to the active Excel application
app = xw.apps.active

# Get the current interrupt key setting
current_key = app.api.CalculationInterruptKey
print(f"Current interrupt key setting: {current_key}") # Output might be 2 for xlEscKey

# Set the interrupt key to xlAnyKey (any key press interrupts)
app.api.CalculationInterruptKey = 1 # Equivalent to xlAnyKey
print("Interrupt key set to xlAnyKey.")

# Perform a long calculation (e.g., a loop that simulates work)
# In a real scenario, this could be a heavy Excel calculation.
try:
    # Simulate a calculation that might be interrupted
    for i in range(1000000):
        # Some calculation code here
        if i % 100000 == 0:
            print(f"Processing... {i}")
except KeyboardInterrupt:
    print("Calculation was interrupted by user.")

# Reset to xlEscKey for standard behavior
app.api.CalculationInterruptKey = 2
print("Interrupt key reset to xlEscKey.")How To Create Surface + 3D Filled Contour Plot Using xlwings?
【Example】
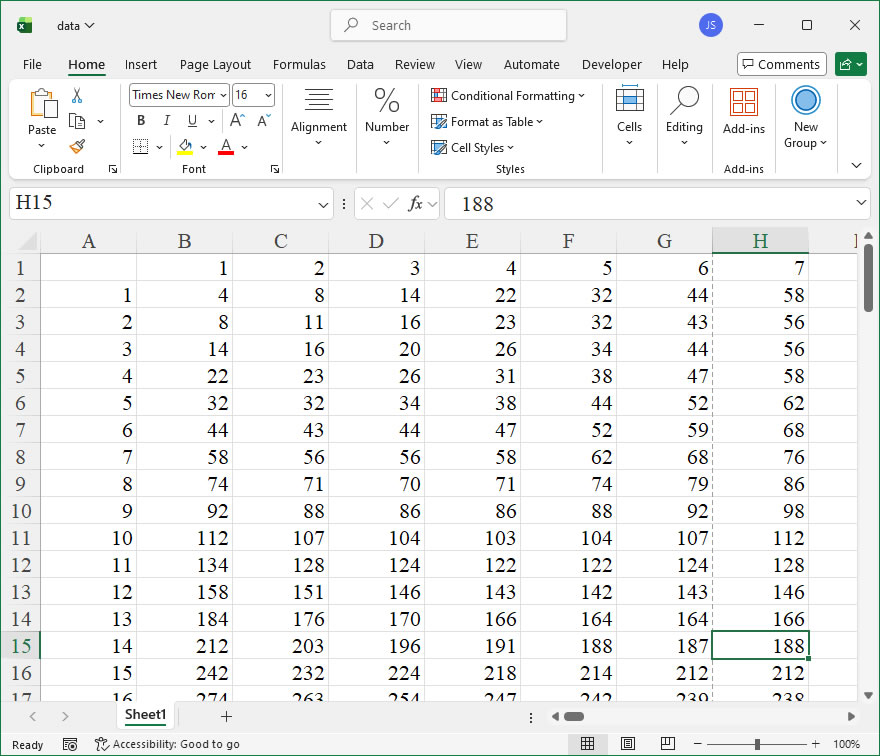
【Code】
import xlwings as xw
import os

def set_style(cht):
    cht.ChartArea.Format.Line.Visible=False
    cht.PlotArea.Format.Fill.Visible = False
    cht.PlotArea.Format.Line.Visible = False
    cht.PlotArea.Format.Line.ForeColor.RGB=xw.utils.rgb_to_int((200,200,200))
    #cht.PlotArea.Format.Line.ForeColor.ObjectThemeColor = msoThemeColorText1
    ax1 = cht.Axes(1)
    ax2 = cht.Axes(2)
    ax1.HasTitle = True
    ax1.AxisTitle.Text = 'Values 1'
    ax1.AxisTitle.Font.Size = 10
    ax1.TickLabels.Font.Size = 8
    #ax1.TickLabels.NumberFormat = '0.00'
    ax1.HasMajorGridlines = True
    ax2.HasTitle = True
    ax2.AxisTitle.Text = 'Values 2'
    ax2.AxisTitle.Font.Size = 10
    ax2.TickLabels.Font.Size = 8
    ax2.HasMajorGridlines = True
    cht.HasTitle = True
    #cht.ChartTitle.Caption = 'Plot'
    #cht.ChartTitle.Font.Size = 12


root=os.getcwd()
app=xw.App(visible=True,add_book=False)
wb=app.books.open(root+r'/data.xlsx',read_only=False)
sht=wb.sheets('Sheet1')

sht.api.Range('A1:CW100').Select()  #
shp=sht.api.Shapes.AddChart2(-1,xw.constants.ChartType.xlSurface,20,20,300,300,True)
cht=shp.Chart  #

set_style(cht)

cht.Export(root+'/cht.jpg')
cht.Export(root+'/cht.svg')
cht.ExportAsFixedFormat(0,root+'/cht.pdf')

#wb.save()
#app.kill()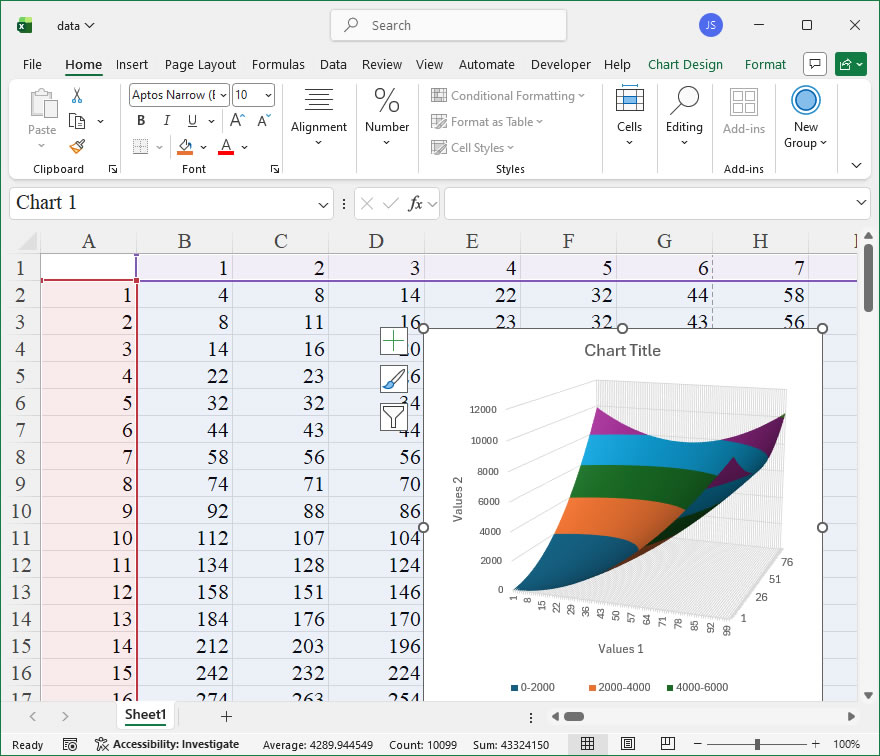
How to use Application.Calculation in the xlwings API way
The Application.Calculation property in Excel is a crucial setting that determines how formulas are recalculated within a workbook. In xlwings, this property allows you to control the calculation mode programmatically, which is essential for optimizing performance, especially when dealing with large or complex spreadsheets that involve numerous formulas and dependencies.
Functionality
This property controls the Excel calculation engine’s mode. You can set it to force automatic recalculation, manual recalculation, or a semi-automatic mode. This is particularly useful when you are writing data to many cells via xlwings and want to prevent Excel from recalculating after each write operation, which can significantly slow down execution. By setting calculation to manual, performing all data updates, and then setting it back to automatic (or triggering a manual calculation), you can drastically improve the performance of your scripts.
Syntax and Parameters
In xlwings, you access this property through the app object, which represents the Excel Application. The syntax is straightforward:app.calculation
This property is both gettable and settable. When setting it, you assign one of the following constants, which are available directly in xlwings:
| Constant (from xlwings.constants) | Value | Description |
|---|---|---|
xlwings.constants.Calculation.xlCalculationAutomatic | -4105 | Excel controls recalculation. |
xlwings.constants.Calculation.xlCalculationManual | -4135 | Recalculation only occurs when explicitly requested (e.g., by pressing F9). |
xlwings.constants.Calculation.xlCalculationSemiautomatic | 2 | Recalculation is automatic except for data tables. |
You can also use the raw numeric values, but using the named constants is recommended for better code readability.
Code Examples
Here are practical examples of using the app.calculation property with xlwings:
- Checking the Current Calculation Mode:
import xlwings as xw
app = xw.apps.active # Get the active Excel application
current_mode = app.calculation
print(f"Current calculation mode is: {current_mode}")- Setting Calculation to Manual for Performance:
This is a common pattern for batch operations.
import xlwings as xw
from xlwings.constants import Calculation

app = xw.apps.active
original_mode = app.calculation # Save the original state

# Set to manual to prevent recalculations during data writes
app.calculation = Calculation.xlCalculationManual

# Perform your data operations (e.g., writing to many cells)
wb = app.books.active
sht = wb.sheets[0]
for row in range(2, 1002):
    sht.range(f'A{row}').value = row * 10
    # Without manual calculation, Excel would recalculate here 1000 times!

# After data is written, trigger a single full calculation
wb.app.calculate() # Equivalent to pressing F9 in Excel

# Restore the original calculation mode
app.calculation = original_mode- Setting Calculation to Automatic:
import xlwings as xw
from xlwings.constants import Calculation

app = xw.apps.active
app.calculation = Calculation.xlCalculationAutomatic
print("Calculation set to Automatic.")How To Create 3D Bubble Chart Using xlwings?
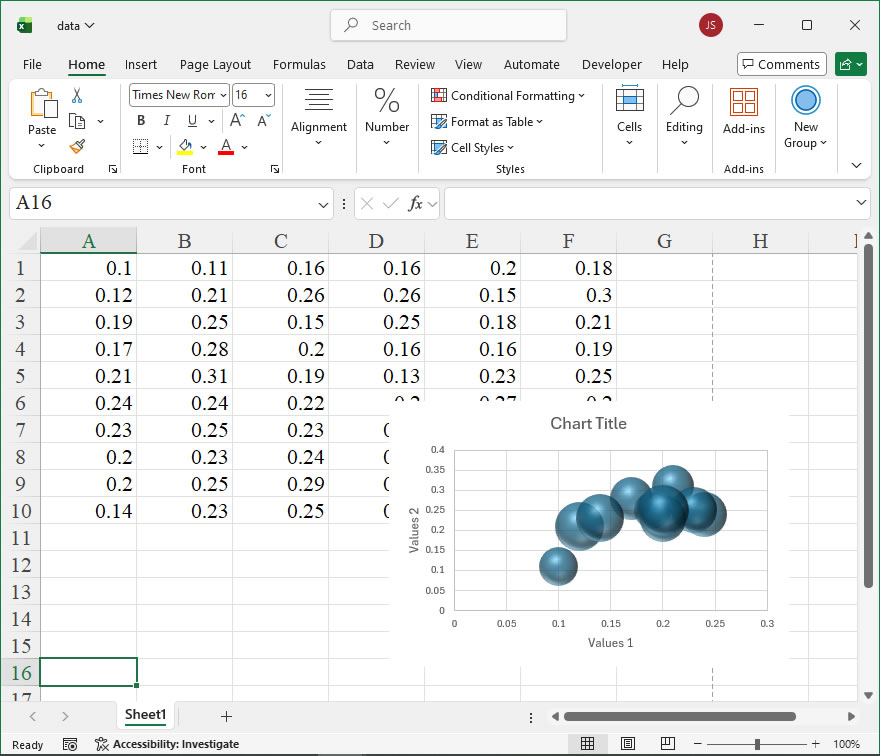
【Example】
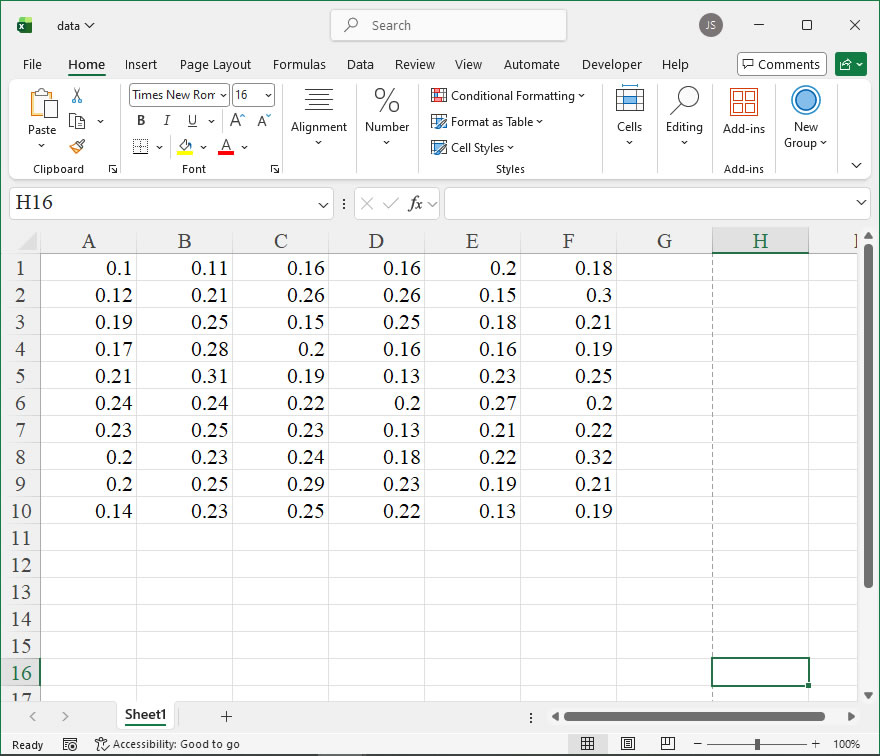
【Code】
import xlwings as xw
import os

def set_style(cht):
    cht.ChartArea.Format.Line.Visible=False
    cht.PlotArea.Format.Fill.Visible = False
    cht.PlotArea.Format.Line.Visible = True
    cht.PlotArea.Format.Line.ForeColor.RGB=xw.utils.rgb_to_int((200,200,200))
    #cht.PlotArea.Format.Line.ForeColor.ObjectThemeColor = msoThemeColorText1
    ax1 = cht.Axes(1)
    ax2 = cht.Axes(2)
    ax1.HasTitle = True
    ax1.AxisTitle.Text = 'Values 1'
    ax1.AxisTitle.Font.Size = 10
    ax1.TickLabels.Font.Size = 8
    #ax1.TickLabels.NumberFormat = '0.00'
    ax1.HasMajorGridlines = True
    ax2.HasTitle = True
    ax2.AxisTitle.Text = 'Values 2'
    ax2.AxisTitle.Font.Size = 10
    ax2.TickLabels.Font.Size = 8
    ax2.HasMajorGridlines = True
    cht.HasTitle = True
    #cht.ChartTitle.Caption = 'Plot'
    #cht.ChartTitle.Font.Size = 12
    ax1.CrossesAt=ax1.MinimumScale
    ax2.CrossesAt=ax2.MinimumScale

root=os.getcwd()
app=xw.App(visible=True,add_book=False)
wb=app.books.open(root+r'/data.xlsx',read_only=False)
sht=wb.sheets('Sheet1')

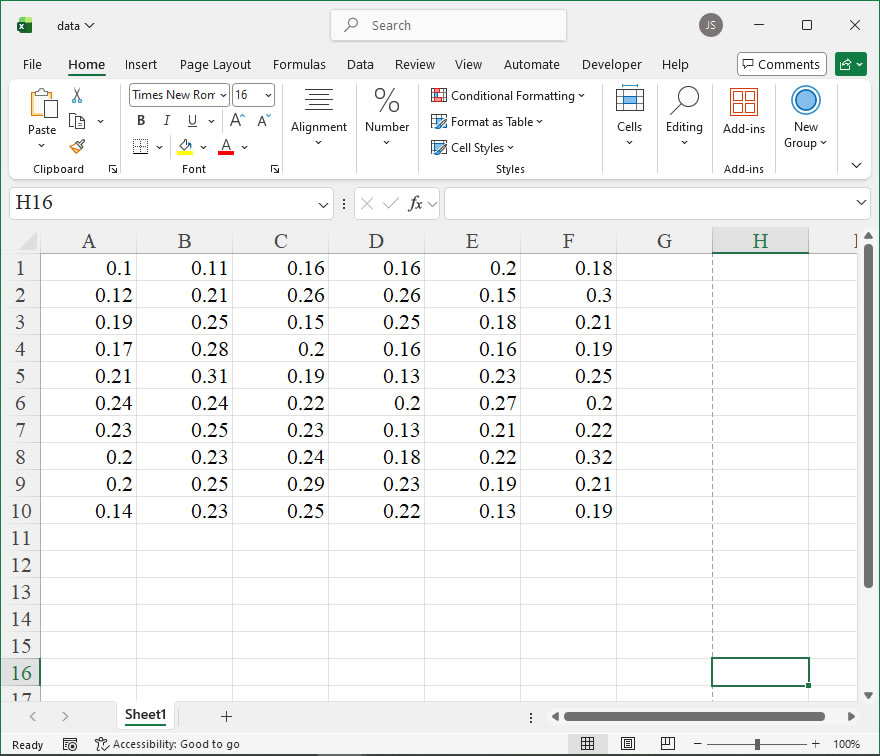
sht.api.Range('A1:C10').Select()  #
shp=sht.api.Shapes.AddChart2(-1,xw.constants.ChartType.xlBubble3DEffect,20,20,300,200,True)
cht=shp.Chart  #

set_style(cht)

cht.Export(root+'/cht.jpg')
cht.Export(root+'/cht.svg')
cht.ExportAsFixedFormat(0,root+'/cht.pdf')

#wb.save()
#app.kill()
How to use Application.CalculateBeforeSave in the xlwings API way
The Application.CalculateBeforeSave property in Excel’s object model controls whether calculation occurs automatically before a workbook is saved. This setting is particularly useful in large or complex workbooks where manual calculation mode is enabled to improve performance during data entry or manipulation. By setting CalculateBeforeSave to True, you ensure all formulas are recalculated with the latest data upon saving, preventing outdated results. When set to False, Excel skips this recalculation step, which can speed up the saving process but may leave formulas unupdated.
In xlwings, you can access this property through the Application object. The syntax is straightforward: app.calculate_before_save, where app represents the xlwings App instance. This property accepts a Boolean value: True enables pre-save calculation, and False disables it. It’s important to note that this is a global setting applied to the Excel application instance, affecting all open workbooks managed by that instance. You can both retrieve the current setting and modify it as needed.
For example, to check the current CalculateBeforeSave setting using xlwings, you can use the following code:
import xlwings as xw

# Connect to the active Excel instance
app = xw.apps.active

# Get the current CalculateBeforeSave value
current_setting = app.calculate_before_save
print(f"CalculateBeforeSave is currently set to: {current_setting}")
To change the setting, assign a new Boolean value. The code below disables calculation before saving, which might be beneficial for performance in large workbooks:
import xlwings as xw

app = xlwings.apps.active
# Disable calculation before saving
app.calculate_before_save = False
print("CalculateBeforeSave has been disabled.")
If you need to enable it again to ensure data accuracy, simply set it to True:
app.calculate_before_save = True
print("CalculateBeforeSave has been enabled.")
A practical use case involves toggling this property during automated processes. For instance, if you’re running a script that makes numerous changes and saves intermittently, disabling CalculateBeforeSave can reduce overhead. After completing all updates, you can re-enable it and force a manual recalculation before the final save:
import xlwings as xw

app = xw.apps.active
workbook = app.books.active

# Disable calculation to speed up intermediate saves
app.calculate_before_save = False
# Perform data manipulations...
workbook.save('temp_save.xlsx')

# Re-enable calculation and recalculate before final save
app.calculate_before_save = True
workbook.calculate()
workbook.save('final_save.xlsx')How To Create 2D Bubble Chart Using xlwings?
【Example】
【Code】
import xlwings as xw
import os

def set_style(cht):
    cht.ChartArea.Format.Line.Visible=False
    cht.PlotArea.Format.Fill.Visible = False
    cht.PlotArea.Format.Line.Visible = True
    cht.PlotArea.Format.Line.ForeColor.RGB=xw.utils.rgb_to_int((200,200,200))
    #cht.PlotArea.Format.Line.ForeColor.ObjectThemeColor = msoThemeColorText1
    ax1 = cht.Axes(1)
    ax2 = cht.Axes(2)
    ax1.HasTitle = True
    ax1.AxisTitle.Text = 'Values 1'
    ax1.AxisTitle.Font.Size = 10
    ax1.TickLabels.Font.Size = 8
    #ax1.TickLabels.NumberFormat = '0.00'
    ax1.HasMajorGridlines = True
    ax2.HasTitle = True
    ax2.AxisTitle.Text = 'Values 2'
    ax2.AxisTitle.Font.Size = 10
    ax2.TickLabels.Font.Size = 8
    ax2.HasMajorGridlines = True
    cht.HasTitle = True
    #cht.ChartTitle.Caption = 'Plot'
    #cht.ChartTitle.Font.Size = 12
    ax1.CrossesAt=ax1.MinimumScale
    ax2.CrossesAt=ax2.MinimumScale

root=os.getcwd()
app=xw.App(visible=True,add_book=False)
wb=app.books.open(root+r'/data.xlsx',read_only=False)
sht=wb.sheets('Sheet1')

sht.api.Range('A1:C10').Select()  #
shp=sht.api.Shapes.AddChart2(-1,xw.constants.ChartType.xlBubble,20,20,300,200,True)
cht=shp.Chart  #

set_style(cht)

cht.Export(root+'/cht.jpg')
cht.Export(root+'/cht.svg')
cht.ExportAsFixedFormat(0,root+'/cht.pdf')

#wb.save()
#app.kill()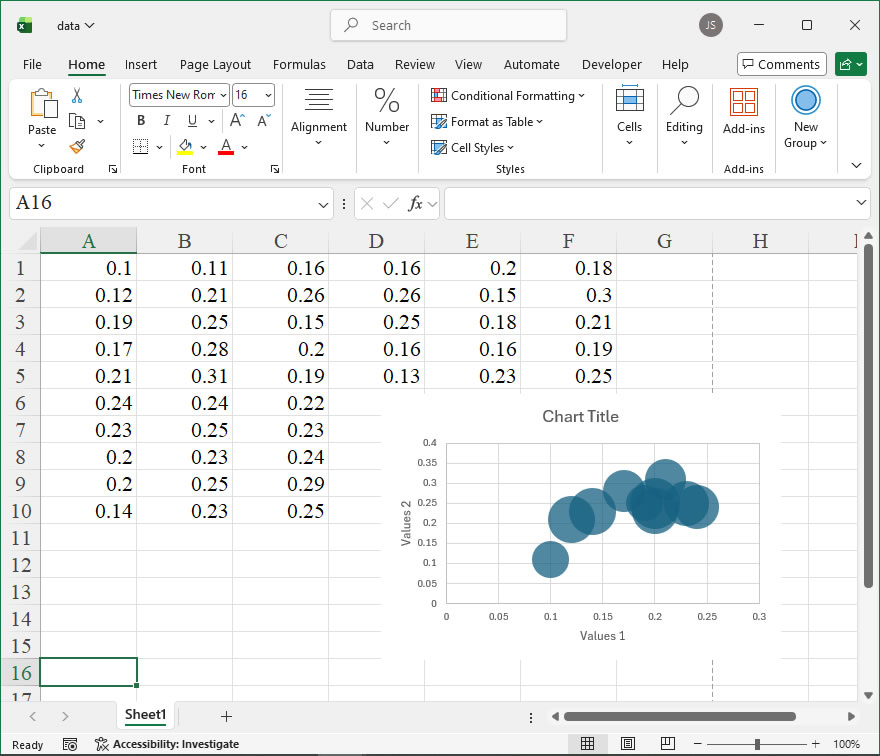
How to use Application.Build in the xlwings API way
The Application.Build property in Excel’s object model represents the build number of the Excel application. This read-only property returns a Long value that corresponds to the specific compilation version of Excel. It is particularly useful for developers who need to implement version-specific logic or ensure compatibility across different builds of Excel, as it provides a more granular identifier than the major version number alone.
In xlwings, the Application object is accessed via the app object when you have an instance of an Excel application. The Build property can be retrieved directly as an attribute. The syntax is straightforward: after establishing a connection to Excel, you simply call .build on the app object. There are no parameters required for this property.
Syntax:
app.buildThis returns an integer representing the build number. For example, in Excel 365, this might be a number like 16.0.xxxxx, but note that Build returns only the numeric build part.
Example Usage:
Consider a scenario where you are automating a report and need to check if the Excel build is compatible with a certain feature. You can retrieve the build number and use it in conditional statements. Below is a code example using xlwings:
import xlwings as xw

# Connect to the active Excel instance or start a new one
app = xw.apps.active if xw.apps.active else xw.App()

# Get the build number
build_number = app.build

# Output the build number
print(f"Excel Build Number: {build_number}")

# Example: Check for a specific build range (e.g., builds after 15000)
if build_number > 15000:
    print("This build supports advanced features.")
else:
    print("Consider updating Excel for full functionality.")

# Close the app if it was created in this script (optional)
if not xw.apps.active:
app.quit()How To Create Complex Scatter Plot Using xlwings?
【Example】
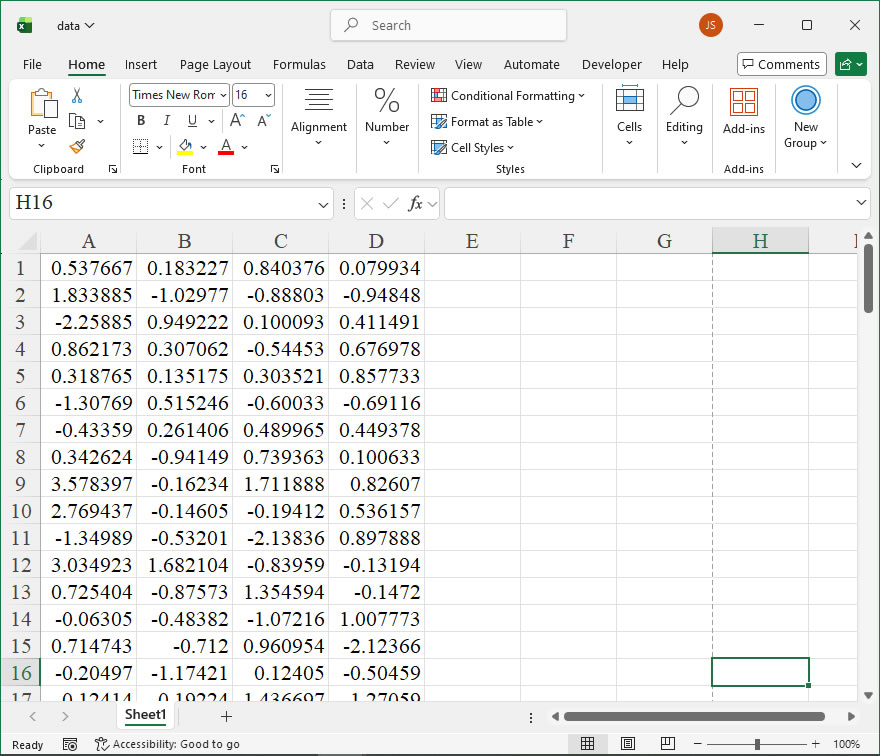
【Code】
import xlwings as xw
import os

def set_style(cht):
    cht.ChartArea.Format.Line.Visible=False
    cht.PlotArea.Format.Fill.Visible = False
    cht.PlotArea.Format.Line.Visible = True
    cht.PlotArea.Format.Line.ForeColor.RGB=xw.utils.rgb_to_int((200,200,200))
    #cht.PlotArea.Format.Line.ForeColor.ObjectThemeColor = msoThemeColorText1
    ax1 = cht.Axes(1)
    ax2 = cht.Axes(2)
    ax1.HasTitle = True
    ax1.AxisTitle.Text = 'Values 1'
    ax1.AxisTitle.Font.Size = 10
    ax1.TickLabels.Font.Size = 8
    #ax1.TickLabels.NumberFormat = '0.00'
    ax1.HasMajorGridlines = True
    ax2.HasTitle = True
    ax2.AxisTitle.Text = 'Values 2'
    ax2.AxisTitle.Font.Size = 10
    ax2.TickLabels.Font.Size = 8
    ax2.HasMajorGridlines = True
    cht.HasTitle = True
    #cht.ChartTitle.Caption = 'Plot'
    #cht.ChartTitle.Font.Size = 12
    ax1.CrossesAt=ax1.MinimumScale
    ax2.CrossesAt=ax2.MinimumScale

root=os.getcwd()
app=xw.App(visible=True,add_book=False)
wb=app.books.open(root+r'/data.xlsx',read_only=False)
sht=wb.sheets('Sheet1')

sht.api.Range('A1:B100').Select()  #
shp=sht.api.Shapes.AddChart2(-1,xw.constants.ChartType.xlXYScatter,20,20,300,200,True)
cht=shp.Chart  #

ser=cht.SeriesCollection().NewSeries()
ser.ChartType=xw.constants.ChartType.xlXYScatter
ser.XValues=sht.api.Range('C1:C100')
ser.Values=sht.api.Range('D1:D100')

set_style(cht)

cht.Export(root+'/cht.jpg')
cht.Export(root+'/cht.svg')
cht.ExportAsFixedFormat(0,root+'/cht.pdf')

#wb.save()
#app.kill()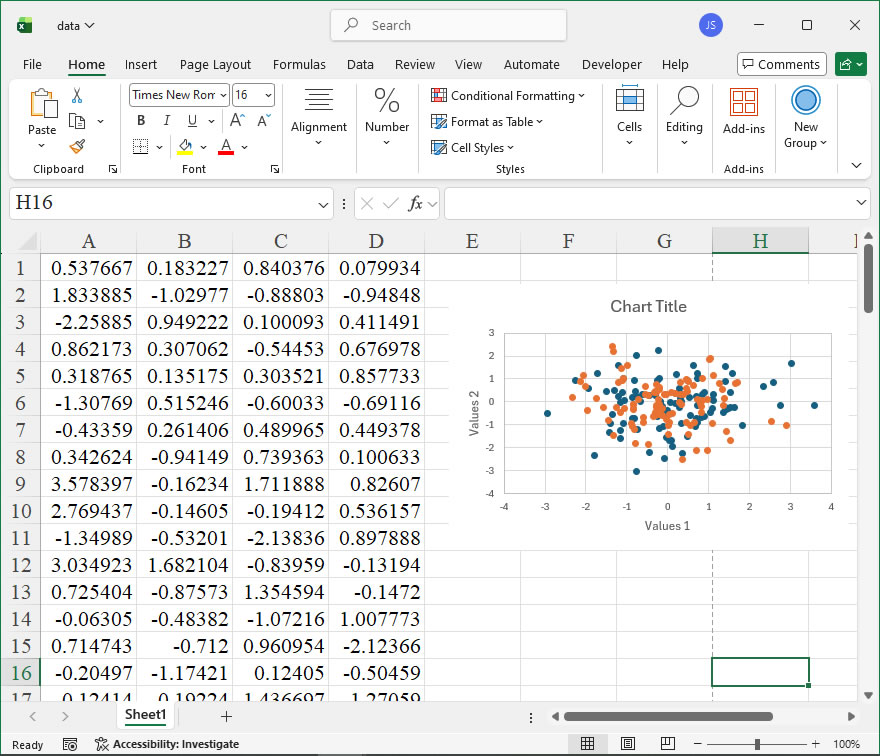
How to use Application.AutoRecover in the xlwings API way
The AutoRecover member of the Application object in Excel’s object model is a critical feature for data integrity and user productivity. In xlwings, this functionality is accessible through the api property, allowing Python scripts to interact with Excel’s native automation interface. The AutoRecover object itself provides properties that enable developers to control and query Excel’s automatic file recovery settings programmatically. This is particularly useful in automation scripts where workbook stability and recovery options need to be managed dynamically, such as in long-running data processing tasks or when deploying Excel-based solutions in environments with intermittent connectivity.
In xlwings, the syntax to access the AutoRecover member is straightforward, as it is a property of the Application object. The typical approach involves obtaining the Excel application instance from a workbook or creating one, then accessing the property.
The syntax is:
app.api.AutoRecover
where app is the xlwings App instance representing the Excel application. The AutoRecover object does not have methods in the traditional sense but exposes several key properties that can be read or set. These properties include Path, which specifies the directory where AutoRecover files are saved, and Time, which sets the time interval in minutes for automatic saving of recovery information. Both properties are of type Variant in Excel’s object model and can be accessed as attributes in xlwings.
For example, app.api.AutoRecover.Path returns a string representing the path, and app.api.AutoRecover.Time returns an integer. Setting these properties is equally simple: assign a string to Path or an integer to Time within valid ranges (e.g., Time must be between 1 and 120 minutes). It’s important to note that changes to these properties apply globally to the Excel instance and may affect other open workbooks.
To illustrate the usage, consider a scenario where an automation script needs to ensure that AutoRecover is configured optimally before performing intensive operations. The following xlwings code examples demonstrate how to interact with the AutoRecover member. First, import xlwings and start an Excel application:
import xlwings as xw;
app = xw.App(visible=False)
To retrieve the current AutoRecover path, use current_path = app.api.AutoRecover.Path; print(current_path). To set a new path, such as a dedicated network drive for recovery files, execute app.api.AutoRecover.Path = r'C:\AutoRecoverBackup'. For the time interval, fetch the current setting with current_time = app.api.AutoRecover.Time; print(current_time), and update it to 10 minutes with app.api.AutoRecover.Time = 10. After completing operations, it’s good practice to reset or close the application: app.quit(). These examples show how xlwings seamlessly bridges Python and Excel, enabling robust management of recovery settings to prevent data loss in automated workflows.
How To Create Scatter Plot Using xlwings?
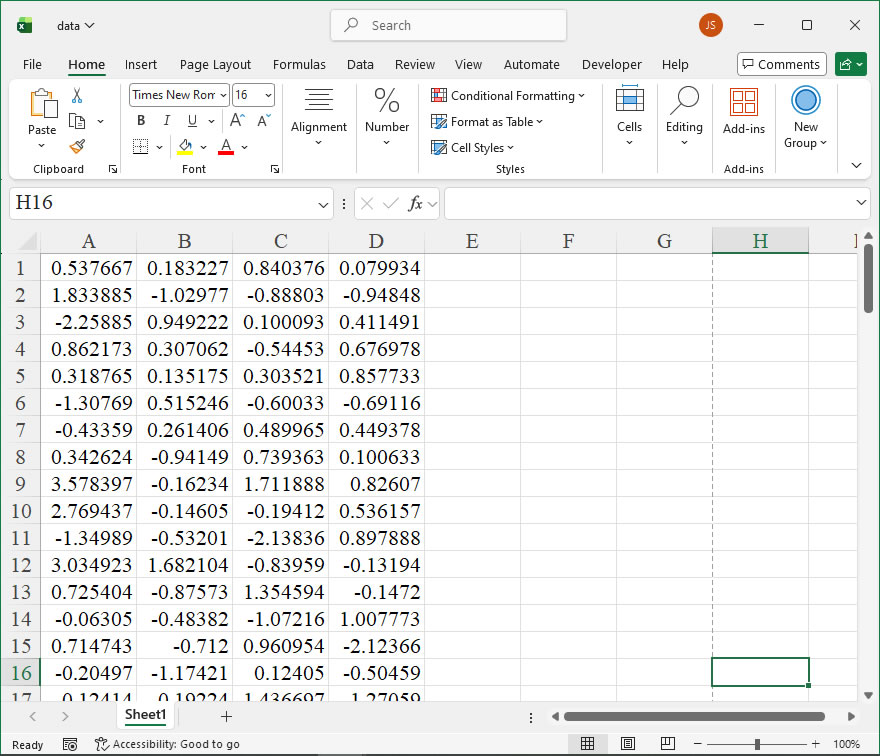
【Example】
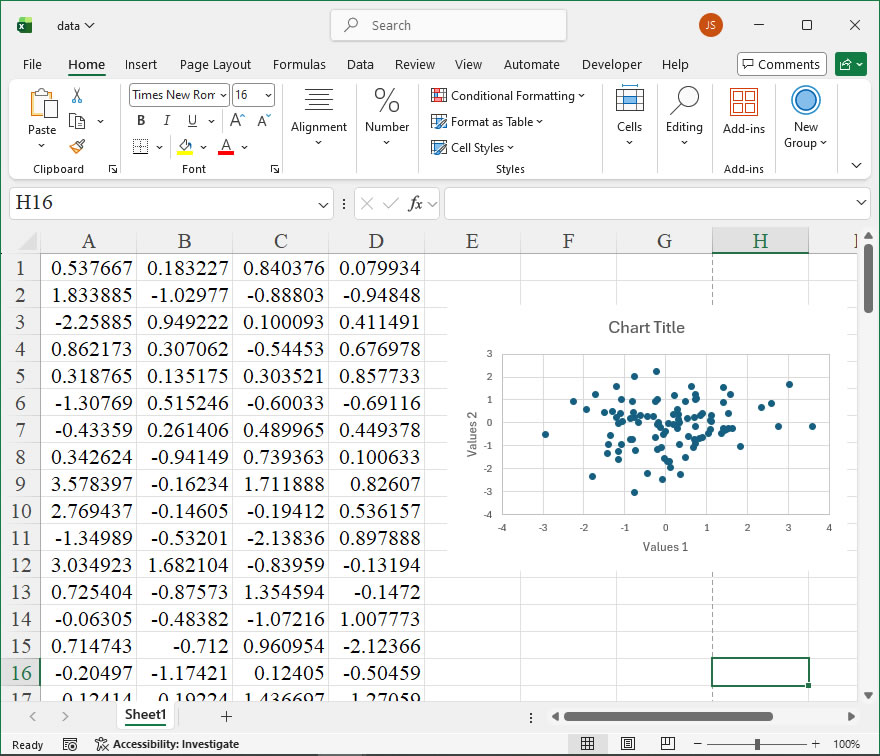
【Code】
import xlwings as xw
import os

def set_style(cht):
    cht.ChartArea.Format.Line.Visible=False
    cht.PlotArea.Format.Fill.Visible = False
    cht.PlotArea.Format.Line.Visible = True
    cht.PlotArea.Format.Line.ForeColor.RGB=xw.utils.rgb_to_int((200,200,200))
    #cht.PlotArea.Format.Line.ForeColor.ObjectThemeColor = msoThemeColorText1
    ax1 = cht.Axes(1)
    ax2 = cht.Axes(2)
    ax1.HasTitle = True
    ax1.AxisTitle.Text = 'Values 1'
    ax1.AxisTitle.Font.Size = 10
    ax1.TickLabels.Font.Size = 8
    #ax1.TickLabels.NumberFormat = '0.00'
    ax1.HasMajorGridlines = True
    ax2.HasTitle = True
    ax2.AxisTitle.Text = 'Values 2'
    ax2.AxisTitle.Font.Size = 10
    ax2.TickLabels.Font.Size = 8
    ax2.HasMajorGridlines = True
    cht.HasTitle = True
    #cht.ChartTitle.Caption = 'Plot'
    #cht.ChartTitle.Font.Size = 12
    ax1.CrossesAt=ax1.MinimumScale
    ax2.CrossesAt=ax2.MinimumScale

root=os.getcwd()
app=xw.App(visible=True,add_book=False)
wb=app.books.open(root+r'/data.xlsx',read_only=False)
sht=wb.sheets('Sheet1')

sht.api.Range('A1:B100').Select()  #
shp=sht.api.Shapes.AddChart2(-1,xw.constants.ChartType.xlXYScatter,20,20,300,200,True)
cht=shp.Chart  #

set_style(cht)

cht.Export(root+'/cht.jpg')
cht.Export(root+'/cht.svg')
cht.ExportAsFixedFormat(0,root+'/cht.pdf')

#wb.save()
#app.kill()