Blog
How To Implement Graphic Translation Using xlwings?
Method
Use the `IncrementLeft` method of the `Shape` object to translate the graphic horizontally. This method has one parameter: when the value is greater than 0, the graphic moves to the right; when the value is less than 0, the graphic moves to the left.
Use the `IncrementTop` method of the `Shape` object to translate the graphic vertically. This method has one parameter: when the value is greater than 0, the graphic moves down; when the value is less than 0, the graphic moves up.
shp=sht.api.Shapes.AddShape(1, 100, 50, 200, 100) #Rectangular area
shp.Fill.PresetTextured(5) #Preset texture: Water drop
shp.IncrementLeft(70) #Move right by 70 units
shp.IncrementTop(50) #Move down by 50 units
Sample Code
#Rotation transformation
import xlwings as xw #Import xlwings package
app=xw.App()
bk=app.books.active #Get the active workbook
sht=bk.sheets.active #Get the active worksheet
shp=sht.api.Shapes.AddShape(1, 100, 50, 200, 100) #Rectangular area
shp.Fill.PresetTextured(5) #Preset texture: Water drop
shp.IncrementRotation(30) #Rotate clockwise by 30°
#bk.save()
#bk.close()
#app.kill()
How To Set Text Properties Using xlwings?
Method
In Excel, fonts are represented by the `Font` object. When setting the font, it is usually done by obtaining the `Font` object through a property, and then using the properties and methods of the object for configuration.
The main properties of the `Font` object include:
– Bold: Whether the font is bold. `True` for bold, `False` for not bold.
– Color: RGB color shading.
– ColorIndex: Index coloring. The index number of a color in the color lookup table.
– FontStyle: Font style, such as “Bold Italic”.
– Italic: Whether the font is italicized. `True` for italicized, `False` for not italicized.
– Name: Font name.
– Size: Font size.
– Strikethrough: Whether to apply a strikethrough. `True` to apply, `False` to not apply.
– Subscript: Whether the text is set as subscript. `True` to apply, `False` to not apply.
– Superscript: Whether the text is set as superscript. `True` to apply, `False` to not apply.
– ThemeColor: Theme color shading.
– ThemeFont: Theme font.
– TintAndShade: Darken or lighten the font color, with a value between -1 (darkest) to 1 (lightest).
– Underline: The type of underline.
– Value -4142: No underline
– Value 2: Single underline
– Value -4119: Bold double underline
– Value 5: Close together thin double underline
sht.api.Range(‘C3′).Value=’Font Test123’
ft=sht.api.Range(‘C3’).Font
ft.Name = ‘Times New Roman’
ft.ColorIndex = 3
ft.Size = 20
ft.Bold=True
ft.Strikethrough = False
ft.Underline = 5
ft.Italic=True
Sample Code
#Translation transformation

import xlwings as xw    #Import xlwings package

app=xw.App()
bk=app.books.active   #Get the active workbook
sht=bk.sheets.active    #Get the active worksheet

shp=sht.api.Shapes.AddShape(1, 100, 50, 200, 100)    #Rectangular area
shp.Fill.PresetTextured(5)    #Preset texture: Water drop
shp.IncrementLeft(70)    #Move right by 70 units
shp.IncrementTop(50)    #Move down by 50 units

#bk.save()
#bk.close()
#app.kill()
How To Set Face Properties Using xlwings? – Transparency
Method
shp=sht.api.Shapes.AddShape(1, 200, 50, 200, 100) #Rectangular area
shp2=sht.api.Shapes.AddShape(9, 150, 70, 200, 100) #Elliptical area
ff=shp2.Fill
ff.ForeColor.RGB= xw.utils.rgb_to_int((255,0,0)) #Set elliptical area to red
ff.Transparency=0.7 #Transparency 0.7
Sample Code
#Text Properties

import xlwings as xw    #Import xlwings package

app=xw.App()
bk=app.books.active   #Get the active workbook
sht=bk.sheets.active    #Get the active worksheet

sht.api.Range('C3').Value='Font Test123'
ft=sht.api.Range('C3').Font
ft.Name = 'Times New Roman'
ft.ColorIndex = 3
ft.Size = 20
ft.Bold=True
ft.Strikethrough = False
ft.Underline = 5
ft.Italic=True

#bk.save()
#bk.close()
#app.kill()
How To Set Face Properties Using xlwings? – Preset Texture Fill
Method
shp1=sht.api.Shapes.AddShape(1, 100, 50, 200, 100) #Rectangular area
ff1=shp1.Fill
ff1.PresetTextured(9) #Preset texture: Green marble
Sample Code
#Area properties - Transparency

import xlwings as xw    #Import xlwings package

app=xw.App()
bk=app.books.active   #Get the active workbook
sht=bk.sheets.active    #Get the active worksheet

shp=sht.api.Shapes.AddShape(1, 200, 50, 200, 100)    #Rectangular area
shp2=sht.api.Shapes.AddShape(9, 150, 70, 200, 100)    #Elliptical area
ff=shp2.Fill
ff.ForeColor.RGB= xw.utils.rgb_to_int((255,0,0))    #Set elliptical area to red
ff.Transparency=0.7    #Transparency 0.7

#bk.save()
#bk.close()
#app.kill()
How To Set Face Properties Using xlwings? – Texture Fill
Method
Using UserTextured method.
shp1=sht.api.Shapes.AddShape(1, 100, 50, 200, 100) #Rectangular area
ff1=shp1.Fill
ff1.UserTextured(root+r”/picpy.jpg”) #Texture fill
Sample Code
#Area properties - Preset texture fill.

import xlwings as xw    #Import xlwings package

app=xw.App()
bk=app.books.active   #Get the active workbook
sht=bk.sheets.active    #Get the active worksheet

shp1=sht.api.Shapes.AddShape(1, 100, 50, 200, 100)    #Rectangular area
ff1=shp1.Fill
ff1.PresetTextured(9)    #Preset texture: Green marble

shp2=sht.api.Shapes.AddShape(9, 400, 50, 200, 100)    #Elliptical area
ff2=shp2.Fill
ff2.PresetTextured(22)    #Preset texture: Walnut wood

#bk.save()
#bk.close()
#app.kill()
How To Set Face Properties Using xlwings? – Picture Fill
Method
Use the `UserPicture` method of the `FillFormat` object for picture fills.
shp1=sht.api.Shapes.AddShape(1, 100, 50, 200, 100) #Rectangular area
ff1=shp1.Fill
ff1.UserPicture(r”D:\picpy.jpg”) #Picture fill
Sample Code
#Area properties - Texture fill

import xlwings as xw    #Import xlwings package
import os
root = os.getcwd()
app=xw.App()
bk=app.books.active   #Get the active workbook
sht=bk.sheets.active    #Get the active worksheet

shp1=sht.api.Shapes.AddShape(1, 100, 50, 200, 100)    #Rectangular area
ff1=shp1.Fill
ff1.UserTextured(r"D:/picpy.jpg")    #Texture fill

shp2=sht.api.Shapes.AddShape(9, 400, 50, 200, 100)    #Elliptical area
ff2=shp2.Fill
ff2.UserTextured(r"D:/picpy.jpg")    #Texture fill

#bk.save()
#bk.close()
#app.kill()
How To Set Face Properties Using xlwings? – Pattern Fill
Method
Use the `Patterned` method of the `FillFormat` object to apply pattern fill. This method takes an `MsoPatternType` enumeration value, which specifies the pattern to be used.
shp1=sht.api.Shapes.AddShape(1, 100, 50, 200, 100) #Rectangular area
ff1=shp1.Fill
ff1.ForeColor.RGB= xw.utils.rgb_to_int((255,0,0))
ff1.Patterned(22) #Pattern fill
ff1.BackColor.RGB= xw.utils.rgb_to_int((0,255,0))
Sample Code
#Area properties - Picture fill

import xlwings as xw    #Import xlwings package

app=xw.App()
bk=app.books.active   #Get the active workbook
sht=bk.sheets.active    #Get the active worksheet

shp1=sht.api.Shapes.AddShape(1, 100, 50, 200, 100)    #Rectangular area
ff1=shp1.Fill
ff1.UserPicture(r"D:\picpy.jpg")    #Picture fill

shp2=sht.api.Shapes.AddShape(9, 400, 50, 200, 100)    #Elliptical area
ff2=shp2.Fill
ff2.UserPicture(r"D:\picpy.jpg")    #Picture fill

#bk.save()
#bk.close()
#app.kill()
How To Set Face Properties Using xlwings? – Multi-Color Gradient Fill
Method
shp1=sht.api.Shapes.AddShape(1, 100, 50, 200, 100) #Rectangular area
ff1=shp1.Fill
ff1.ForeColor.RGB= xw.utils.rgb_to_int((255,0,0))
ff1.OneColorGradient(3, 1, 1) #One color gradient fill
#Insert color nodes in gradient sequence.
ff1.GradientStops.Insert(xw.utils.rgb_to_int((255,0,0)), 0.25)
ff1.GradientStops.Insert(xw.utils.rgb_to_int((0,255,0)), 0.5)
ff1.GradientStops.Insert(xw.utils.rgb_to_int((0,0,255)), 1)
Sample Code
#Area Properties - Pattern Fill

import xlwings as xw    #Import xlwings package

app=xw.App()
bk=app.books.active   #Get the active workbook
sht=bk.sheets.active    #Get the active worksheet

shp1=sht.api.Shapes.AddShape(1, 100, 50, 200, 100)    #Rectangular area
ff1=shp1.Fill
ff1.ForeColor.RGB= xw.utils.rgb_to_int((255,0,0))
ff1.Patterned(22)    #Pattern fill
ff1.BackColor.RGB= xw.utils.rgb_to_int((0,255,0))

shp2=sht.api.Shapes.AddShape(9, 400, 50, 200, 100)    #Elliptical area
ff2=shp2.Fill
ff2.ForeColor.RGB= xw.utils.rgb_to_int((255,255,0))
ff2.Patterned(48)    #Pattern fill
ff2.BackColor.RGB= xw.utils.rgb_to_int((0,0,255))

#bk.save()
#bk.close()
#app.kill()
How To Set Face Properties Using xlwings? – Two-Color Gradient Fill
Method
Use the `TwoColorGradient` method of the `FillFormat` object for two-color gradient fills.
ff.TwoColorGradient(Style, Variant)
shp1=sht.api.Shapes.AddShape(1, 100, 50, 200, 100) #Rectangular area
ff1=shp1.Fill
ff1.ForeColor.RGB= xw.utils.rgb_to_int((255,0,0)) #Start color
ff1.TwoColorGradient(3, 1) #Two-color gradient fill
ff1.BackColor.RGB= xw.utils.rgb_to_int((0, 255,0)) #End color
Sample Code
#Area Properties - Multi-color Gradient Fill

import xlwings as xw    #Import xlwings package

app=xw.App()
bk=app.books.active   #Get the active workbook
sht=bk.sheets.active    #Get the active worksheet

shp1=sht.api.Shapes.AddShape(1, 100, 50, 200, 100)    #Rectangular area
ff1=shp1.Fill
ff1.ForeColor.RGB= xw.utils.rgb_to_int((255,0,0))
ff1.OneColorGradient(3, 1, 1)    #One color gradient fill
#Insert color nodes in gradient sequence.
ff1.GradientStops.Insert(xw.utils.rgb_to_int((255,0,0)), 0.25)
ff1.GradientStops.Delete(2)
ff1.GradientStops.Insert(xw.utils.rgb_to_int((0,255,0)), 0.5)
ff1.GradientStops.Insert(xw.utils.rgb_to_int((0,0,255)), 1)

shp2=sht.api.Shapes.AddShape(9, 400, 50, 200, 100)    #Elliptical area
ff2=shp2.Fill
ff2.ForeColor.RGB= xw.utils.rgb_to_int((0,0,255))
ff2.OneColorGradient(7, 1, 1)    #One color gradient fill
#Insert color nodes in gradient sequence.
ff2.GradientStops.Insert(xw.utils.rgb_to_int((255,0,0)), 0.25)
ff1.GradientStops.Delete(2)
ff2.GradientStops.Insert(xw.utils.rgb_to_int((0,255,0)), 0.5)
ff2.GradientStops.Insert(xw.utils.rgb_to_int((0,0,255)), 1)

#bk.save()
#bk.close()
#app.kill()
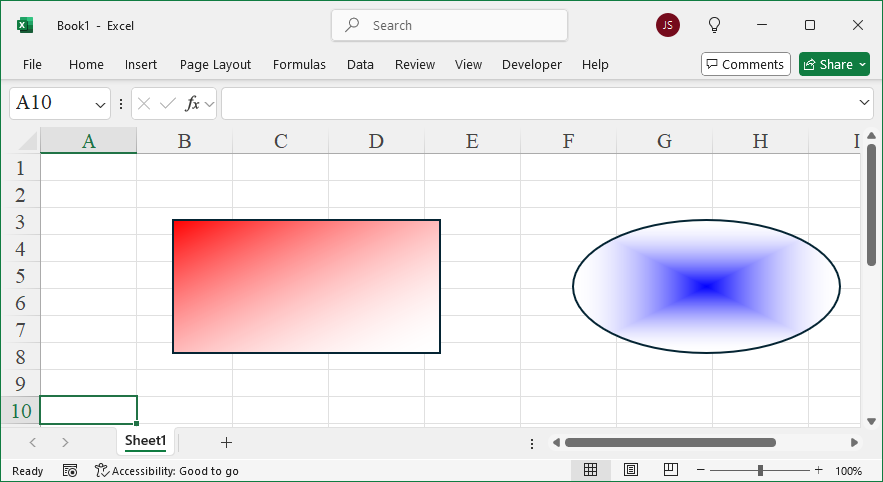
How To Set Face Properties Using xlwings? – Single Color Gradient Fill
Method
Use the `OneColorGradient` method of the `FillFormat` object for single-color gradient fills. A single-color gradient fill involves a variation of a single color’s intensity.
ff.OneColorGradient(Style, Variant, Degree)
|
Name |
Required/Optional |
Data Type |
Description |
|
Style |
Required |
MsoGradientStyle |
Gradient style |
|
Variant |
Required |
Integer |
Gradient variant (1 to 4) |
|
Degree |
Required |
Single |
Degree of gradient (0.0 – dark to 1.0 – light) |
shp1=sht.api.Shapes.AddShape(1, 100, 50, 200, 100) #Rectangular area
ff1=shp1.Fill
ff1.ForeColor.RGB= xw.utils.rgb_to_int((255,0,0))
#Solid gradient fill, white to red, gradient from bottom-right to top-left
ff1.OneColorGradient(3, 1, 1)
Sample Code
#Area properties - Two Color Gradient fill

import xlwings as xw    #Import xlwings package

app=xw.App()
bk=app.books.active   #Get the active workbook
sht=bk.sheets.active    #Get the active worksheet

shp1=sht.api.Shapes.AddShape(1, 100, 50, 200, 100)    #Rectangular area
ff1=shp1.Fill
ff1.ForeColor.RGB= xw.utils.rgb_to_int((255,0,0))    #Start color
ff1.TwoColorGradient(3, 1)    #Two-color gradient fill
ff1.BackColor.RGB= xw.utils.rgb_to_int((0, 255,0))    #End color

shp2=sht.api.Shapes.AddShape(9, 400, 50, 200, 100)    #Elliptical area
ff2=shp2.Fill
ff2.ForeColor.RGB= xw.utils.rgb_to_int((0,0,255))    #Start color
ff2.TwoColorGradient(3, 1)    #Two-color gradient fill
ff2.BackColor.RGB= xw.utils.rgb_to_int((0, 255,0))    #End color

#bk.save()
#bk.close()
#app.kill()